Menu Close

Tag: paper (page 7 of 17)

DIY FOLDABLE BOXES

låda

låda

låda

låda

And here is how: /// Och så här gör du:

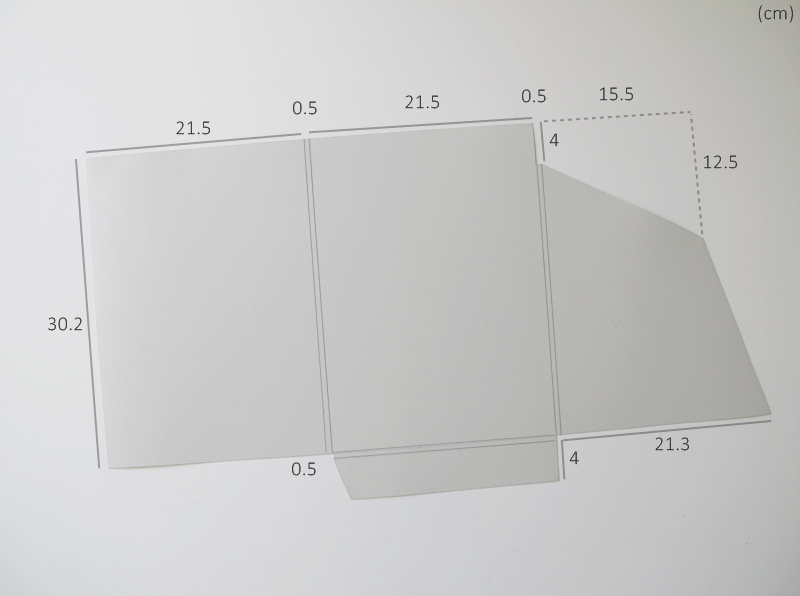
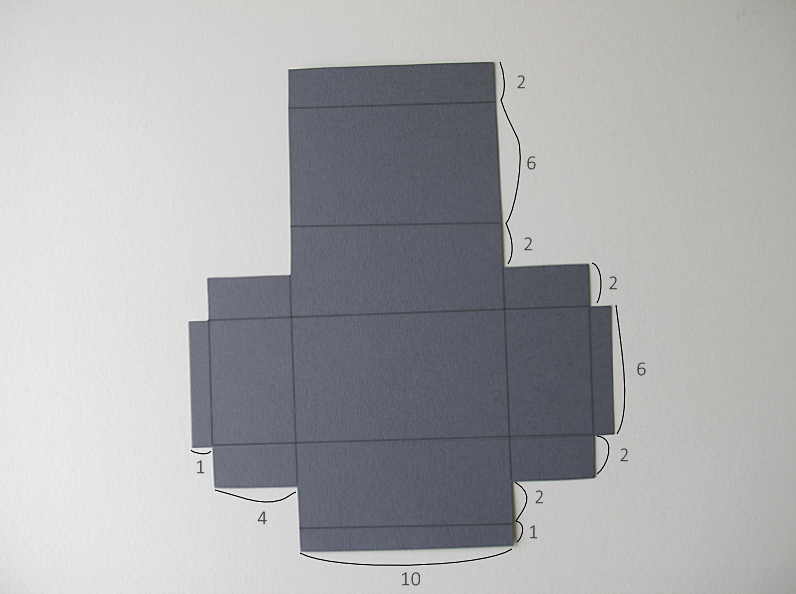
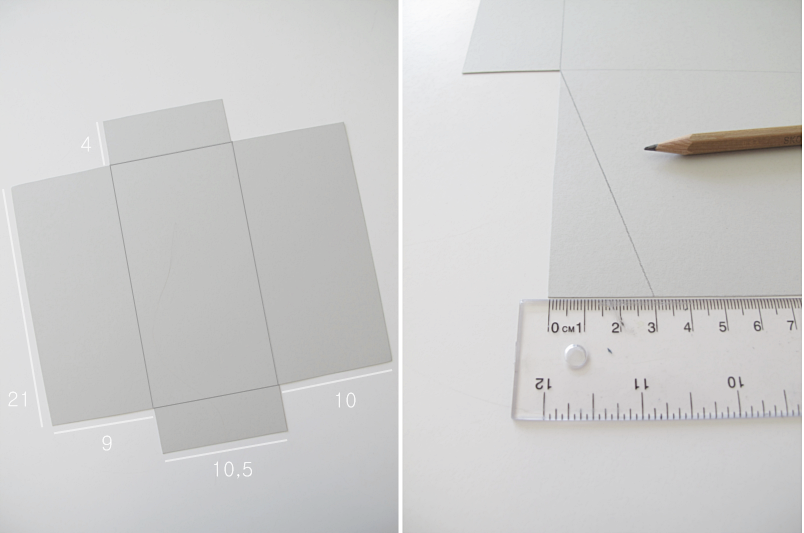
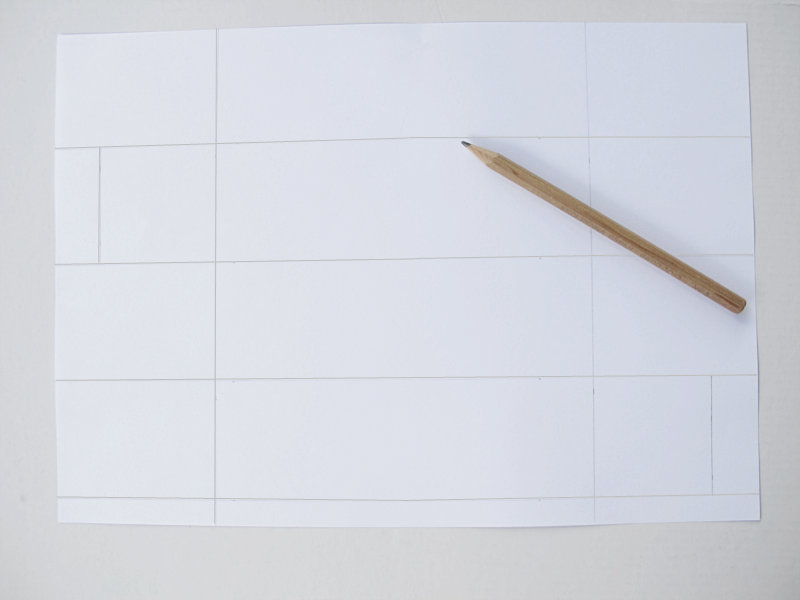
1. Start with a A4 paper and make lines from the top at 5, 10, 15 and 20 cm. Then make two lines 7cm in on both sides. And finally make two lines 2cm in on both sides. See picture where to do them.

/// 1. Börja med ett A4 papper. Rita linjer 5, 10, 15 och 20 cm från toppen. Sedan gör du två linjer till, 7cm från kanten på båda sidor. Och slutligen gör du två linjer, 2cm från kanten. Var du ska göra dom ser du på bilden.

ask

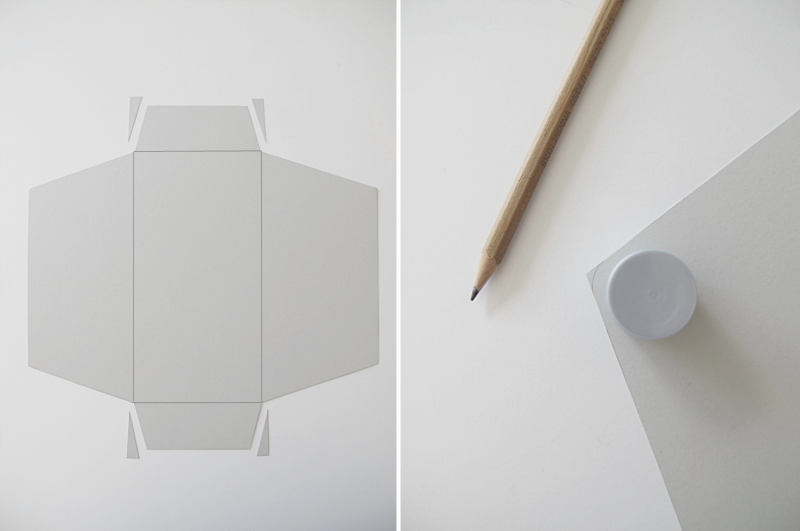
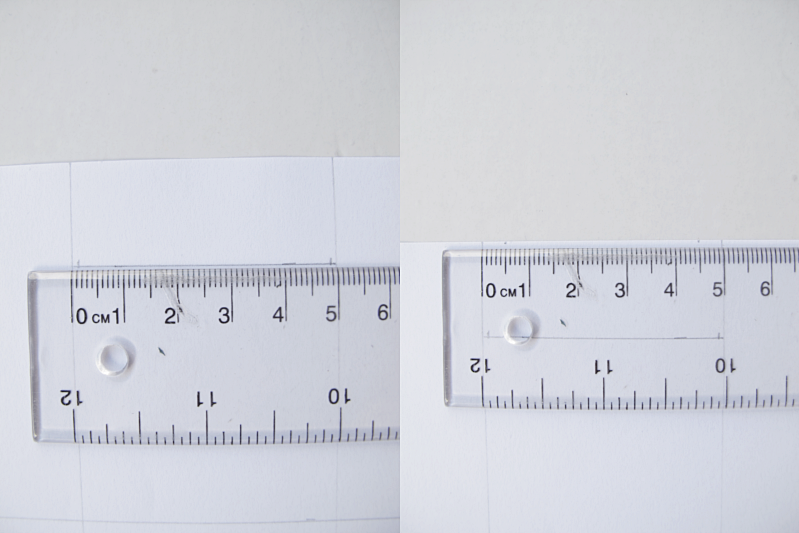
2. Continue where you last did the lines. Make two marks 1mm from the sides at the bottom of the “box”. 3. Then make two marks 5mm on the top of the “box”.

/// 2. Fortsätt nu i den rutan du gjorde sist. Gör två markeringar 1mm in på båda sidorna. 3. Gör sedan två nya markeringar 5mm in från kanterna på toppen av “rektangeln”

ask

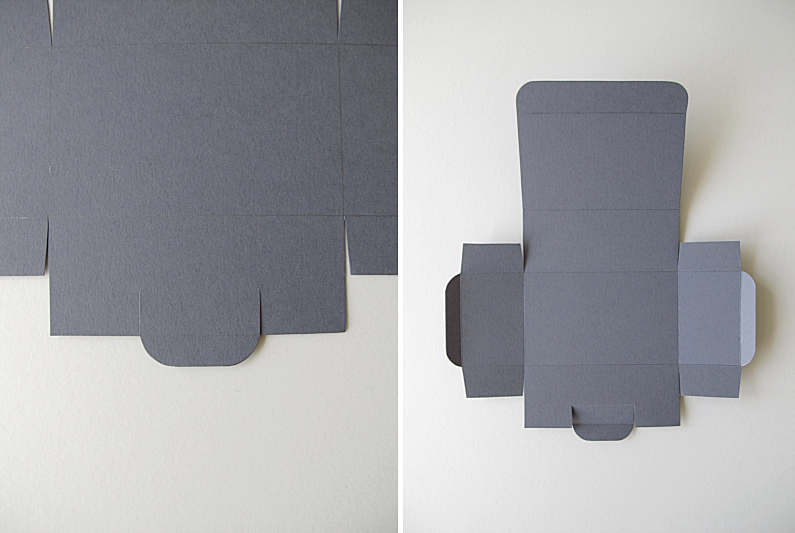
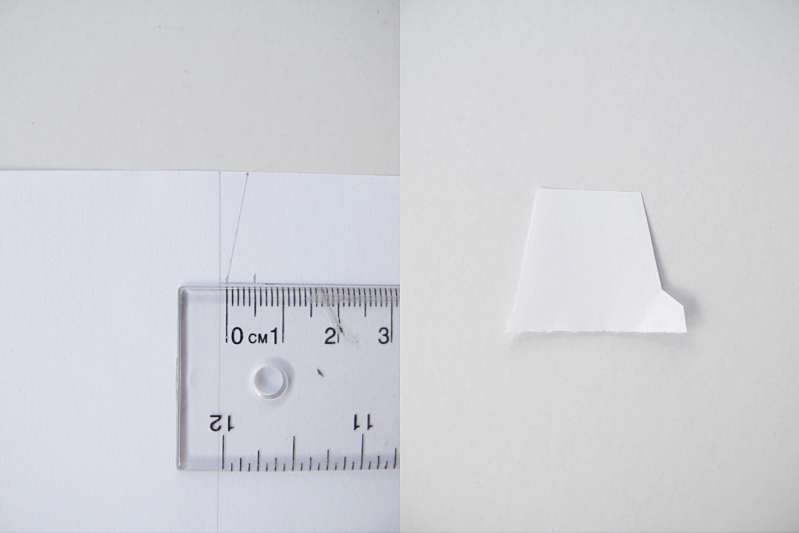
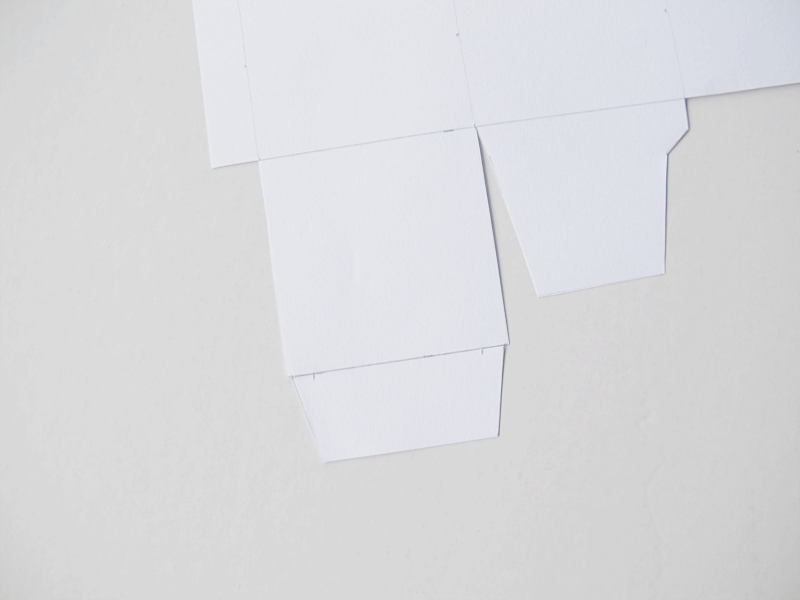
4. Draw lines between the marks. And make another mark 5mm from the first. Repeat step 2-4 on the other side too. 5. Now you want to make a template of how you want the two loose sideparts of the box to look like. I wanted mine to look like this.

/// 4. Dra två linjer mellan markeringarna. Så gör du två markeringar till, 5mm från de två första du gjorde. Sedan upprepar du steg 2-4 på andra sidan. 5. Nu ska du göra en mall på hur du vill att de två lösa sidbitarna på botten och toppen av din låda ska se ut. Jag ville att mina skulle se ut så här.

ask

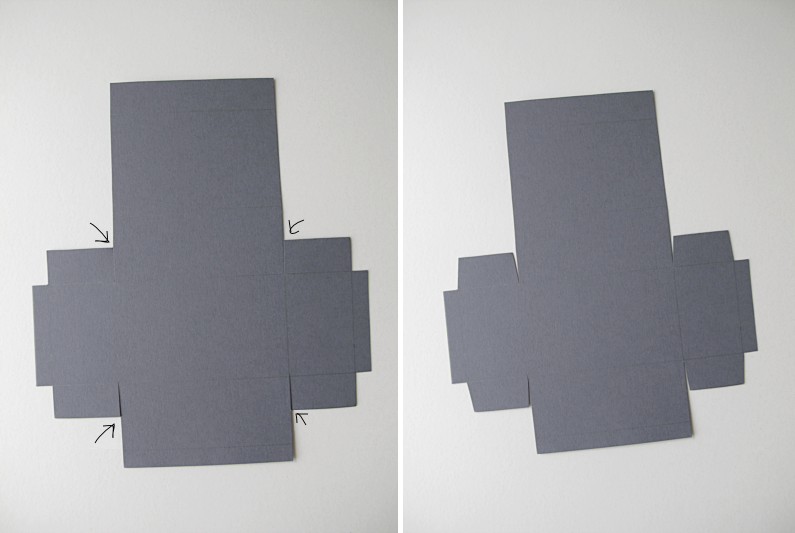
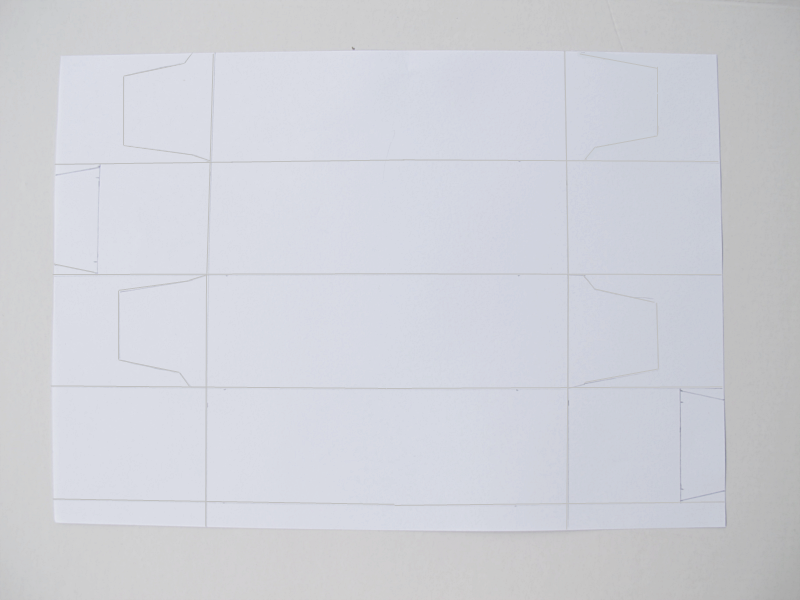
6. If you made the template in step 5 equal on both sides you can skip this step and do step 7, to see where you should draw around the template. But if you, like me, made the sides different you want to make sure that they look similar when you fold the box together. Start by drawing around the template on the same places as I did in the picture below. Notice that I turned it.

/// 6. Om du gjort en mall där båda sidorna ser likadana ut så kan du hoppa till steg 7, för att se var du ska rita ut dem. Men om du som jag, gjorde sidorna olika, så vill du nu vara noga så att lådan ser likadan ut på båda sidor när du viker ihop den. Börja med att rita av mallen på samma ställen där jag gjort det. Kom ihåg att snurra på den.

ask

7. Now turn the template upside down and draw two more. (If you skipped step 6 you can see in this picture where you should draw along the sides of the template.)

/// 7. Vänd nu mallen upp och ner och rita igen. (Om du hoppade över steg 6 så ser du här i vilka rutor du ska rita av mallen)

ask

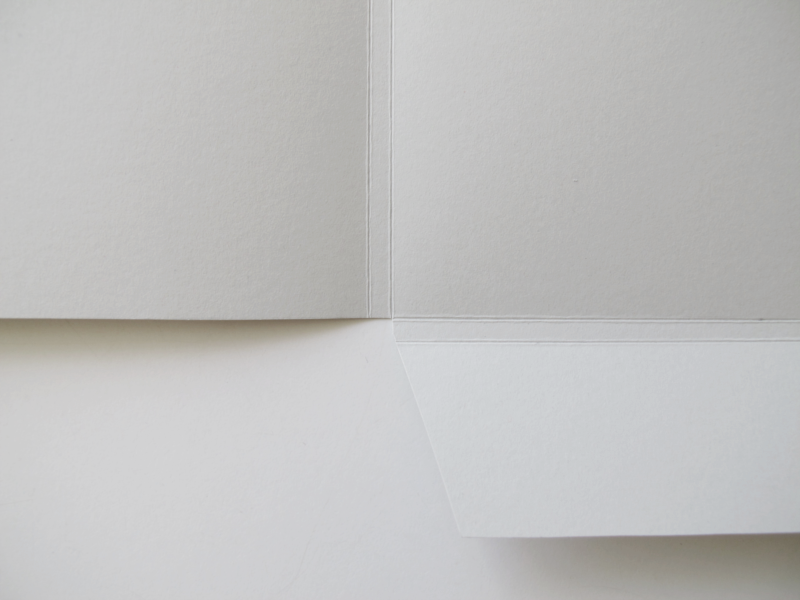
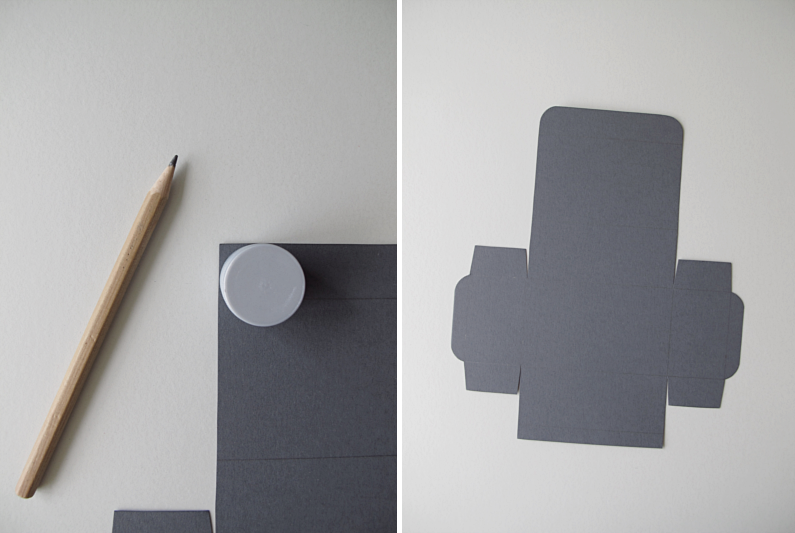
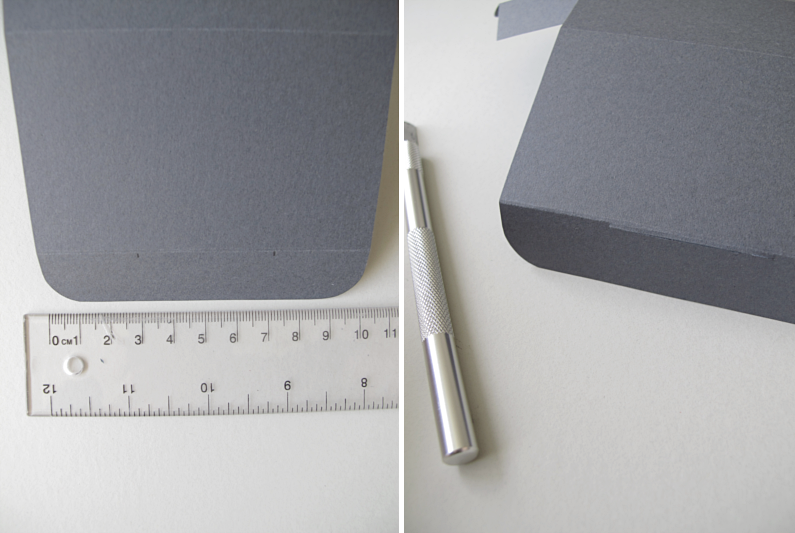
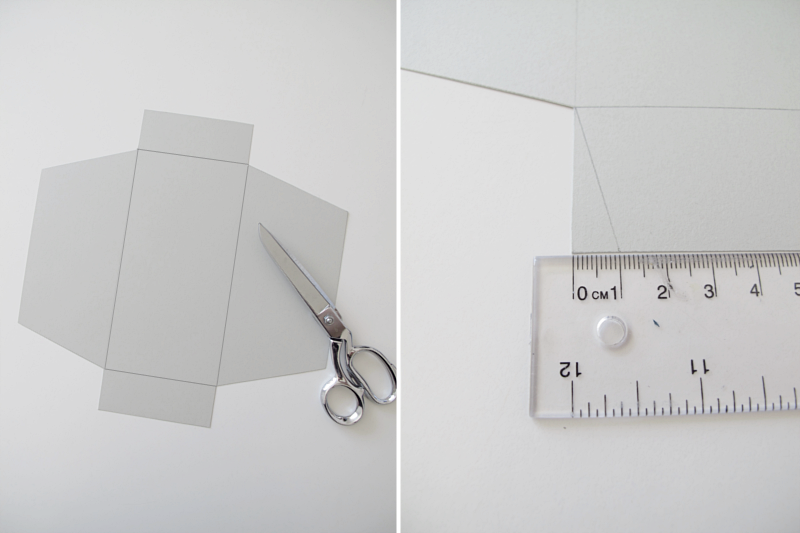
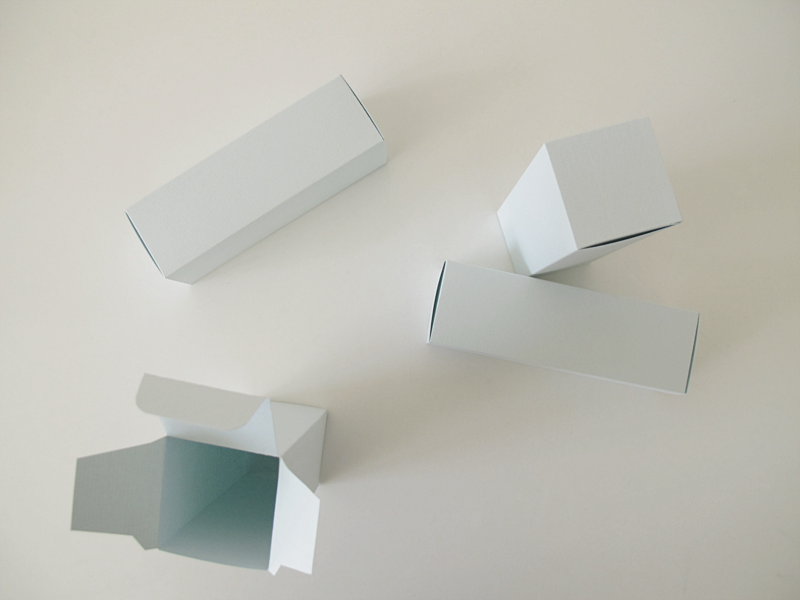
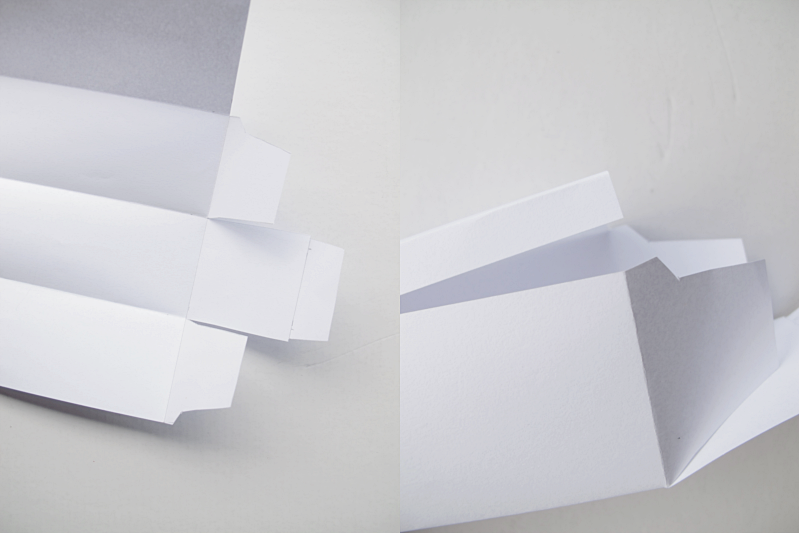
8. Cut along the lines. Make sure to cut all the way to the marks. See picture.

/// 8. Nu är det dags att klippa ut din ask. Och kom ihåg att klippa ända till markeringarna.

ask

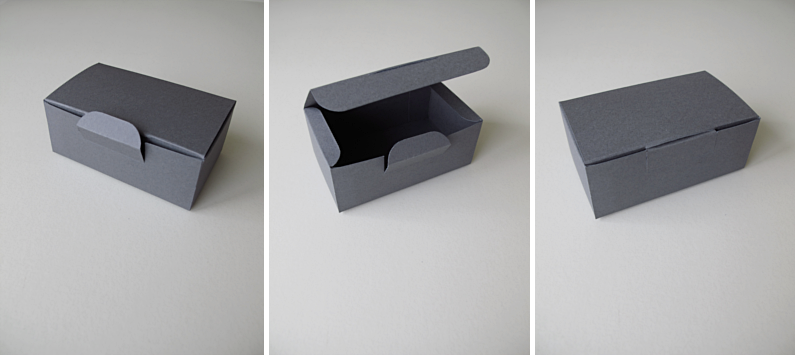
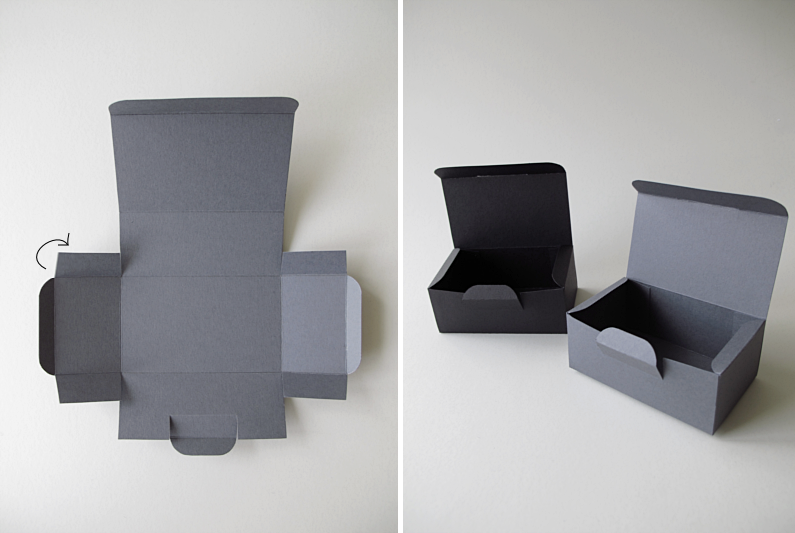
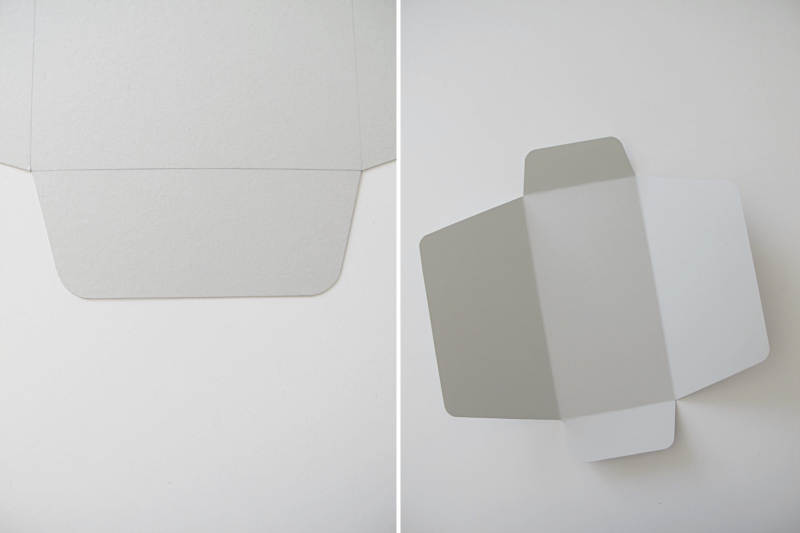
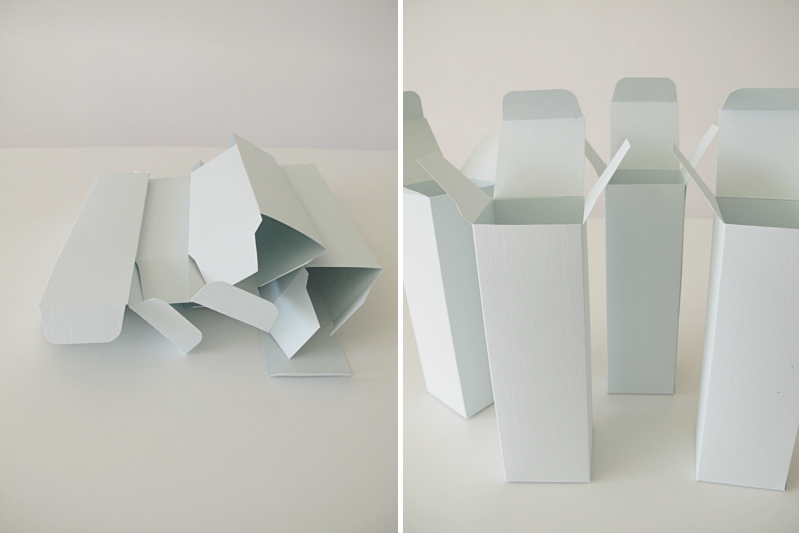
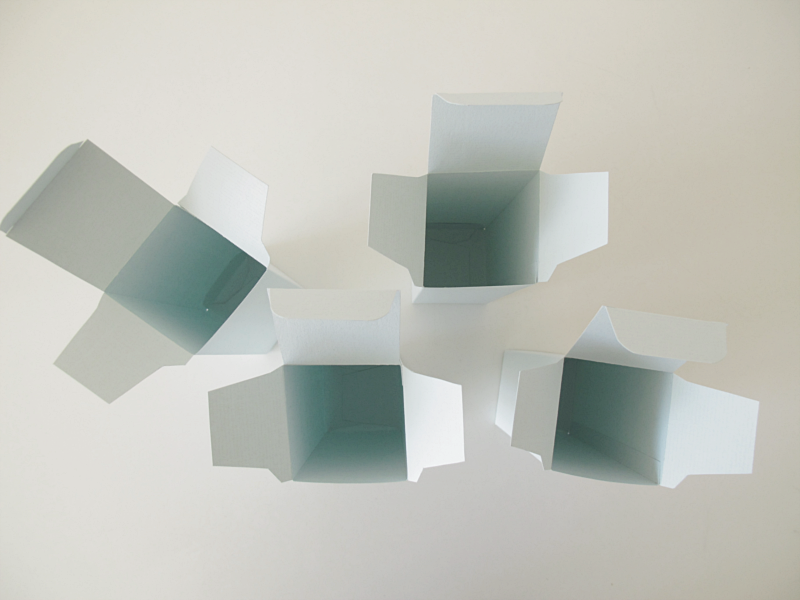
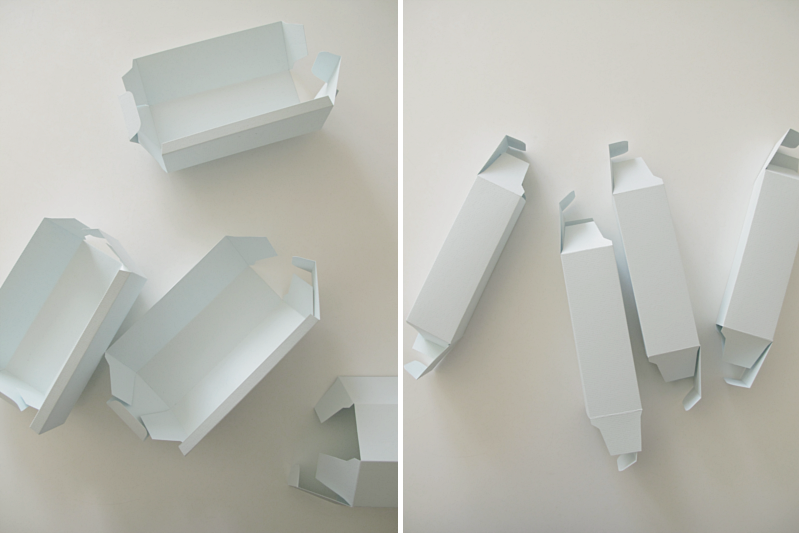
9. Fold along the lines and erase all the pencil lines. 10. Glue the 1cm side ( the one in the bottom in step1) to the opposite side and you are done!

/// 9. Vik längst med linjerna och sudda sedan bort blyertsstrecken. 10. Sätt lite lim på 1cm-biten (den längst ner på bilden i steg 1) och limma ihop den med den andra sidan och du är klar!

ask

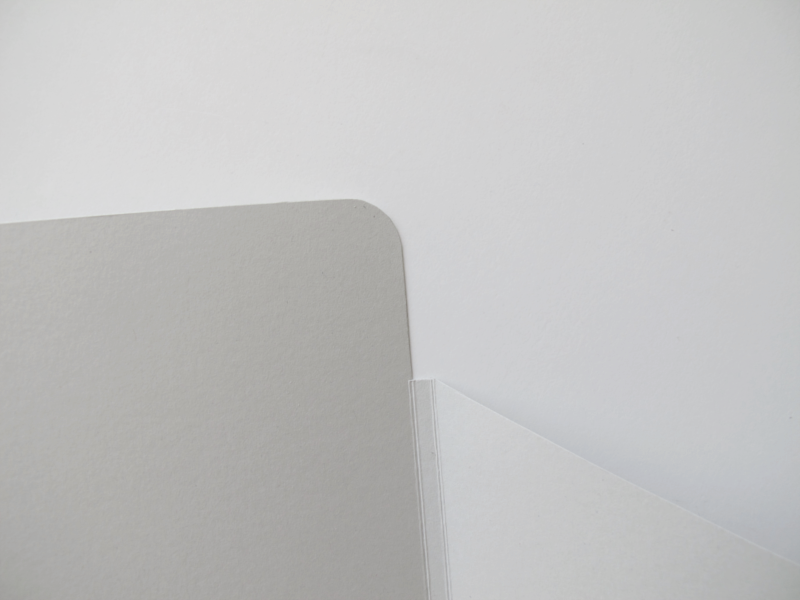
If you want to you can make the lid and the bottom of the box with round corners. As I did with the green ones.

/// Om du vill så kan du göra botten och locket med rundade hörn, som jag gjort med de gröna lådorna.

TIME TO GET ORGANIZED

mapp

I often save pages from magazines I buy, and up till now I haven´t really had a good place to store them. But yesterday I made this organizer and I think it turned out really good, so I thought I share it with you. Oh and I made this one using a regular a4 paper as a template. So if your pages are like that or smaller, it fits this folder. First make a figure with these measurments:

/// Jag river ofta ur sidor ur tidningar jag köper och fram till nu har jag inte riktigt haft något bra sätt att förvara dem på. Men igår gjorde jag denna mapp, och tänkte att jag skulle visa er hur jag gjort, ifall ni också är en sidsamlare. Och just det.. Jag använde ett vanligt a4 papper som mall, så om dina sidor är så stora eller mindre passar denna mapp perfekt. Börja med att göra en figur med dessa mått:

mapp

Then you fold at all lines

/// Vik vid alla linjer

mapp

Erase all the pencil marks, and rounden all the upper corners. As I describe here.

/// Sudda bort blyertstrecken och runda alla övre hörn. Beskrivning hur jag gjorde runda hörn, hittar du här:

mapp

Glue it together and you are done!

/// Limma ihop mappen och du är klar!

mapp

BOX

box

Today I have a new box diy for you. These are the measurements I used:

/// Idag har jag ett nytt ask diy till er. Dessa är måtten som jag använde:

box

Cut along the lines, where the arrows shows. And cut out a tiny tiny triangle too. On both sides of the four side parts.

/// Klipp längs med linjerna där pilarna visar. Klipp sedan små, små trianglar i hörnen. På båda sidorna av sidobitarna.

box

Take a round object, and draw a line in six of the corners. Cut the edges off.

/// Ta något runt, och dra linjer i sex av hörnen. Klipp sedan bort det överflödiga papperet.

box

Make two marks (on 3cm and 7cm from the left) on the bottom off the figure. Then draw a line where you made the mark, from the edge and 2,5 cm in.

/// Gör två markeringar, (3cm och 7cm från vänster) på figurens nederdel. Sedan drar du en 2,5cm lång linje från kanten, där du gjorde din markering.

box

Cut along the line, and cut away the excess part (the 1cm wide part). Take the round object and rounden the corners. The next step is to fold at all lines. You should fold towards you on all of them except on the little part you just did. The one on the bottom of the figure. Fold that one from you, and the tip towards you.

/// Klipp sedan längs med linjen. Klipp även bort de 1cm breda bitarna som finns på var sida om de linjerna du just klippt. Gör sedan hörnen runda med hjälp av den runda saken du använde tidigare. Nu är det dags att vika. Vik vid alla linjer och mot dig, förutom längst ner på den lilla flärpen. Där viker du först från dig och sedan viker du toppen mot dig.

box

Now you make two new marks, on the top of the figure. Where you have folded. The same as before. 3cm and 7 cm from the left side. Then you use a paper knife and cut a hole between the lines 4cm x 1mm.

/// Gör två nya markeringar på övre delen av din figur. Likadant som förut.  3 och 7 cm från vänster sida. Skär ut ett hål mellan markeringarna 4cm x 1mm.

box

Put some glue on the back of the upper and lower parts of the side parts and glue the box together, and you are done!

/// Sätt lite lim på baksidan av den översta och nedersta delen så sidbitarna och limma ihop din ask. Och du är klar!

box

TIME FOR A PARTY?

inbjudan

Today I have another envelope diy for you. Maybe for a party invitation. For this you need: a pair of scissors, a piece of carton, eraser, thread, pencil, ruler and a round object. I used the lid of my glue stick. Start by making a figure like the one in the picture below. After that you make a mark 3 cm from the edge, on the top and bottom of both side pieces, and then draw a line between the mark and the corner.

/// Idag har jag ännu ett kuvert diy till er. Kanske till en festinbjudan. Till detta behöver du: sax, en bit kartong, sudd, snöre, blyertspenna, linjal och något runt. Jag använde locket till mitt limstift. Börja med att göra en figur som på bilden nedan. När du är klar gör du en liten markering 3cm in från kanten, på övre delen och nedre delen av båda siddelarna. Dra en linje mellan markeringen och hörnet.

inbjudan

Cut along the lines. When you are finished cutting, make a new mark 1cm from the edge on the top and bottom pieces.

/// Klipp nu längs med linjerna. Sedan är det dags att göra nya markeringar. 1cm in från kanten på båda sidor av översta och nedersta biten.

inbjudan

Once again, cut along the lines. Now it´s time to make the corners round. Take your round object and draw along the side, on all corners.

/// Åter igen, klipp längs med linjerna. Nu ska du runda hörnen. Använd den runda saken (alt. limstiftslocket) till hjälp.

inbjudan

And for the third time, cut along the lines. Then fold the paper.

/// Klipp bort hörnen, och vik papperet.

inbjudan

Erase all pencil marks, place the card inside the envelope and tie the thread around it and you are done!

/// Sudda bort alla blyertsstreck, placera inbjudan i kuvertet, knyt snöret runt och du är klar!

inbjudan

NOTE BOOK XL

book

book

Lets continue on the note book diys. This is more of a note book XL than the ones I showed you before. Once again it´s really easy to do. You need a bunch of papers (30 x 21cm), a hole puncher, two pieces of carton, some thread and a pair of scissors. Start with the hole puncher. Make the holes (on all the papers and the carton),  about 3,5 cm from the edge on both sides.

/// Jag tänkte fortsätta på temat anteckningsblock. Och nu är det dags för version XL. Du behöver: en bunt med vanliga a4 papper, en hålslagare, två bitar kartong, lite snöre och en sax. Börja med att göra hål 3,5 cm från kortsidan på alla papper, även på kartongen.

bok

Slide the thread through the holes, and make a knot. Then gently pull the thread so you get the knot inside the hole. Repeat on the other pair of holes and you are done!

/// Dra snöret igenom hålen, och gör en knut. Sedan drar du försiktigt i snöret så att knuten göms inne i hålet. Gör sedan likadant på de andra två hålen och du är klar!

bok

book