Menu Close

Tag: paper (page 3 of 17)

DIY – SEWN GIFT WRAPPING

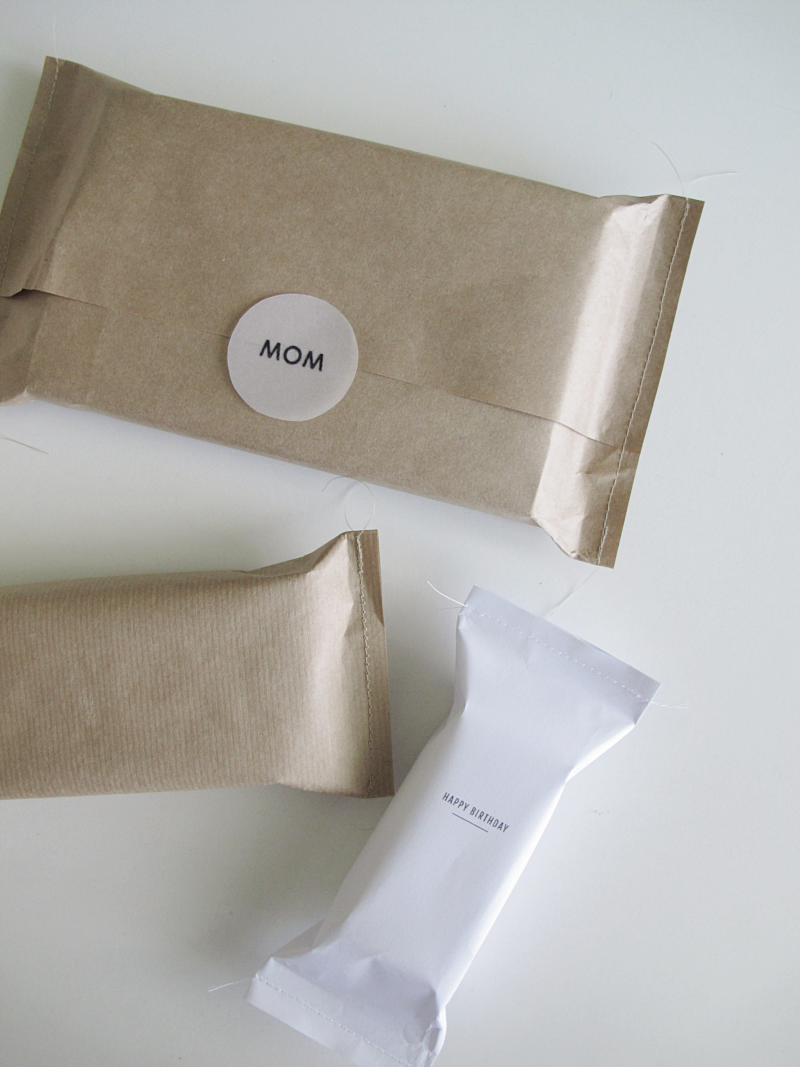
Those of you who follow me on instagram have already seen a tiny glimpse off this DIY but for you who haven’t seen it, I made these gifts where I sewed the ends together using a sewing machine. On one of the gifts I also used a grocery bag as wrapping paper.

/// Ni som följer mig på instagram har redan sett en liten, liten glimt av detta DIY, men för er som inte har det så har jag gjort dessa paket där ändarna är sydda istället för tejpade. Jag har också på ett av paketen använt papper från en vanlig brun papperspåse som man hittar i matvaruaffären.
diy sewn wrapping | designoform.com

You need:

→ A brown grocery bag or regular giftwrapping paper (The MOM-gift are from a grocery bag)
→ A sewing machine
→ A pair of scissors

If you want to:
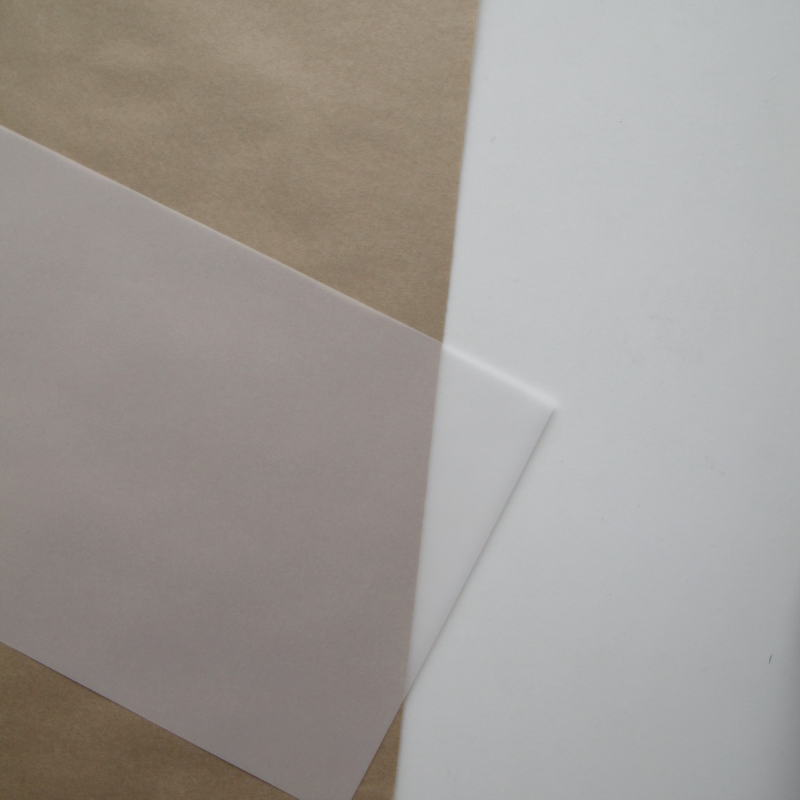
→ A transparent print paper
→ A printer

/// Du behöver:

→ En brun papperspåse eller vanligt omslagspapper. (MOM-presenten är gjord med papperspåse)
→ En symaskin
→ Sax

Om du vill:
→ Transparent kopieringspapper
→ En skrivare
diy sewn gift wrapping | designoform.com

And this is how to:

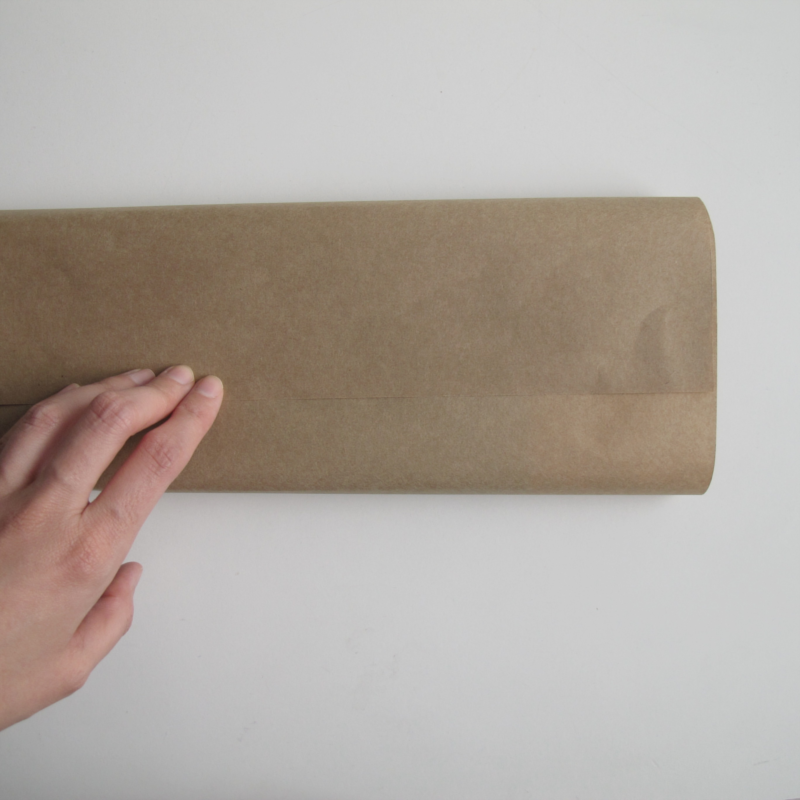
Fold the paper around the gift so that you have the ending of the paper where my fingers are on the photo bellow. Make sure you also have a lot of paper sticking out on the sides.

/// Vik papperet runt presenten så att du har änden mitt på paketet (där jag har fingrarna på bilden). Se även till att du har ganska mycket papper över på sidorna.
diy sewn gift wrapping | designoform.com

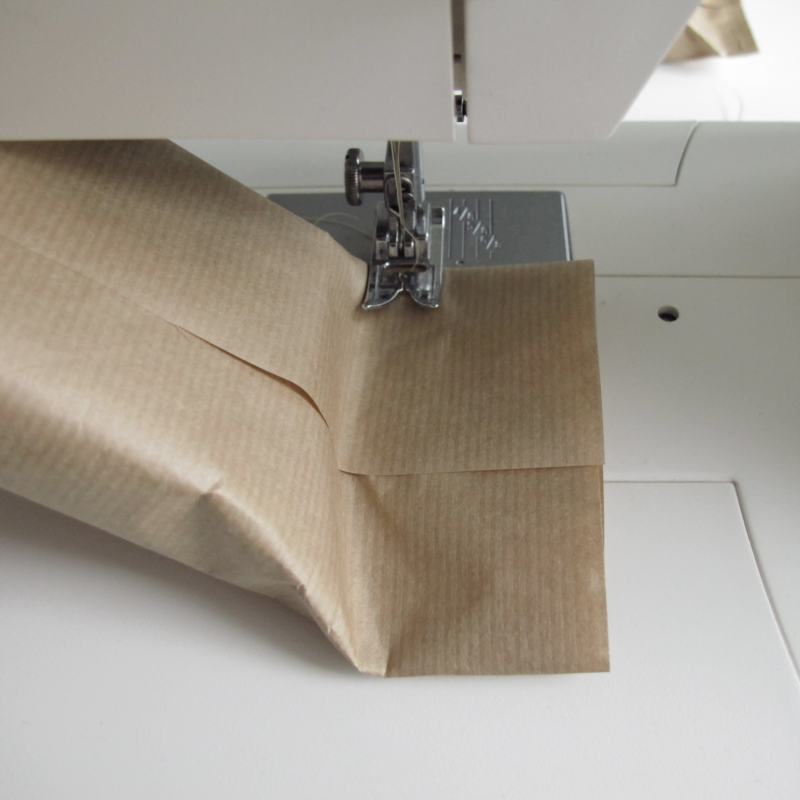
Sew a seam as close to the gift as you can. I found it easier if I tipped the gift upwards while sewing. This way you avoid getting folds in the paper too.

/// Sy en sömn så nära själva presenten som möjligt. Jag tycker det var lättare att sy om jag höll upp paketet medans. På detta sätt undvek jag även att få veck i papperet.
diy sewn gift wrapping | designoform.com

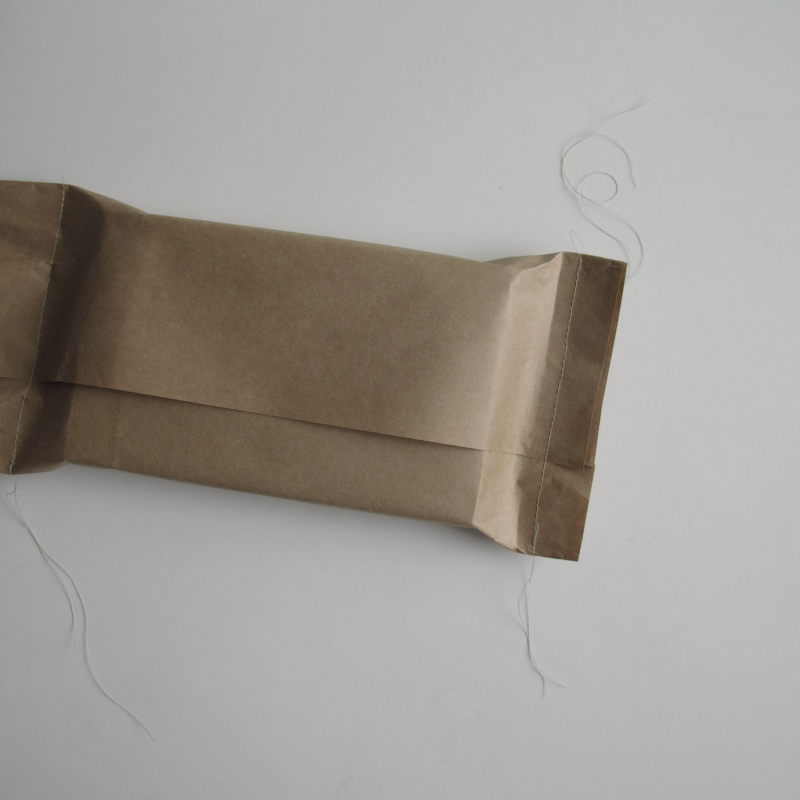
Repeat on the other side. I like how it looks when you leave a cm or two of thread, but if you don’t like that just cut them off.

/// Gör likadant på andra sidan. Jag tycker det är ganska fint om det sticker ut lite trådar på sidorna, men om du inte gillar det är det ju bara att klippa av dem.
diy sewn gift wrapping | designoform.com

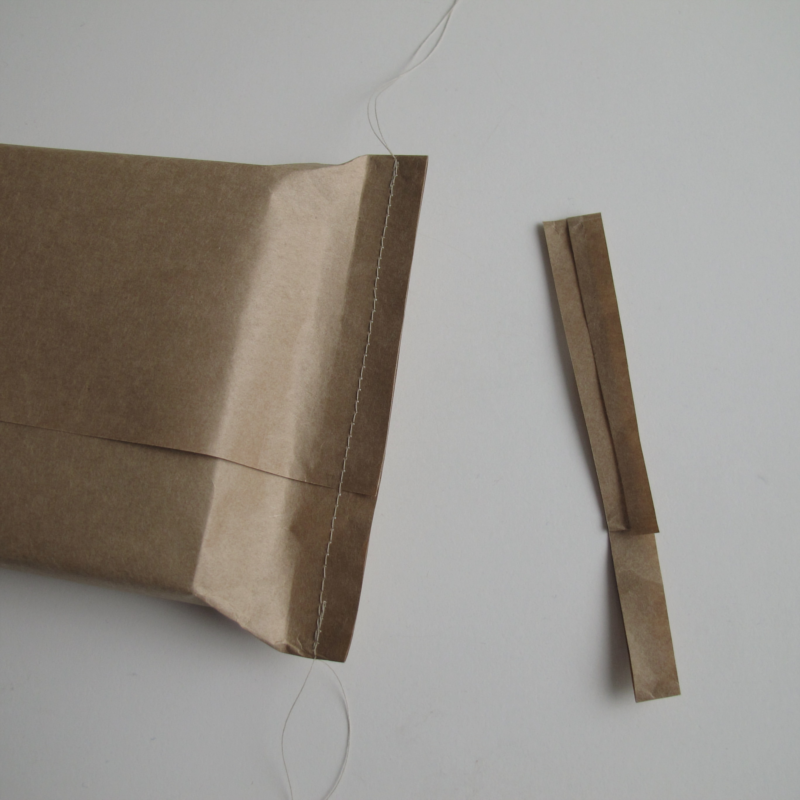
Cut off the excess paper. You can use a regular pair of scissors or you can use one of those pattern scissors.

/// Klipp av ändarna på papperet. Här kan du använda en vanlig sax eller så använder du en sicksack-sax.
diy sewn gift wrapping | designoform.com

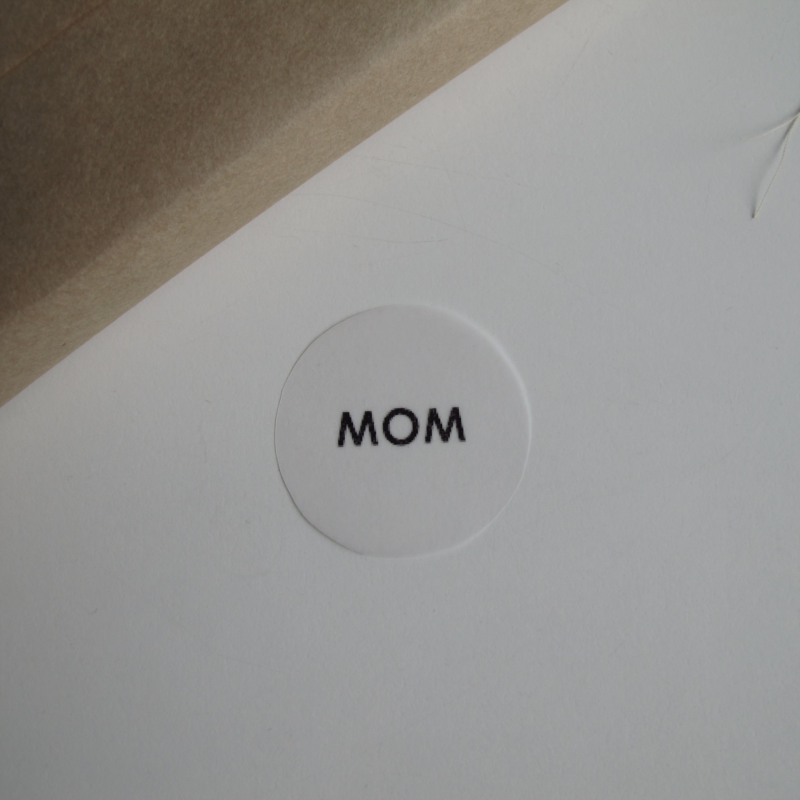
Now you can decorate the gift wrapping as you like. To make the note on the gift (the round one), I used my computer to print out the text I wanted on a transparent print paper.

/// Nu är paketen klara för att dekoreras. För att göra lappen på paketet (den runda) så skrev jag ut en text från datorn på det transparenta kopieringspapperet.
diy sewn gift wrapping | designoform.com

And then you attach it to the gift over the end of the paper. I found that the glues I have bleed through the transparent paper so I used a tiny bit of tape instead. And done!

/// Och satte fast den där änden av papperet var. Jag upptäckte dock att de lim jag har blöder igenom papperet så jag valde att använda en liten bit tejp istället. Och klart!

diy sewn gift wrapping | designoform.com

DIY – CARD WITH WASHI TAPE PATTERN

DIY card with washitape | designoform.com

If I don’t remember wrong this is the blogs first DIY using Washi tape. It’s a pretty simple one but you need a bit of patience.

/// Om jag inte är helt fel ute nu så tror jag minsann att detta är bloggens första DIY med Washi tape. Det är väldigt enkelt med kräver lite tålamod.

Other than that you’ll need:

→ Washitape with a striped pattern
→ A pair of scissors
→ A card (If you are using Washi tape that are black and white like I did you get the best result with a white card since the Washitape is a bit transparent)
→ A piece of regular paper

Till detta behöver du:

→ Washi tape med ränder
→ Sax
→ Ett kort (Om du använder svart och vit Washi tape som jag så får du bäst resultat med ett vitt kort då Washi tapen är lite genomskinlig).
→ Ett vanligt papper

And this is how you do it:

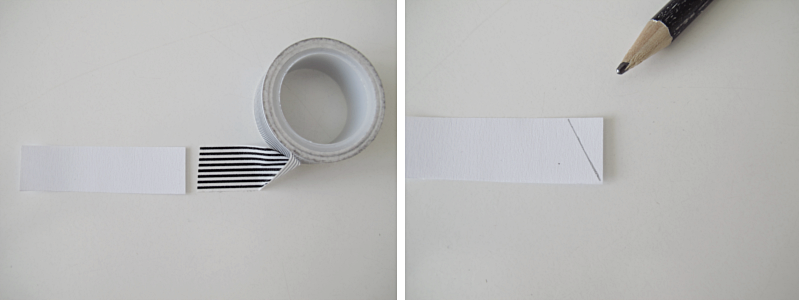
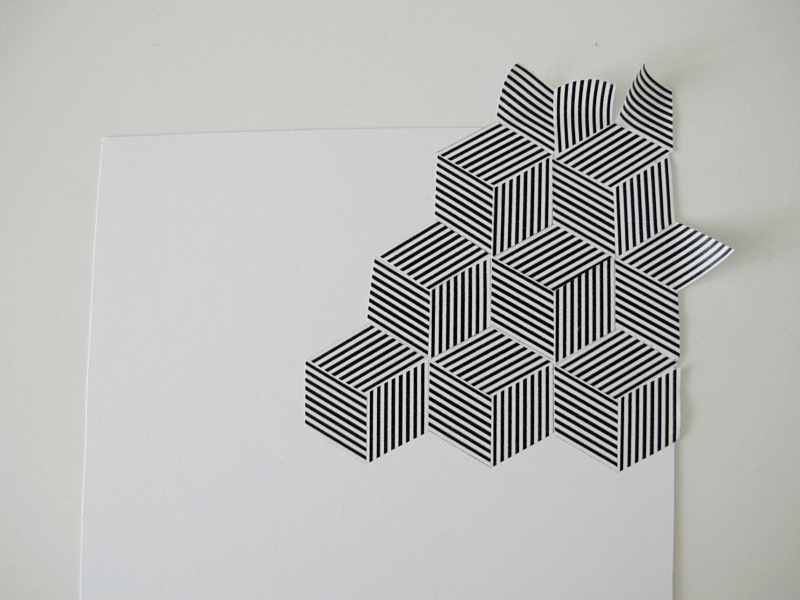
First you cut a stripe from the regular paper as wide as the Washi tape. Then you draw a line in a 60° angle.

/// Börja med att klippa ut en bit ur det vanliga papperet som är lika bred som din Washi tape. Sedan ritar du ett streck som är i 60° vinkel.

DIY card with washitape | designoform.com

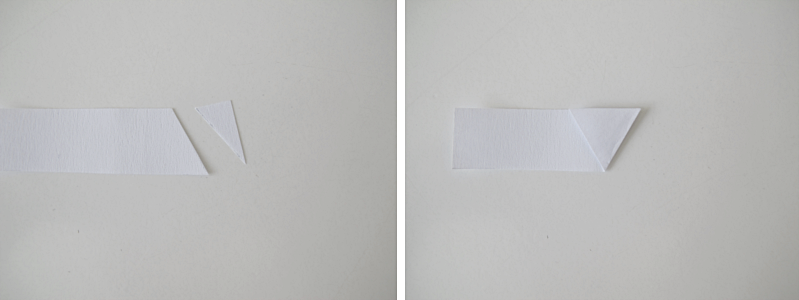
Cut along the line. Then fold like the picture shows.

/// Klipp längst med linjen och vik som bilden visar.

DIY card with washitape | designoform.com

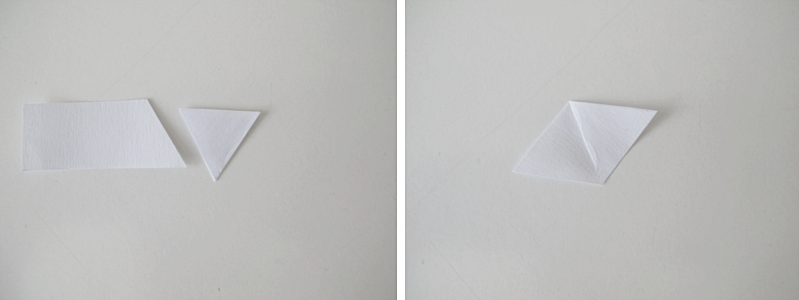
Then you cut again and unfold. Now you have a template for the Washi tape.

/// Klipp sedan igen och vik upp. Nu har du ett mall till Washi tapen.

DIY card with washitape | designoform.com

DIY card with washitape | designoform.com

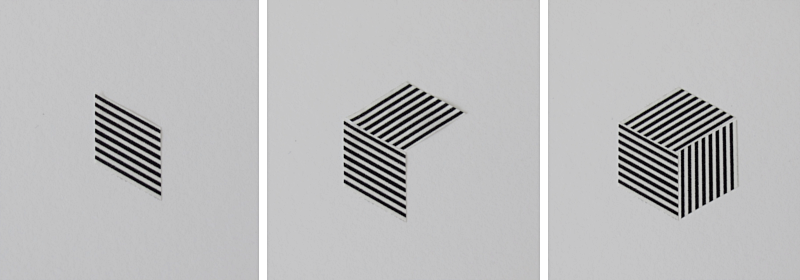
Now it’s time to start making the pattern. All pieces are the same, you just rotate them.

/// Nu är det dags att börja med mönstret. Alla bitar är likadana, vi bara roterar dem.

DIY card with washitape | designoform.com

I started in the middle and worked my way out to the sides. Some tips along the way: When you fasten your pieces, do it so that they still are a bit loose, because you may have to go back and move them a bit later. At the same time don’t be too meticulous. A small gap won’t show when the card is finished.

/// Jag började i mitten och arbetade mig utåt. Några tips längst vägen: När du sätter fast dina bitar låt dem vara ganska lösa, för det kan vara så att du behöver gå tillbaka och ändra och flytta om lite. Men var samtidigt inte allt för noga för eventuella småluckor kommer inte att synas i slutändan.

DIY card with washitape | designoform.com

When the pattern is done, you cut along the edges of the card to remove the leftover Washi tape. And you are done!

/// När du är färdig med mönstret klipper du längst efter kanten på kortet för att ta bort all överbliven Washi tape och du är klar!

DIY card with washitape | designoform.com


DIY – BOX MADE WITH ONE SHEET OF PAPER

diybox

diybox

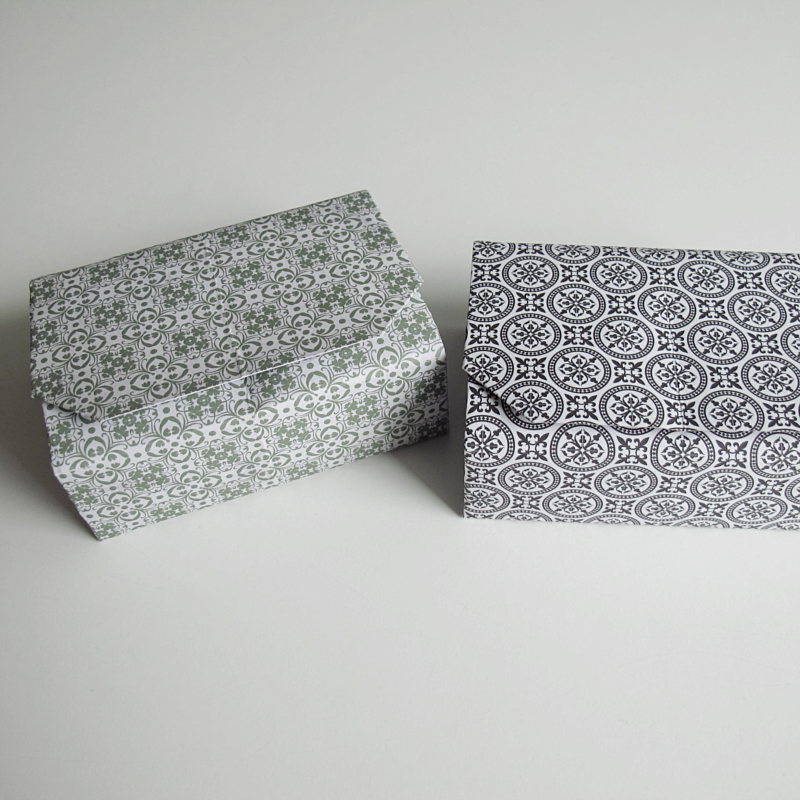
This might be the longest tutorial I have ever posted on the blog. It’s not hard  to make, it’s just that I wanted to show you all the steps with pictures. I found another tutorial on how to make this online, but it didn’t have a lot of pictures and I found it pretty confusing. So here you have my tutorial on how to make a box using only one sheet of paper and no glue.

/// Det här kan nog vara den längsta beskrivning jag någonsin gjort på bloggen. Asken är inte svår att göra, men jag vill visa er varje steg med bilder. Jag hittade nämligen en annan beskrivning på nätet, men den hade inte bilder på de olika stegen och jag tyckte det blev en aning krångligt att följa med. Så här har ni min beskrivning på hur du gör en ask med endast ett ark papper och inget lim.  

You’ll need:

→ A paper 30 x 30cm

/// Du behöver:

→ Ett papper 30x 30 cm

And this is how you do it:

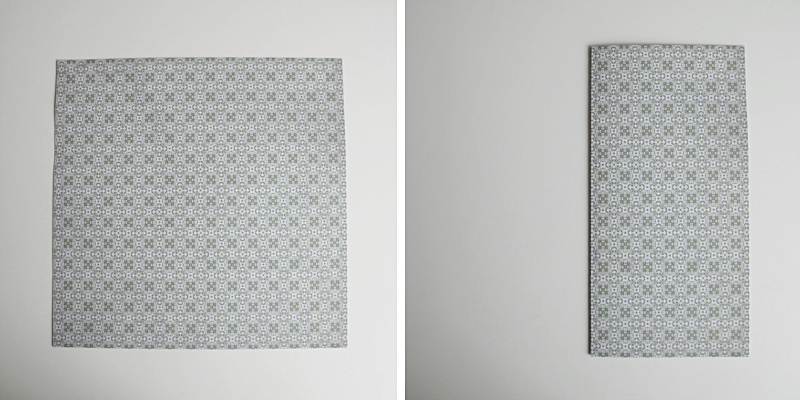
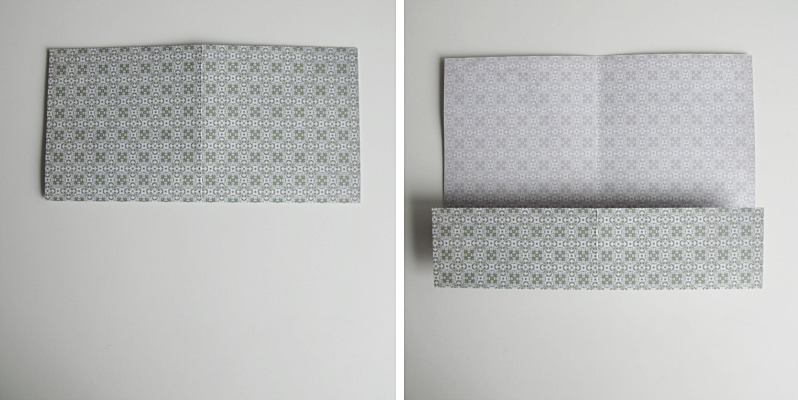
First you have to choose which side of the paper (if you use one with patterns) you want the outside of the finished box to have. Place that side facing down. Then fold the paper in half.

/// Börja med att bestämma vilken sida av pappret (om du använder ett med mönster) du vill ha på utsidan asken. Den sida som du väljer lägger du neråt. Vik sedan papperet på hälften.

diybox

Unfold and fold the other way. Unfold again and fold the bottom of the paper towards the middle.

/// Vik upp papperet igen och vik det sedan åt det andra hållet. Efter det viker du nederdelen av papperet mot mitten.

diybox

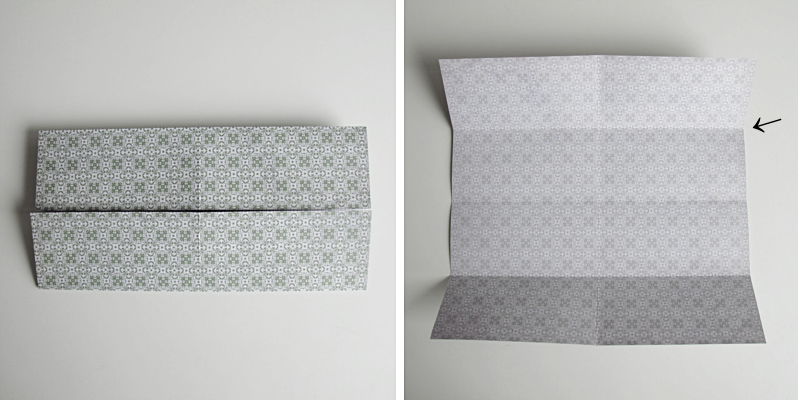
Fold the top of the paper towards the middle. Then unfold. Do you see that little arrow there?..

/// Vik ovandelen av papperet mot mitten. Vik sedan upp papperet. Ser du den där lilla pilen?..

diybox

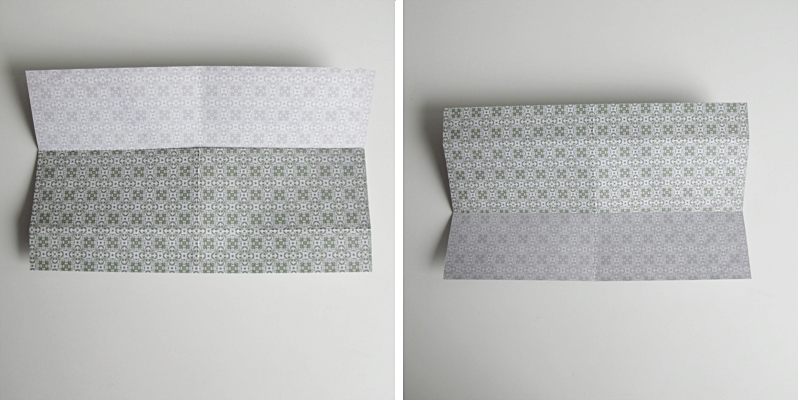
.. fold the bottom of the paper towards the folding where the arrow shows. Unfold. Then do the same with the top of the paper (but to the fold at the bottom)

/// …vik nederdelen av papperet mot viklinjen där pilen visar. Vik upp. Sedan gör du likadant med ovandelen av papperet (fast mot viklinjen längst ner)

diybox

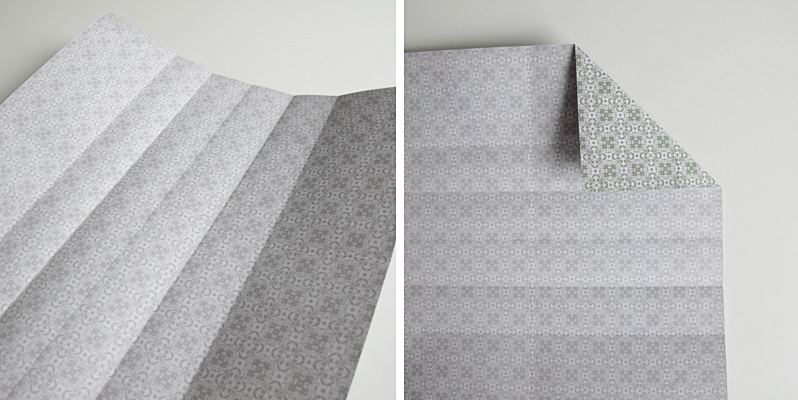
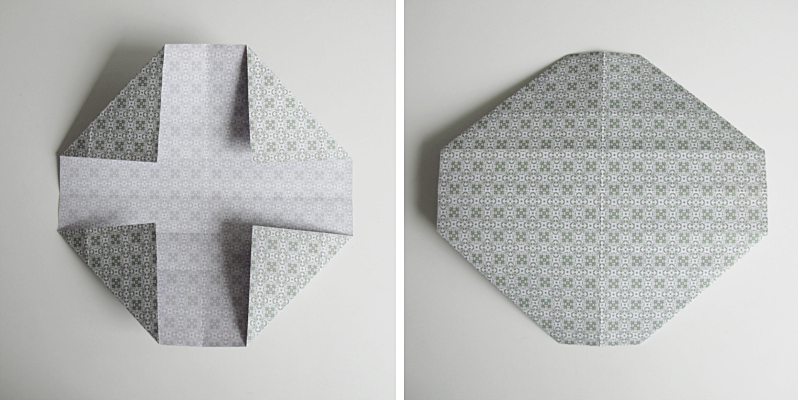
Now your paper should look like this. With five folded lines. Fold the corner to the second line from the top.

/// Nu borde ditt papper se ut så här. Med fem viklinjer. Vik in hörnet så att det möter den andra viklinjen uppifrån.

diybox

Repeat on all corners. Then turn your paper upside down.

/// Gör likadant på alla fyra hörnen. Sedan vänder du papperet upp och ner.

diybox

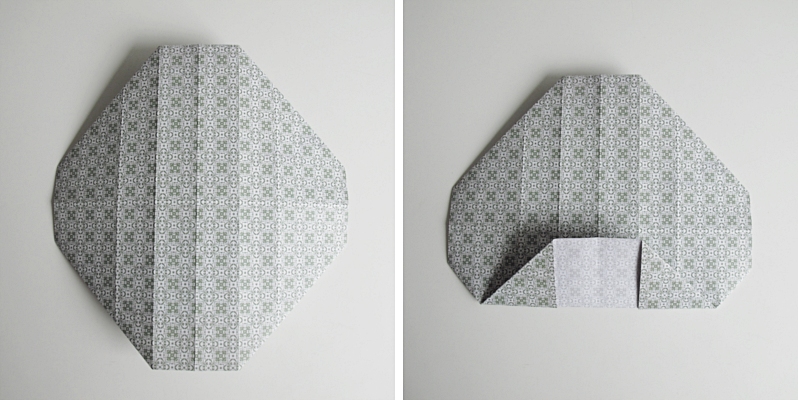
Rotate the paper 90° and fold the bottom of the paper toward the middle.

/// Vänd papperet 90° och vik upp botten mot mitten.

diybox

Fold the top to the middle too. Then you fold the bottom piece of paper in half.

/// Vik också ovandelen av papperet mot mitten. Vik sedan bottendelen på mitten.

diybox

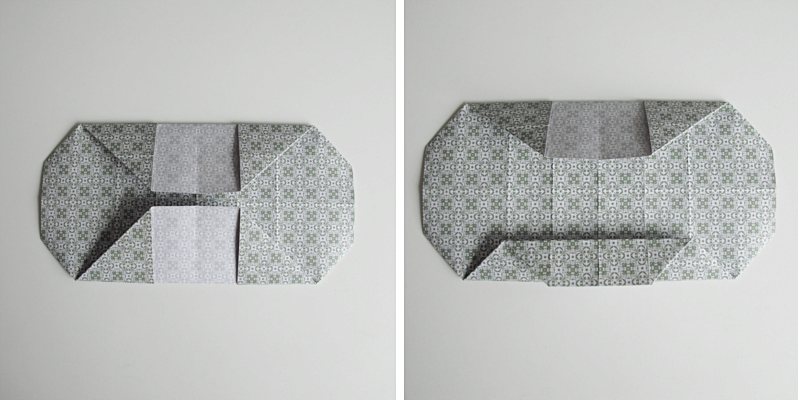
Do the same to the top. Then unfold the bottom.

/// Vik även ovandelen på mitten, och vik efter det upp bottenvikningen igen.

diybox

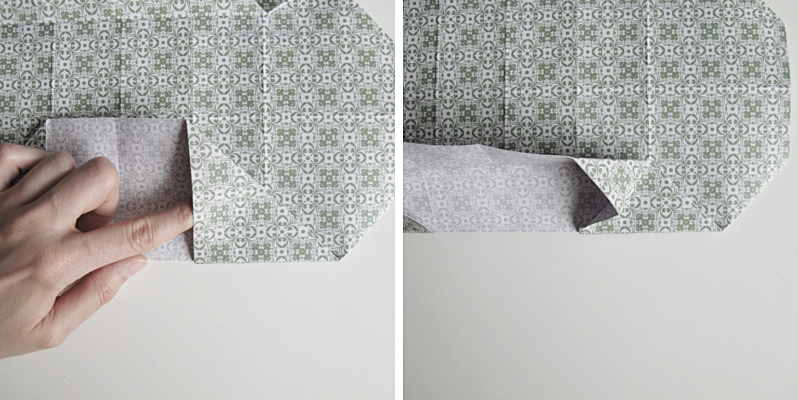
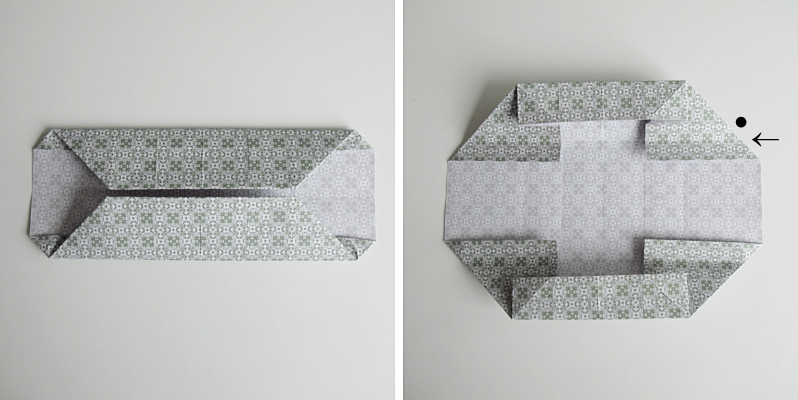
Use your finger to fold the flap to the side ..

/// Använd fingret för att vika ut fliken mot sidan..

diybox

..like this.

/// ..såhär.

diybox

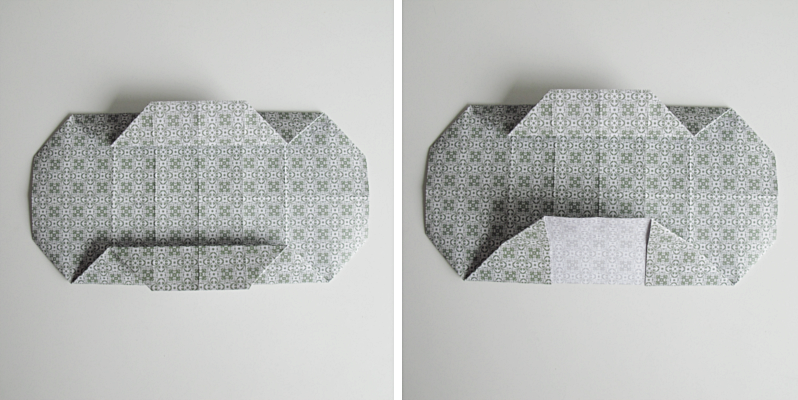
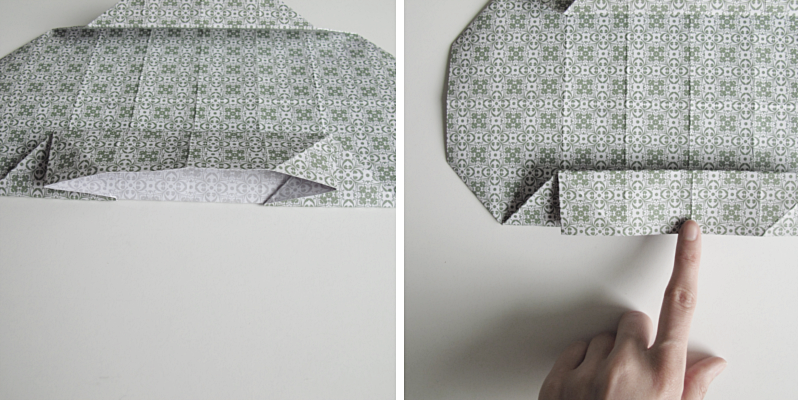
Repeat on all four flaps. Then unfold the bottom and the top like the picture shows.

/// Gör likadant på alla flikar. Sedan viker du upp ovandelen och botten som bilden visar.

diybox

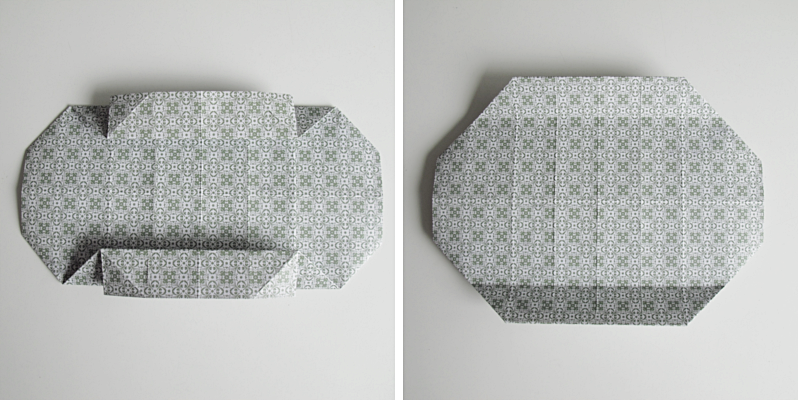
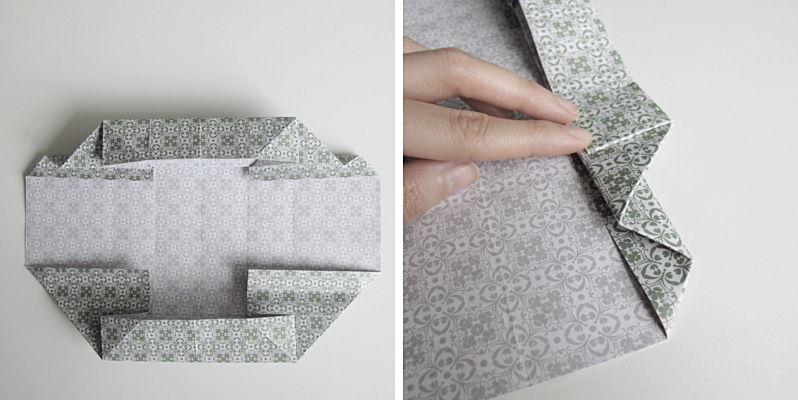
Turn the paper upside down and it should look like this. Then fold the top of the paper towards the middle.

/// Vänd på papperet och det borde se ut såhär. Vik därefter ovandelen av papperet mot mitten.

diybox

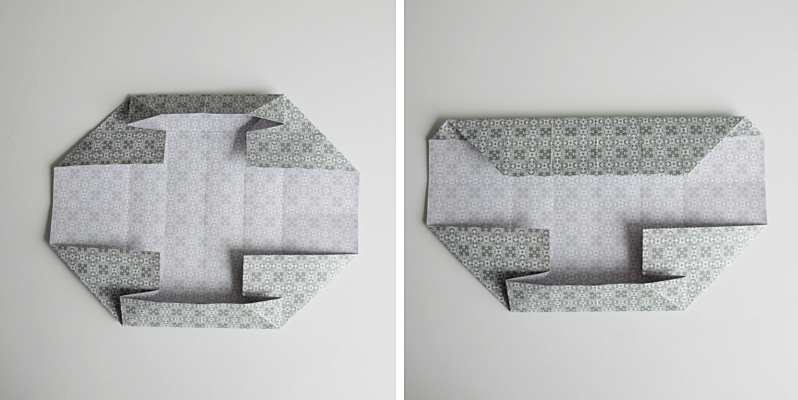
And then the bottom to the middle too. Unfold. Now it’s time to fold the paper again at the fold you just did (the arrow) but at the same time you fold where the dot is…

/// Vik också botten av papperet mot mitten. Vik sedan upp igen. Nu ska du vika igen där du precis vikt (där pilen är) men samtidigt ska du också vika där pricken är..

diybox

..like this.

/// .. såhär.

diybox

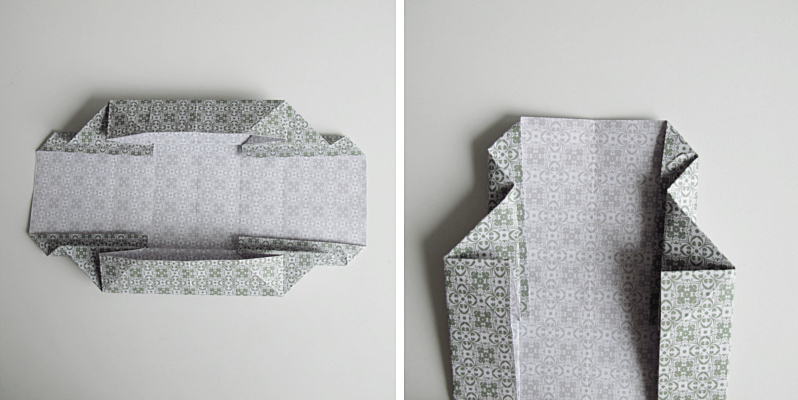
Repeat on the other side too. Then turn the paper 90°.

/// Gör likadant på andra sidan. Vrid sedan papperet 90°.

diybox

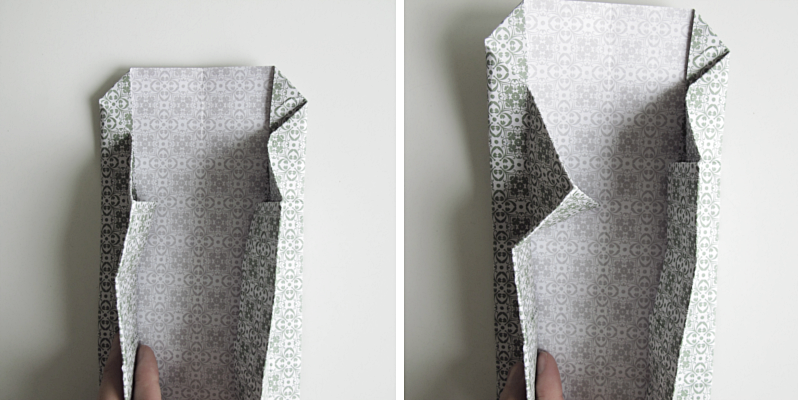
Fold along the lines, where the arrows shows. (We folded lines here in an earlier step so it shouldn’t be to hard to fold). Repeat on the other side.

/// Vik längst med de viklinjer där pilarna visar. (Vi har redan vikt här i ett tidigare steg så det borde gå ganska lätt). Gör likadant på andra sidan.

diybox

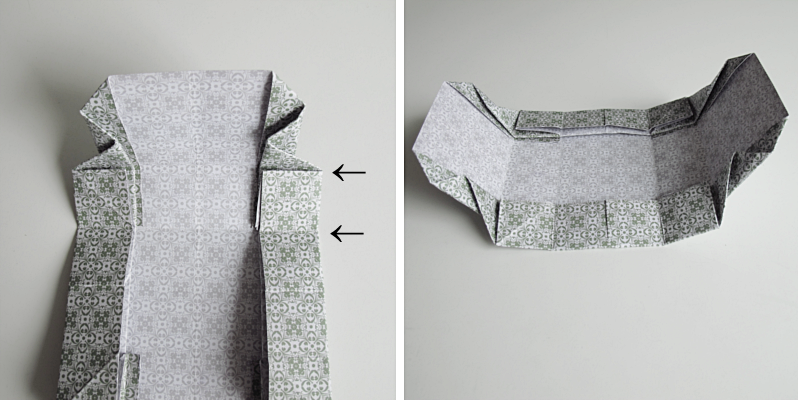
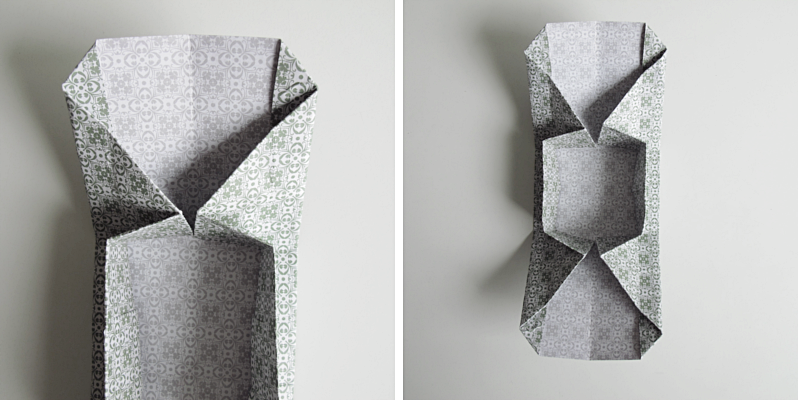
Now you’re going to gently pull the flap towards the middle.

/// Dra försiktigt papperet mot mitten.

diybox

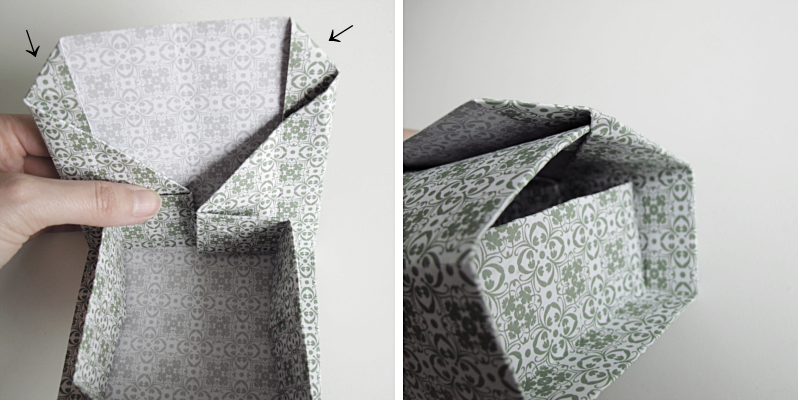
And on the other sides too.

/// Gör likadant på alla fyra sidor.

diybox

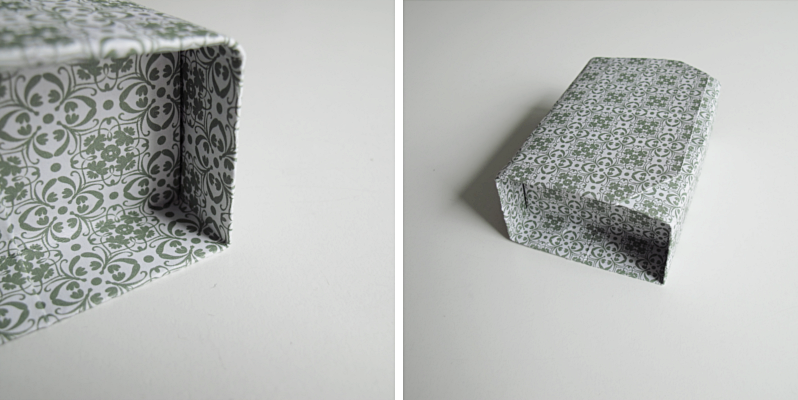
And gently press. And you are done! To close the box you slide the paper (where the arrows are) on one side into the other side.

/// Tryck till lite i vikningarna. Och du är klar! För att stänga asken så skjuter du in ena änden av papperet (där pilarna är) i den andra änden.

diybox

diybox


like

This paper diamond
This paper flower
These origami balls

DIY – PAPER MARBLE BOX

diy marmor ask

diy marmor ask

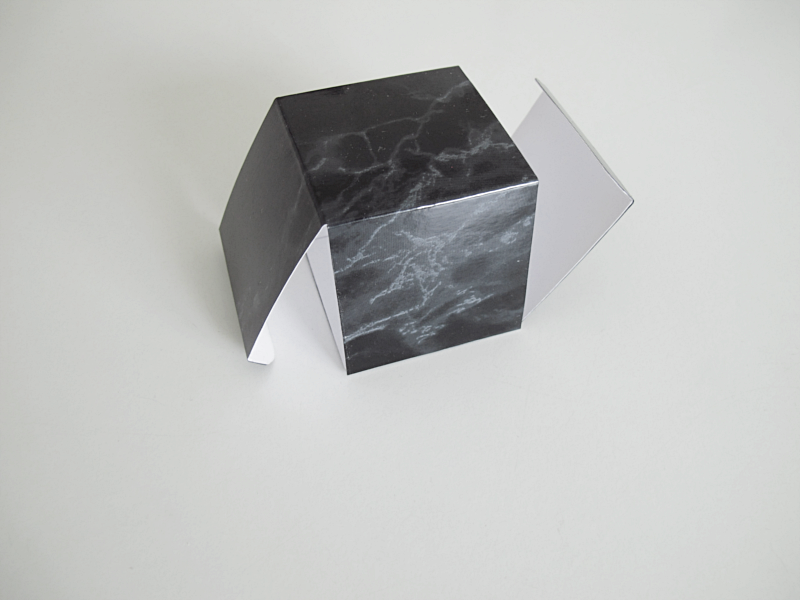
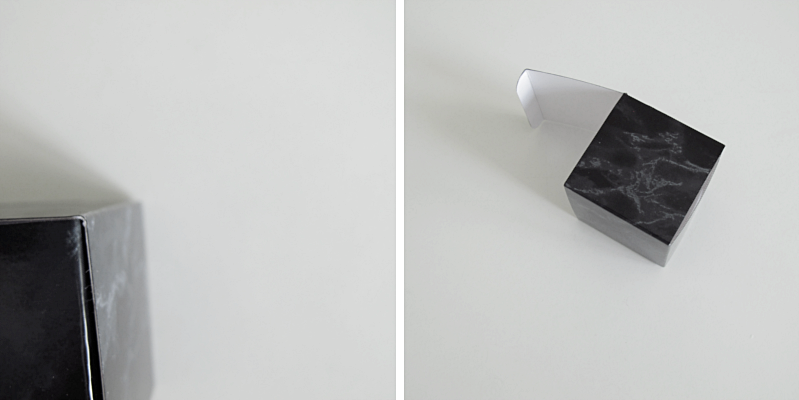
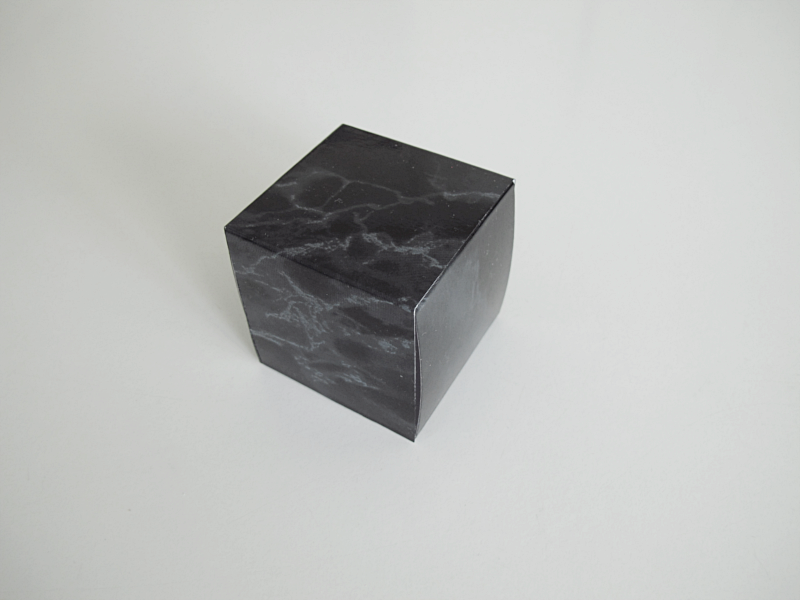
Another really simple DIY for you today. A small box made a little bit nicer with contact vinyl.

You’ll need:

→ Carton
→ A pair of scissors
→ Marble looking contact vinyl
→ Glue
→ Pencil
→ Ruler

Här kommer ännu ett enkelt och snabbt DIY till er. En liten ask klädd i marmor.

/// Du behöver:

→ Hobbykartong
→ Sax
→ Kontaktplast – marmor
→ Lim
→ Penna
→ Linjal

diy marmor ask

And this is how you do it:

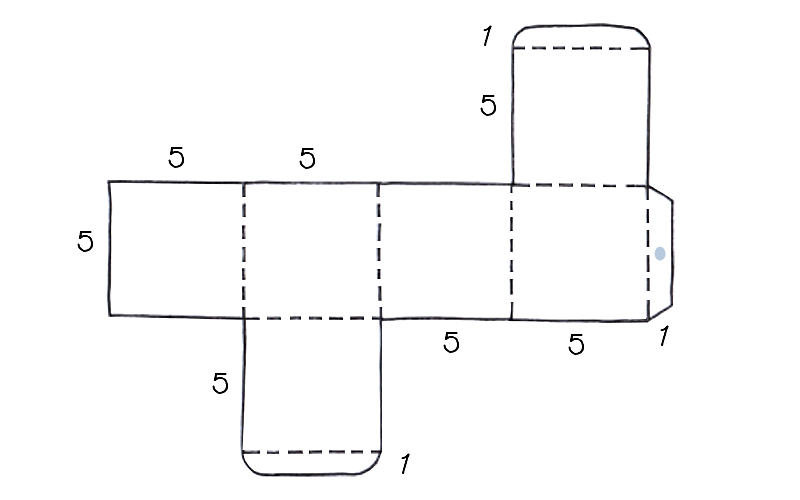
Take the piece of carton and make a figure like the template shows.

/// Ta biten med kartong och gör en likadan mall som jag ritat.

template


Cut it out and fold along the dashed lines. Now it’s time to attach the contact vinyl to the carton. I found it easier to avoid bubbles if you remove the back of the vinyl first, then place the vinyl on a flat surface with the right side down, and then place the carton on top of that. Rather than the other way around. And another tip for you: don’t put any vinyl on the small 1 cm piece (the one with the blue dot) because that’s the piece you use to glue the box together.  When that is done you cut the excess vinyl off, glue the box together and you are done!

/// Klipp sedan ut mallen och vik längst med de sträckade linjerna. Nu är det dags att sätta fast kontaktplasten på kartongen. Jag tycker det var lättare att undvika bubblor genom att lägga kontaktplasten på ett bord och sen lägga kartongbiten på denna, istället för tvärtom. Ett annat tips är att inte fästa någon plast på den lilla biten som jag målat en blå prick på (på mallen) för det är den fliken du ska limma ihop asken med. Klipp sedan bort kontaktplasten som sticker ut, limma ihop asken och du är klar!

diy marmor ask

DIY – SEWN NOTEBOOK

notebook
notebook

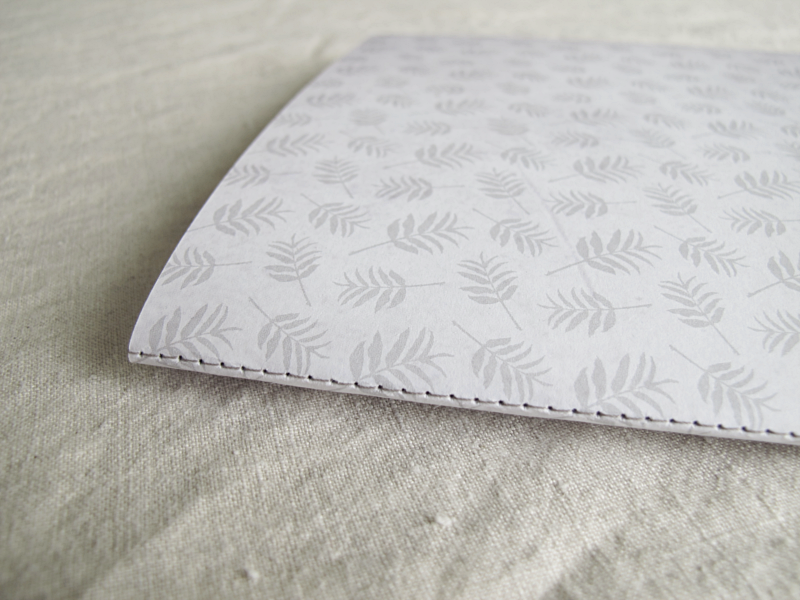
I guess it’s no surprise to you that I like note books. I’ve done one in marble, leather, a braided one and one with thread (and a couple more). Todays diy is one with a sewn back.

For this you need:

→ 15 A4 copying papers
→ Thread. You can choose to use a matching thread or a contrast color
→ A sewing machine
→ One paper 30 x 30cm to use as a cover. I used a scrapbook paper
→ Paper knife

/// Jag antar att det inte kommer som någon överraskning för er att jag gillar anteckningsböcker. Jag har gjort en i marmor, en i läder, en flätad och en med tråd (plus några fler varianter). Dagens anteckningsbok är en med sydd rygg.

Till detta behöver du:

→ 15 st kopieringspapper, A4
→ Sytråd. Du kan välja om du vill ha en som är samma färg som omslaget eller ett i annan färg som en kontrast.
→ Symaskin
→ Ett papper som är 30×30 som ska fungera som omslag. Jag använde ett för scrapbooking.
→ Papperskniv

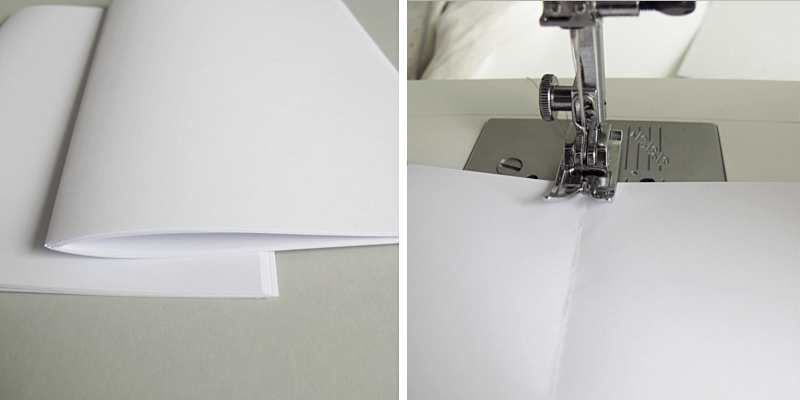
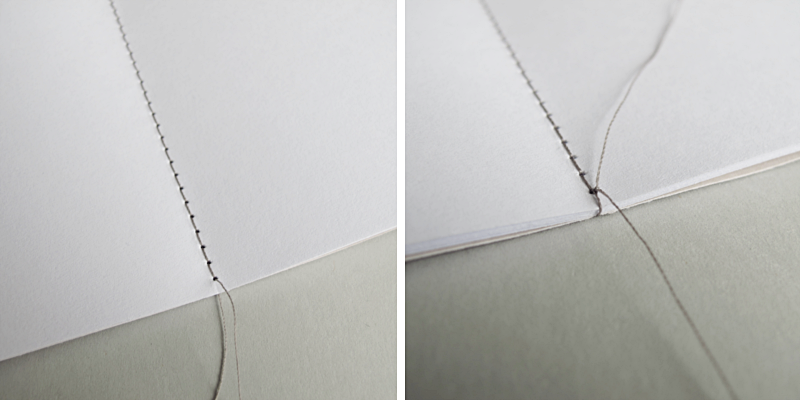
Start by folding all the papers in half including the cover paper. When that is done place all the papers on top of the cover paper and sew a seam along the folded line. Make sure you have long pieces of the thread sticking out on both ends of the note book. This makes it easier to tie them together. I choose to tie them on the inside of the note book, as close to the hole as I could.

/// Börja med att vika alla papper på mitten, inklusive omslagspapperet. När det är klart så lägger du alla papper uppe på omslagspapperet och syr en sömn längst efter den vikta linjen. Tänk på att ha en ganska lång bit tråd kvar på båda sidorna av anteckningsboken, då det blir lättare att knyta ihop dem sedan. Jag valde att knyta på insidan av anteckningsboken så nära hålet jag kunde.

notebook

notebook

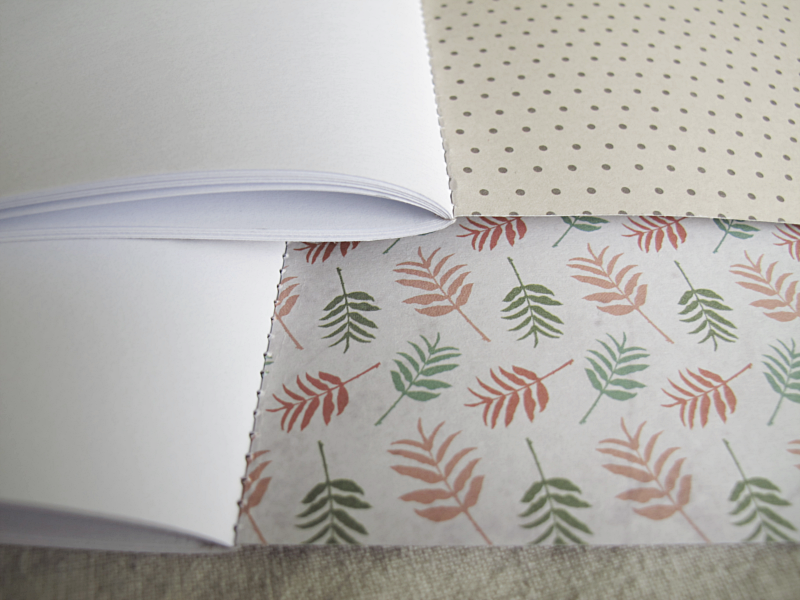
After that, you fold the note book and carefully cut the excess paper off (when you place the papers on top of each other and then fold the note book, a bit of shifting occurs.)

And then you are done!

/// Vik sedan anteckningsboken och skär försiktigt bort det överflödiga papperet som sticker ut. (När man lägger alla papper i varandra och sedan viker boken så förskjuts bladen lite).

Och så var det klart!
notebook