Menu Close

Tag: DIY (page 17 of 40)

CONCRETE CONE

kon

I made this concrete cone the other day. Turned out even better than I’ve expected! Started with painting the inside of the paper mold with liquid latex (to make it easier to remove later). Then I filled the paper cone with concrete, tapped the cone to remove bubbles and then set it to dry. I waited two days to be sure it was dry, and then I removed the mold. Done!

/// Jag gjorde denna betongkon häromdagen. Blev bättre än väntat faktiskt. Jag började med att måla insidan av pappersstruten med Formgummi ( för att det skulle bli lättare att ta bort formen senare). Sen fyllde jag struten med betong och klappade bort bubblorna. Väntade två dagar för att vara säker på att betongen var torr. Sedan tog jag bort struten. Klart!

kon

(I bought the paper cone here. /// Här hittar du pappersstruten.)

FOLD BUTTERFLIES

diy

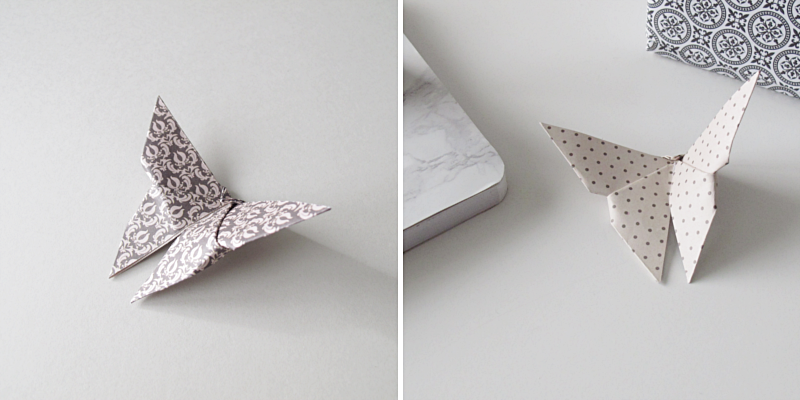
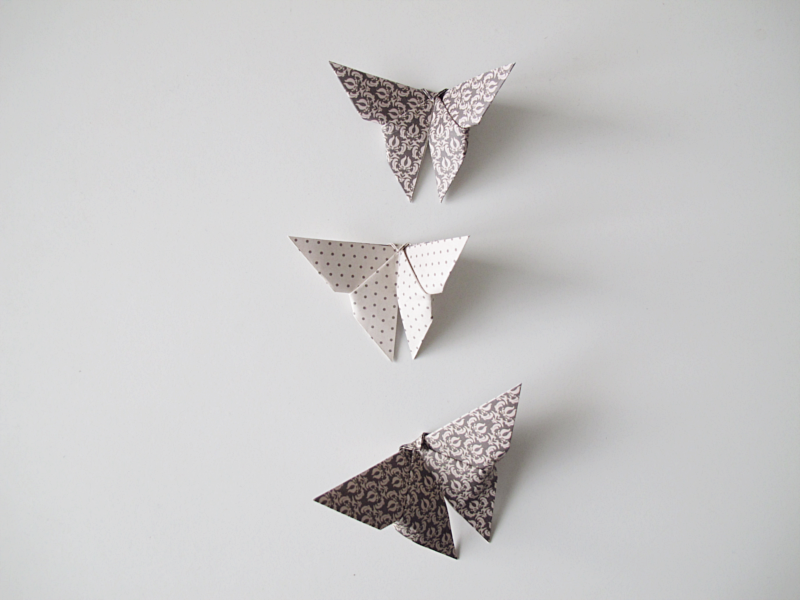
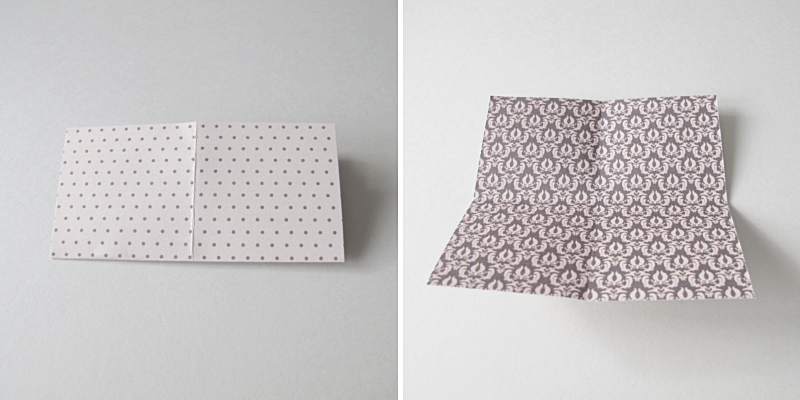
Time to fold some paper again. This diy show you how to fold butterflies. Butterflies that you can make a garland out of or why not a mobile. 1. You need a square piece of paper. 13×13 cm make a butterfly that is 13cm between the wings. 2. Fold the paper in half.

/// Nu är det dags att vika papper igen. Detta diy visar hur man enkelt gör fjärilar. Fjärilar som man kan göra till en girlang eller varför inte hänga i en mobil. 1. Du behöver en fyrkant av papper. 13x13cm ger en fjäril som är 13cm mellan vingarna. 2. Vik papperet på mitten.

diy

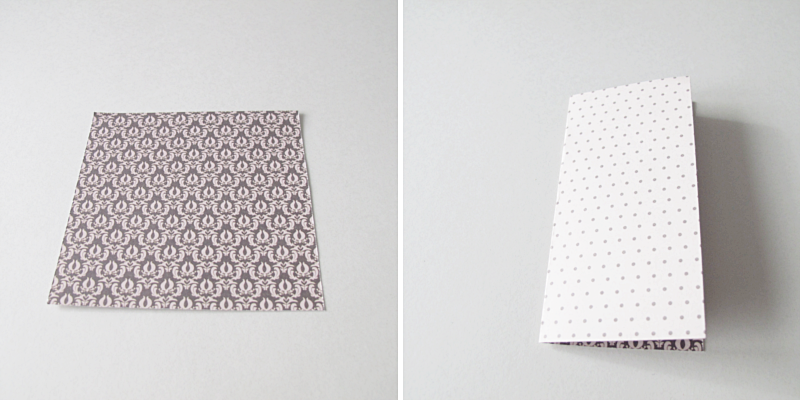
3. Unfold and fold the other way. 4. Then unfold.

/// 3. Vik  upp den och vik åt andra hållet. 4. Vik upp igen.

diy

5. Turn the paper upside down 6. Fold it diagonally.

/// 5. Vänd papperet upp och ner. 6. Vik det diagonalt.

diy

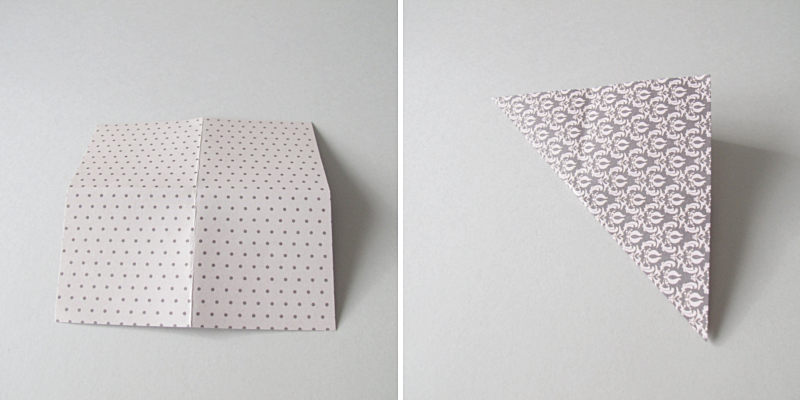
7. Unfold and fold it the other way. 8. Unfold again.

/// 7. Vik upp och vik den åt andra hållet. 8. Vik upp igen.

diy

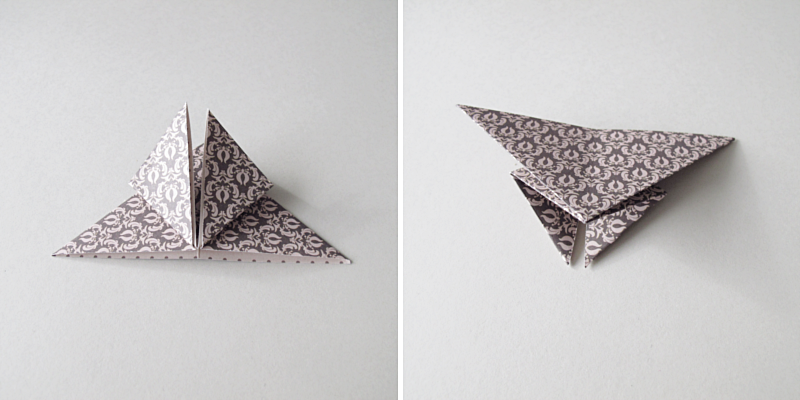
9-11. Push the sides towards the middle.

/// 9-11. Tryck in sidorna mot mitten.

diy

12. Then fold the sides towards the middle, away from you. 13. Turn the paper upside down and then turn it 180 degrees.

/// 12. Vik in sidorna mot mitten. Bort från dig. 13. Vänd papperet upp och ner och snurra den 180grader.

diy

14-15. Fold the bottom upwards. Fold it so that you can fold the tip over to the other side. But make sure you don’t push the sides down. (Where the squares are).

/// 14-15. Vik den nedersta delen uppåt. Vik den så att du kan vika ner toppen på andra sidan. Men se till att du inte trycker till sidorna. (Där fyrkanterna visar)

diy

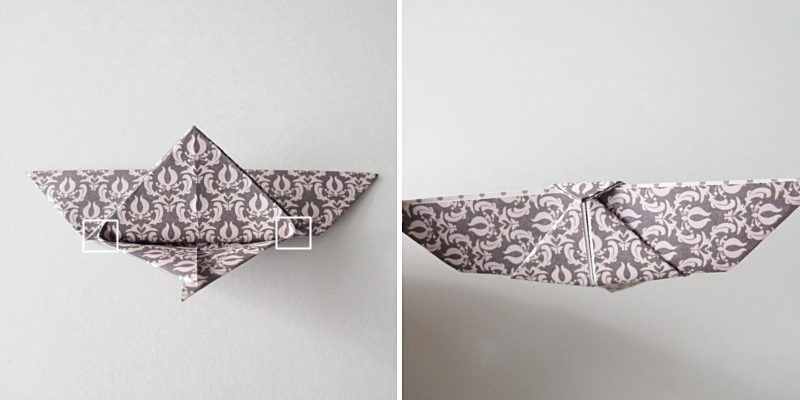
16. Fold the butterfly in the middle and you are done!

/// 16. Vik ihop fjärilen på mitten och du är klar!

diy

5 MINUTE MAKEOVER

vase

I’ m a big fan of recycling and this one might be on my top three. Christmas ornaments turned into mini vases. And the best part. It’s easily done in five minutes. For this you need ornaments (of course), pliers and some gravel. First you remove the hanger.

/// Jag gillar verkligen när man kan återanvända saker som man kanske har blivit lite less på. Och denna makeover är nog på min topp tre lista. Julgranskulor som blir till små vaser. Och det bästa är, att det tar bara 5 minuter att göra. Till detta behöver du självklart julgranskulor, en tång och lite småsten. Börja med att ta bort hängaren.

vase

Then fill the vase with gravel. This is for keeping the vase standing. Fill it with water and stick a branch or a flower in it and you are done!

/// Sedan fyller du kulan med småsten. Det är för att få den att stå rakt. Fyll den med vatten och stick ner en gren eller blomma och du är klar!

vase

DIY – PICTURE HOLDER

diy

Todays diy is a picture holder. For this you need two pieces of glass, a picture that you like,  some plastic (both to protect the glass and the table) and self hardening clay. I used about 0.5  pounds of clay for this. But it depends on how big your glass is. The bigger the glass, the more clay you have to use to prevent it from falling over. Take a piece of the plastic and wrap it around the two pieces of glass. This is for preventing the glass to get clay on it.

/// Dagens diy är en bildhållare. För att göra en sådan här behöver du två bitar glas, en bild som du gillar, plast (både för att skydda glaset och bordet) och självhärdande lera. Jag använde ungefär 1/4 förpackning till denna, (förpackningen var på 1kg). Men det beror helt på hur stora glas du använder. Ju större glas, ju mer lera behövs så att inte hållaren tippar över. Ta glasen och linda in botten i lite plast, så att inte de får lera på sig.

diy

Make a “blob” out of the clay, and gently press the pieces of glass into the “blob”. With a little angle and not all the way through.

/// Forma en “klump” av leran, och tryck försiktigt ner glasen i “klumpen”. Med lite vinkel och inte hela vägen igenom.

diy

Like this. Make the notch wider than you actually want it, by moving the glass up and down a bit. Why, you might wonder. It’s because clay shrinks when it dries, so if you just make it the right size, the notch will be to narrow when it’s dry.

You can leave the clay as it is for a rougher look or you can smooth it out with your finger. Let it dry and you are done!

/// Så här. Nu ska du göra skåran lite bredare än du egentligen vill ha den. Varför? Jo, för lera krymper när den torkar och gör du den då i rätt storlek så kommer skåran att vara för smal när den är torr. 

Nu kan du lämna hållaren som den är eller så jämnar du till ytan med ett finger, för att få den slät. Låt den torka och du är klar!

diy

WHAT ABOUT THE LEFTOVER SHELF?

tavla

I promised to show you what I did with the leftover shelf from the Ikea table, and here it is. A bulletin board!

/// Jag lovade ju att visa vad jag gjorde av hyllan på ikea bordet. Och här är den. En anslagstavla!