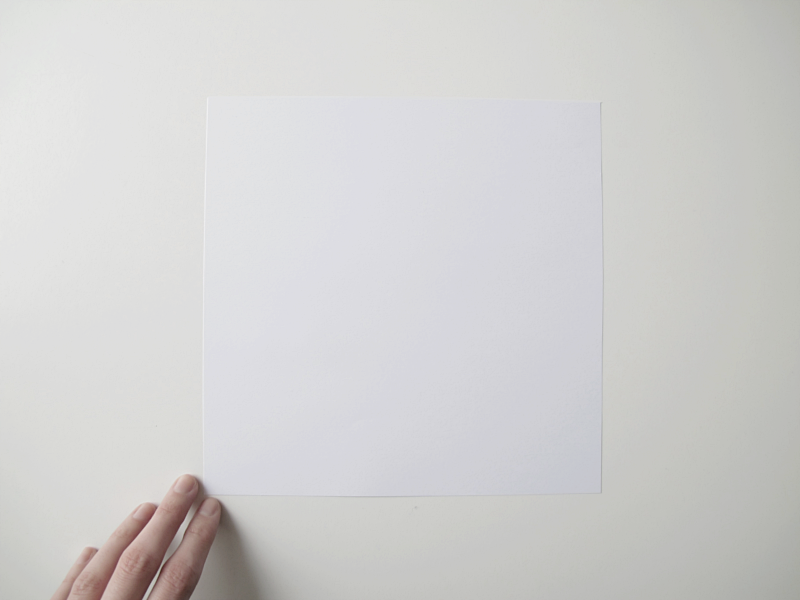
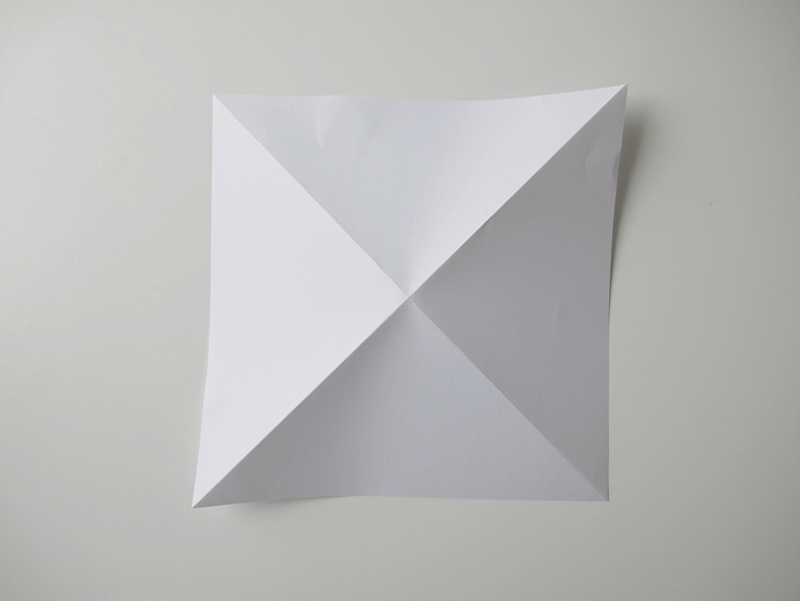
Start with a square of paper /// Börja med en fyrkant
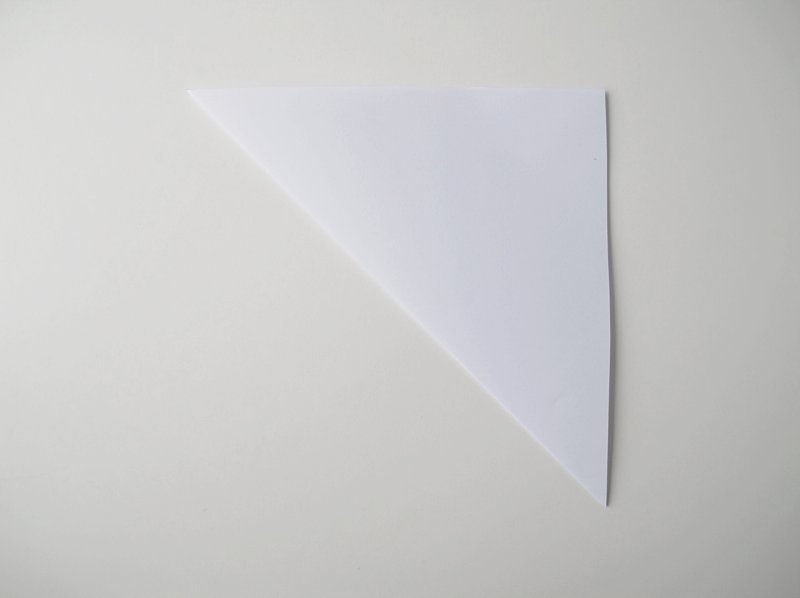
Fold it from one corner to the other /// Vik från ett hörn till det andra
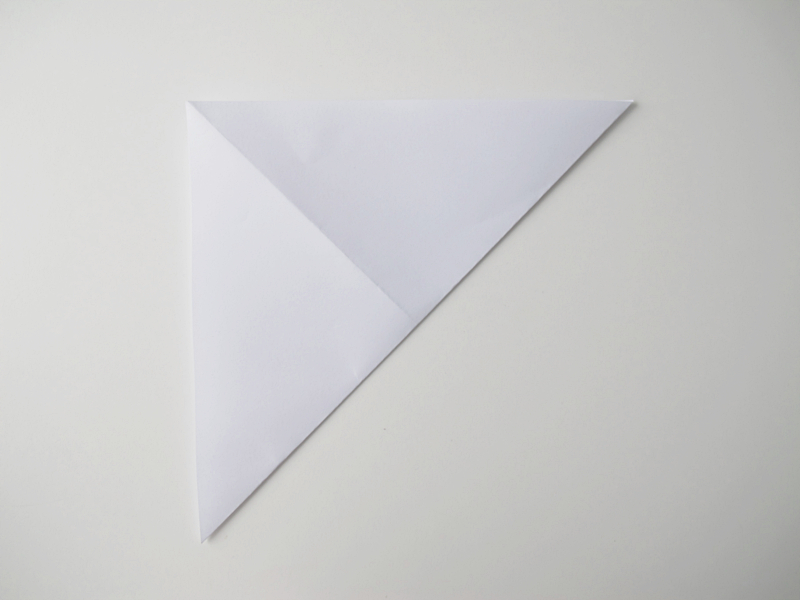
Unfold and fold it the other way. From corner to corner /// Vik upp den och vik från det andra hållet. Hörn till hörn.
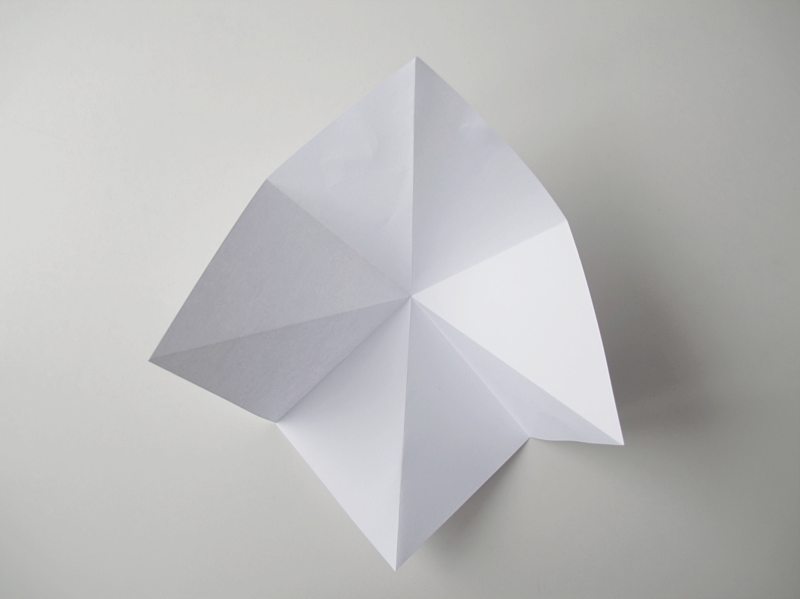
Unfold and turn it over so it looks like this: /// Vik upp och vänd på den så att den ser ut så här:
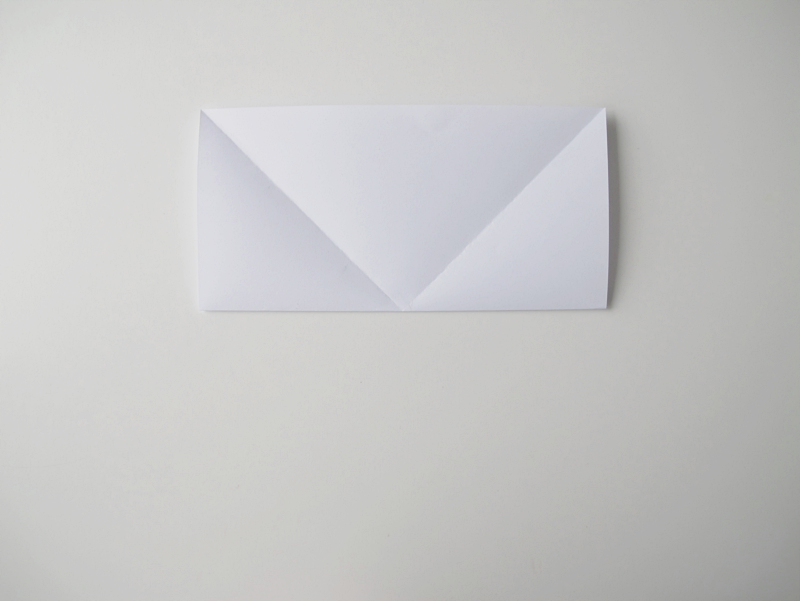
Fold the bottom part to the top /// Vik nedre delen mot den övre
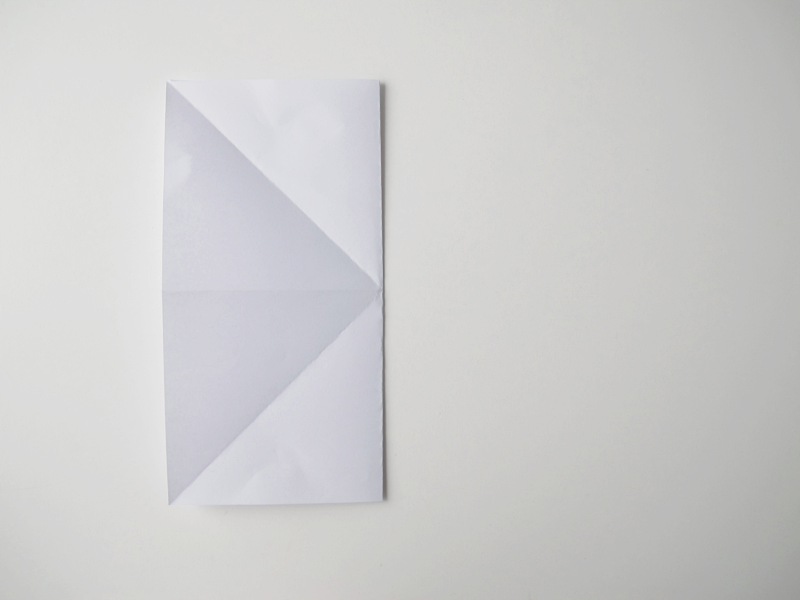
Unfold and fold it the other way /// Vik upp och vik den åt andra hållet.
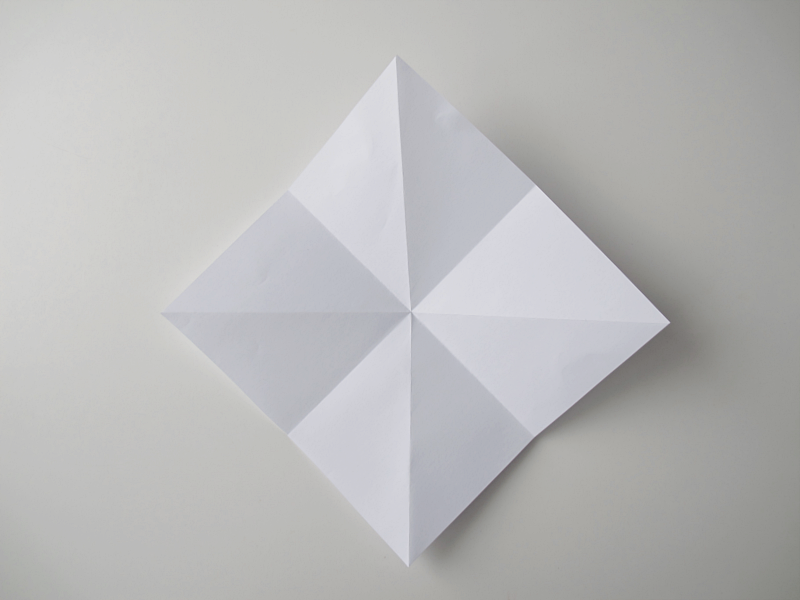
Unfold and turn it over. So it look like the one in the picture. /// Vik upp och vänd på den så att den ser ut som på bilden
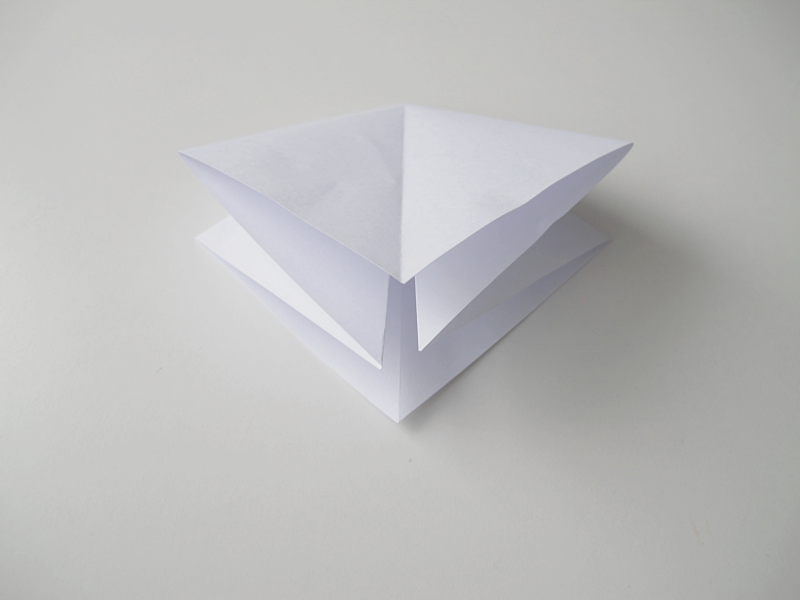
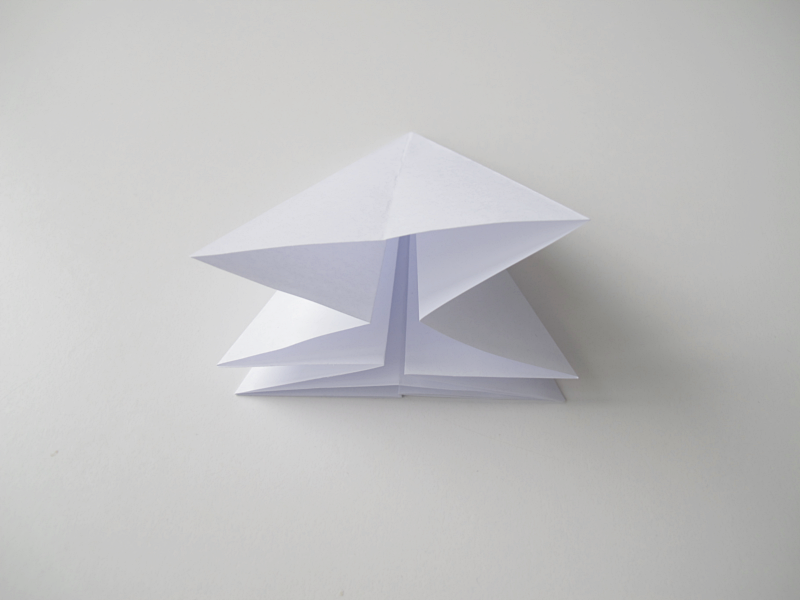
Gently press the sides towards the middle… /// Tryck försiktigt sidorna in mot mitten…
…and fold the top part towards you /// …och vik ner toppen mot dig
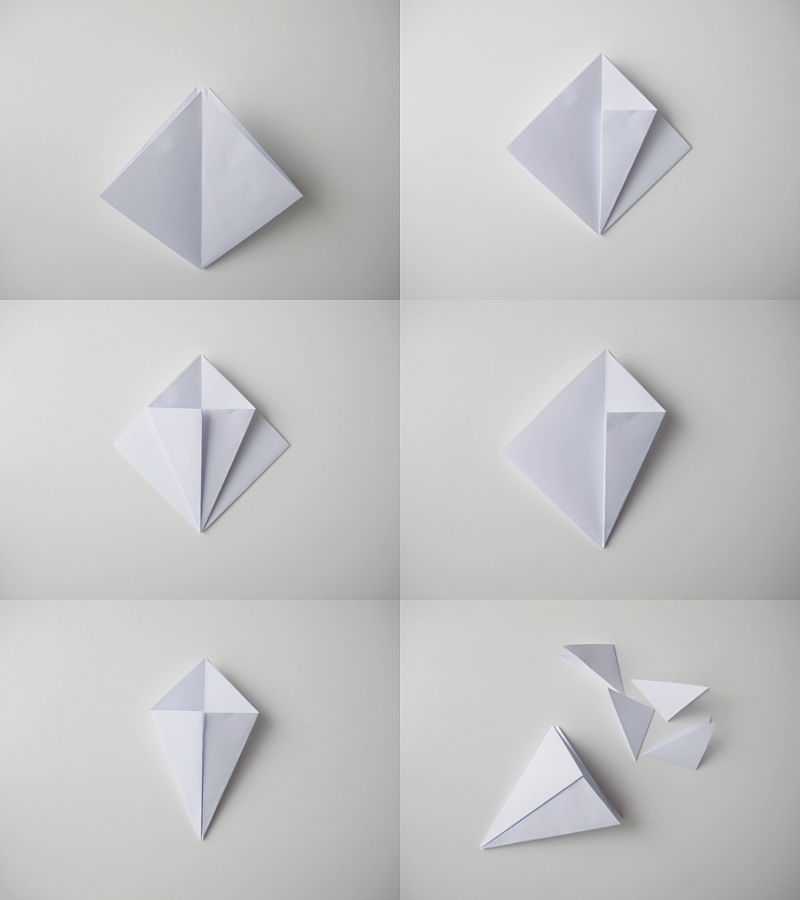
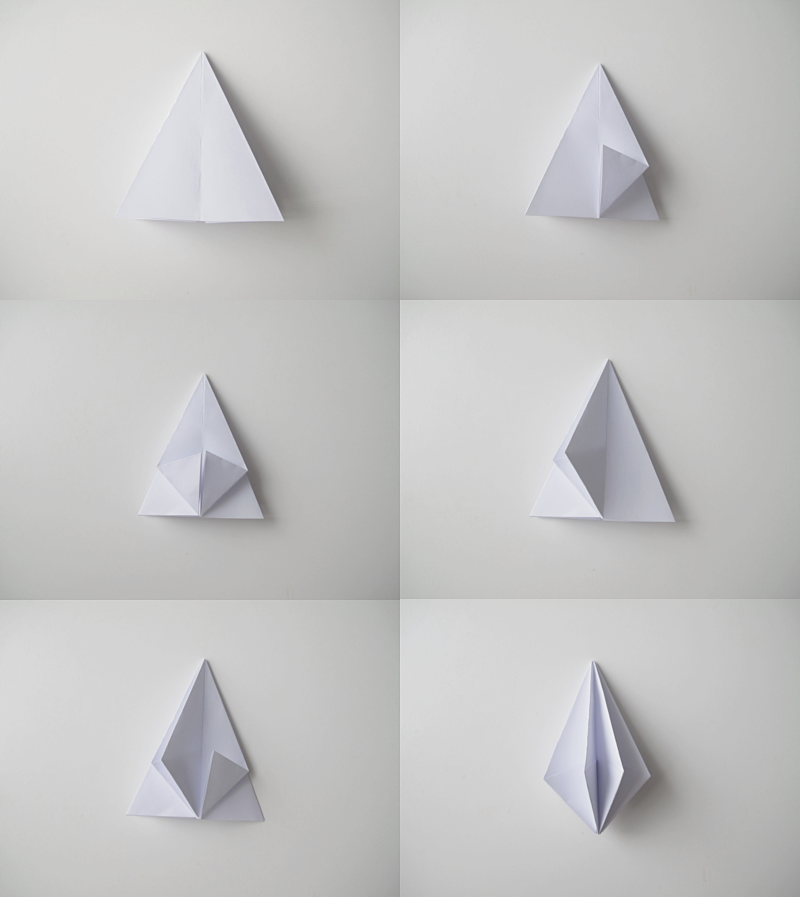
Turn it 180° and fold the sides. When you´re finished folding, cut the top part off.
/// Vänd på den 180° och vik in sidorna. När det är klart så klipp bort toppen.
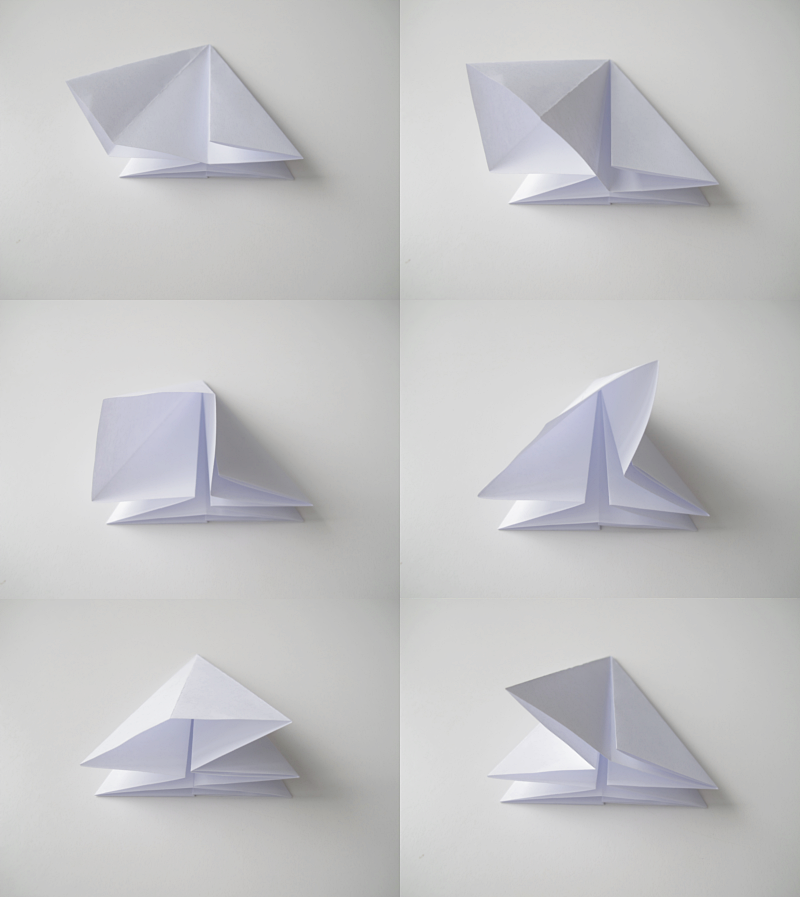
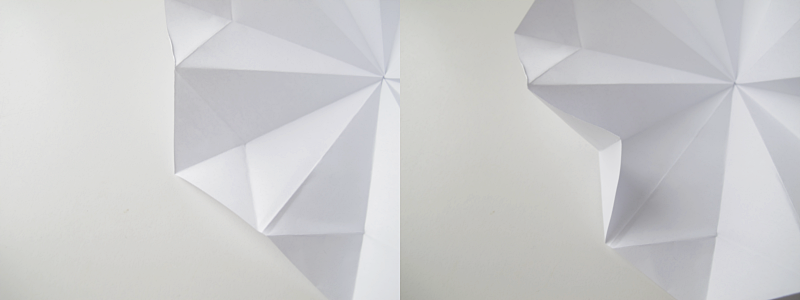
Here comes the tricky part. Place the paper so you have the opening towards you. Take the left side and unfold it. Open it a bit, and fold it over to the right side. (see pictures). Press down the folding on the top, and fold it to the left. (last picture)
/// Nu kommer den lite kluriga biten. Lägg papperet så att du har öppningen mot dig. Vik upp på vänster sida. Öppna upp den lite, och vik den mot den högra sidan. (se bilder). Tryck ner vikningen som är högst upp med fingret och vik sedan till vänster (sista bilden)
Do the same to the right side /// Och nu gör vi likadant med den högra sidan
Fold the corners. All off them /// Vik upp alla hörn
Unfold /// Vik upp
Fold the corners inwards /// Vik hörnen inåt
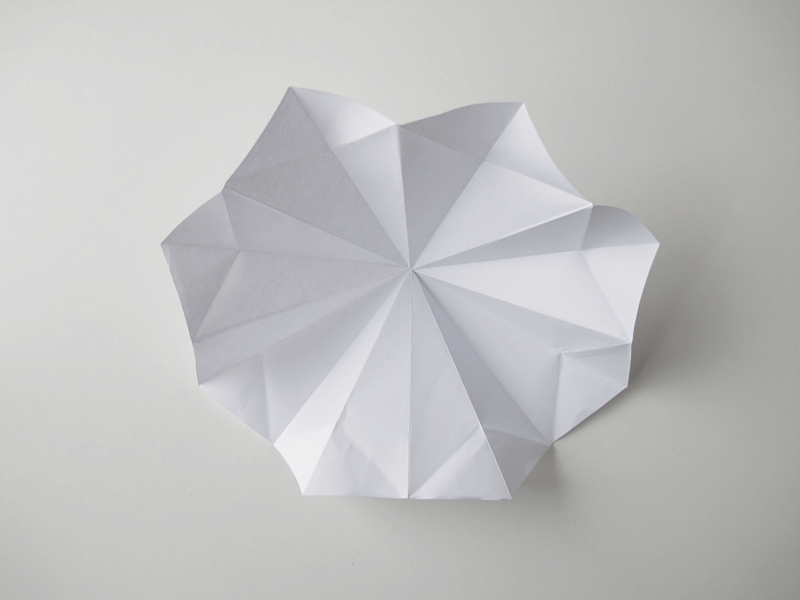
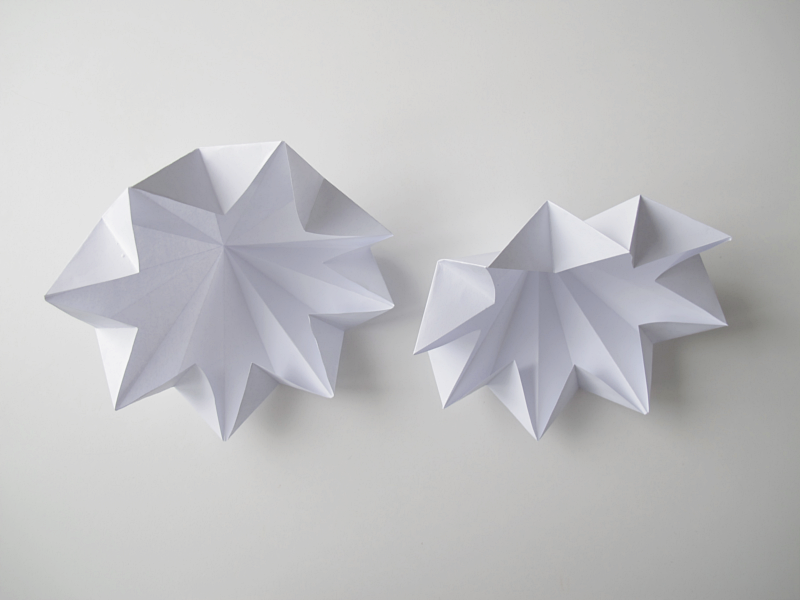
Now you want to make the other half of the diamond, repeat all the previous steps so that you have two pieces that looks like this.
/// Gör nu en precis likadan igen, så att du får den andra halvan av diamanten.
Put some glue on the corner parts you just folded and gently press half the diamond to the other half. (You want to turn the two parts so you have one “top” facing one “valley”. And not “top” to “top”.)
/// Stryk lite lim på de delar du just vikt in och tryck försiktigt den ena halvan av diamanten mot den andra. (Tänk på att ha en “topp” mot en “dal” och inte “topp” mot “topp”)
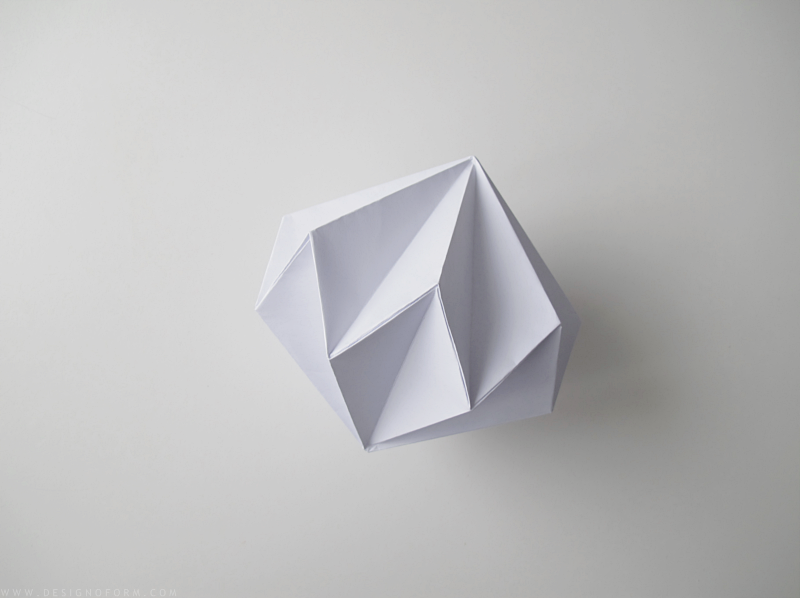
Done! /// Klart!


Amanda Englund says:
Åh vad fin, det måste jag testa på! Jättebra guide! :)
February 8, 2013 — 16:01
Vardagstugg says:
Å så fina! Ska provas nästa gång jag får lite egen pysseltid ;-)
Trevlig helg!
Annelie
February 8, 2013 — 19:59
designoform says:
Trevlig helg på dig med!
February 10, 2013 — 18:14
Ilenia Martini says:
such cute little projects!
February 9, 2013 — 22:55
Ann Martin says:
Thank you for this how-to! I’m thinking it would be nice to make some as tree ornaments for next Christmas.
February 12, 2013 — 18:18
designoform says:
Yes, what a great idea!
February 13, 2013 — 09:35
Marta Funniest says:
JUST BILLIANT!!
Thanks 4 sharing :)
February 12, 2013 — 20:29
Sylvie says:
I love these paper diamonds! One problem, I have tried a couple times, and my husband tried as well, and neither of us can figure out how to glue it together in the end! It ends up looking more like a UFO than a diamond! I wonder what we are doing wrong?
February 12, 2013 — 22:31
Jen says:
I’m having a super hard time with that also. I was so proud of myself for folding everything correctly and BAM! I can’t figure out how to connect it right.
January 6, 2022 — 23:22
Sylvie says:
Yay! I looked at it for a while and finally figured it out! We were lining up the small tabs when gluing, rather than alternating them! :)
February 12, 2013 — 23:14
designoform says:
I wanted to show a photo of that part too, but since I was all alone at home (no one to help me with the camera) and needed all my hands for the paper diamond I had to leave that part out. But I´m glad you figured it out! :)
February 13, 2013 — 09:40
Victoria says:
Stopped at the step of glueing… sitting confused for more than five minutes! How to do that?
December 21, 2013 — 09:38
designoform says:
Take one half in each hand and turn one of them just a tiny bit so that you get a zig-zag pattern.
January 1, 2014 — 11:07
G says:
These are so cool! We are making these with some friends for a x-mas tree decorating party. We struggled with the glue part until we discovered that setting the bottom in a mug/glass made for a stable base on which to glue the top. This made things much easier and neater. Cheers!
December 3, 2022 — 14:02
Sabine says:
I managed to make one! But it looks a lot less neat than yours….maybe I have to practice. Thanks for sharing!
February 16, 2013 — 18:05
Hilda says:
Hasta el anteultimo paso todo bien , pero hay algo que falta , no se como explicarlo , antes de pegar entre si , pregunto es un solo papel o son dos papeles que despues se pegan entre si ? deberia estar el paso este mas explicado si es un solo papel , como va armado ? No es tan facil como parece ,,,, Gracias por leerme .
March 25, 2013 — 05:31
designoform says:
When you glue them together, turn them so you have one “top” facing one “valley”. Not “top” facing “top”.
March 25, 2013 — 19:05
Soncie says:
When I saw the beautiful diamond and also what appeared to be very ‘simple’ instructions, I was so excited I didn’t know what to do with myself!LOL! Unfortunately, you loss me,when I I was instructed to ‘Turn it 180° and fold the sides. When you´re finished folding, cut the top part off’. Please, please, please, help. Is there anyway you’d post a picture showing exactly which part I am to cut off? The holiday’s are here, and I’d love to make a couple as stocking stuffer’s for my co-workers to display on their desks!
Thank you in advance for your patience and kind assistance!
Best regards,
Soncie
December 9, 2013 — 22:35
designoform says:
Look at the 6 pictures under “Turn it 180° and fold the sides. When you´re finished folding, cut the top part off”. Picture 5 and 6 showes exactly were to cut. I’m sorry but I don’t think I can explain it better than what those two pictures shows.
December 10, 2013 — 19:11
Kaise says:
i don’t understand the glue part
April 6, 2013 — 08:21
designoform says:
I´ve updated the post. Hope you can figure it out. If not let me know..
April 7, 2013 — 17:48
Susie says:
Help! I can’t :-(
April 10, 2013 — 13:22
designoform says:
Check your email! :)
April 10, 2013 — 15:03
stefan says:
can you help me with the part ‘glue them easy together’?
i dont know how this works..
greets
November 29, 2017 — 23:49
cora says:
So,do i have to make two and glue them together or just one and glue parts of that one together? I dont understand,halp!
May 25, 2013 — 10:31
cora says:
nevermind! got it! :D
May 25, 2013 — 10:44
designoform says:
Good! :D
May 25, 2013 — 17:27
joe Chastain says:
i need help i cant get this glue part
November 18, 2017 — 17:38
Qin says:
;( i am using tracing paper to make the diamond, and then it becomes so hard to glue them together.. they just slip away from glue… if you can help..
May 25, 2013 — 16:12
designoform says:
Maybe if you use a different glue? Or use regular copying paper instead of the tracing paper?
May 25, 2013 — 17:29
Ananas says:
Oh så fin! Ska genast pröva om jag får ihop en diamant :)
September 12, 2013 — 17:20
designoform says:
Det tycker jag du ska! ;)
September 12, 2013 — 17:25
Natasja says:
Hej. :)
Tak for den fine opskrift. – men har desværre stadig svært ved og forstå hvordan man sætter den sammen til sidst! :( hjælp mig. Kan man se en video på hvordan man gør? Har siddet i 1 time nu og bakset rundt med den uden held. Det bare det sidste jeg ikke forstår. Håber du kan hjælpe mig!
Mvh Natasja.
November 2, 2013 — 16:31
designoform says:
Jag har skickat en liten bild, som jag hoppas ska hjälpa, till din mail.
November 4, 2013 — 11:52
smj says:
Hello, Do you have to make the second one for the other half a little smaller than the first? – it looks that way in the picture.
November 11, 2013 — 23:43
designoform says:
No, you make them the same size.
November 12, 2013 — 12:45
Nanna Bonde says:
Hej :-)
Jeg er blevet super forelsket i din diamant og har sagtens kunne folde de to dele – jeg kan simpelthen bare ikke få den sat sammen. Kan jeg måske få det stykke video som du har sendt til en af de andre der havde problemer med at lime diamanten?
November 27, 2013 — 14:37
designoform says:
Jag har tyvärr ingen video som visar hur man sätter ihop de två delarna. Det enda tipset jag kan ge är att ta en del i vardera hand. Vrid den ena, bara lite grann så att du får ett zick zack mönster. Så att “topparna” på ena delen går i “dalarna” på den andra. Lycka till!
November 28, 2013 — 20:45
Jessica Jones says:
Thanks for sharing these instructions. I made some diamonds and linked over from here! http://howaboutorange.blogspot.com/2013/12/origami-diamond-ornaments.html
December 10, 2013 — 15:58
Kassandra says:
Glue what to what I don’t understand… ;(
December 11, 2013 — 03:50
celina says:
jeg har lyst for det!!!
December 12, 2013 — 07:37
Caroline says:
Så bra med en tutorial där man inte behöver klippa!
Ska testas. Perfekt att göra på trista möten ju.
December 18, 2013 — 09:51
designoform says:
Hehe..
December 20, 2013 — 18:07
Tanja says:
Hej, sikke en flot diamant. Den er rimelig let at folde, men jeg kan ikke se hvordan den skal limes sammen. Det med top og bund, er ikke meget hjælp :) håber du kan hjælpe? Jeg sidder her og vil så gerne lave den færdig :D
Hilsen Tanja & rigtig godt nytår
January 4, 2014 — 21:20
designoform says:
Jag är ledsen, men jag kan inte förklara det på något annat sätt än vad jag redan gjort i inlägget och i kommentarena. Bara ta en halva i var hand, vrid den ena lite lite grann. Och för dem mot varandra. Som ett zick-zack mönster.
January 5, 2014 — 19:03
Rebekka's craft room says:
Thanks so much for the tutorial. I used it to make diamond decorations for our Easter tree. Want to have a look? Click here:http://www.rebekkascraftroom.blogspot.ch/2014/04/un-arbre-de-paques-avec-des-diamants-en.html
April 2, 2014 — 08:07
designoform says:
Lovely! :)
April 2, 2014 — 12:55
paperbear says:
i really like this paper diamond a lot! have you invented it?
November 12, 2014 — 12:41
designoform says:
No I haven´t :)
November 23, 2014 — 21:50
Mariita says:
Eres una perraaaaaaaaaaaaaaaaaaaaaaa xq no dijistes que eran 2 pegado
3
November 13, 2014 — 21:02
Mantaku, doushite kire? says:
Useless!! >:•(
November 15, 2014 — 01:33
designoform says:
No it´s not :)
November 23, 2014 — 21:48
OhCapi says:
Brilliant, thank you for the DIY. It’s great
November 20, 2014 — 16:30
designoform says:
Thank you!
November 23, 2014 — 21:48
Serene says:
Que language es por? Only ablo espanol!
November 23, 2014 — 04:27
designoform says:
Swedish and english. Use google translate
November 23, 2014 — 21:46
Circé says:
Hi!
I would love to make these for christmas but I have one tiny problem! (I read the previous comments but still can’t get it)
How do you glue it together? I don’t understand which part do you glue with what?
Thank you! :)
November 24, 2014 — 15:57
Ozge says:
I took me a while too! You need to make 2 of those and then glue them together! Not that obvious…
November 29, 2016 — 10:17
Veronika says:
Thank you for that great idea and very nice tutorial! I managed to do my diamond until the last step, but the part with glueing didnt go so good:-)) Could you please write me, which kind of glue is the best for that project. I tried normal paper glue, super glue and double tape, but they all failed:-( I dont want to give up right before the end:-(
I would also appreciate if you can write which paper is the best to use (in grams).
Thank you again!
Greetings from Czech!
March 23, 2015 — 14:42
GlowingApple says:
I folded an origami box (from http://www.origami-instructions.com/origami-box-with-cover.html), but valley-folded the corners inside the finished box to make a stand for this (using a 2″ square of paper).
It turned out great as a diamond “ring” as part of my first anniversary gift for my wife (traditionally paper)!
Finished project: http://i.imgur.com/B8MKX3z.jpg
May 25, 2015 — 21:33
vandana says:
Lovely…enjoyed making it. Except i made a very big one. WIll try smaller next. Cheer. Thanks for sharing.
July 24, 2015 — 18:34
Saim says:
Utmärkt grejer , är du geniet!
September 8, 2015 — 09:49
Carina says:
Hi Emma,
i’m picturedesk from WOMAN-Magazine (Austria/Vienna).
Your Paper Diamonds are very cute and we’re interested to publish it in our next issue.
Is it possible to send me highres images?
Please write me back via my buisness emailadress: horvath.carina@woman.at.
Best,
Carina
November 24, 2015 — 11:09
Alice says:
Thanks for the clear instructions for these beautiful shapes ! I had already made these once and needed a refresher.
Personally I use double-sided tape to stick the two halves together. I cut a triangle of tape, with the longest side a little shorter than one edge of the paper edge. I stick all my little triangles on one of the pieces of paper. Then i remove the tape backing one or two at a time and assemble progressively so I don’t have sticky bits everywhere.
Hope this helps people who have trouble with the gluing phase…
December 6, 2015 — 23:15
Tamsin says:
I managed to do the steps but the glueing failed and it ended up looking like a waffle iron ☹️
August 9, 2016 — 11:10
Tamsin says:
Please help !!!!!!!!!!!!
August 9, 2016 — 11:12
Tamsin says:
_______________
|. | | | | |
|____|__|__|____|__|
Waffle maker
August 9, 2016 — 11:15
Tamsin says:
Failed picture
August 9, 2016 — 11:16
Tamsin says:
Failed picture sadly
August 9, 2016 — 11:17
Poppy says:
i dont really understand the second last part about making the other half of the diamond, can you explain that??
October 3, 2016 — 08:14
designoform says:
You do another one, the same as the first half. Then you put the two halves together.
October 3, 2016 — 19:55
Jessica says:
Jag förstår verkligen inte delen efter man klippt av toppen (den kluriga delen). Kan vika den vänstra sidan som på bilderna, men den högra så skiter det sig och allt blir fel :/ Vet inte hur jag ska göra, försökt flera gånger. Hjälp, snälla! :)
November 17, 2016 — 12:14
designoform says:
Ja det är lite klurigt, men jag har mailat en bild till dig, så kanske det blir lite tydligare. Hoppas det löser sig!
November 17, 2016 — 19:23
Jodi kuhnmuench says:
Great directions….Love!!
November 21, 2016 — 04:44
designoform says:
Thank you Jodi! :)
November 21, 2016 — 18:39
carmela says:
gracias. muy clara la explicacion
November 28, 2016 — 14:31
Melissa says:
Note: if you are using colored paper you are going to want to start with the color facing up. I now have a white ornament instead of a red. Oops
December 1, 2016 — 04:17
Sarah says:
Ridiculous!!!!! Do not try!!!! It will take you more than an hour per paper thing!!!!!!!!!!!!!!!!!
December 14, 2016 — 06:55
designoform says:
If you are a beginner at folding origami it might be a bit tricky, but there are alot of other DIY’s on the blog you can try instead :)
December 30, 2016 — 17:42
inaya says:
SHUT UP!!!!! these instructions are good!!! Don’t be such a fool! You have to have patience, duma-** This is the best diamond instructions ever, so shut the fu-* up you mothe-*******!!! PATIENCE
Thank you so much for the instructions, they were very helpful☺️☺️☺️
December 10, 2020 — 20:00
CAT says:
hate this project because, it’s a stupid !!!!!!!!!!!!!!!!!!!!!!!!!!!!!!!!!!!!!!!!!!!!!!!!!!!!!!!!!!!!!!!!!!!!!!!!!!!!!!!!!!!!!!!!!!!!!!!!!!!!!!!!!!!!!!!!!!!!!!!!!!!!!!!!!!!!!!!!!!!!!!!!!!!!!!!!!!!!!!!!!!!!!!!!!!!!!!!!!!!!!!!!!!!!!!!!!!!!!!!!!!!!!!!!!!!!!!!!!!!!!!!!!!!!!!!!!!!!!!!!!!!!!!!!!!!!!!!!!!!!!!!!!!!!!!!!!!!!!!!!!!!!!!!!!!!!!!!!!!!!!!!!!!!!!!!!!!!!!!!!!!!!!!!!!!!!!!!!!!!!!!!!!!!!!!!!!!!!!!!!!!!!!!!!!!!!!!!!!!!!!!!!
January 26, 2017 — 22:16
designoform says:
Im sorry you feel that way
January 27, 2017 — 22:00
Liz Aguirre says:
Yes it’s a bit confusing at the end….But to clarify…..You will need 2 seperate pieces then glue and put together. One over the other.
Hope this helps!
January 27, 2017 — 22:53
Sandra says:
Hi, I used some festive looking origami papers and turned these paper diamonds into decor accessories for Chinese New Year! :-) Thanks for the detailed instructions.
February 1, 2017 — 11:00
designoform says:
What a great idea :) You’re welcome!
February 1, 2017 — 15:22
Sandra Ringsted says:
How many grams world you recommend for at diamond made of 30×30 cm paper
February 15, 2017 — 16:58
designoform says:
I used paper that was 75gram, but I guess you could use origami paper too. But hobby carton is too thick.
February 15, 2017 — 21:04
jason says:
I also used paper that was 75 grams
December 19, 2018 — 20:26
Dorothy Dodd says:
Just about managed it. Wonderful!
Thank you
October 2, 2017 — 12:37
Cristina Matsubara says:
Hello. Please could you reply me as soon as possible? What is the measure of this paper?
November 27, 2017 — 12:57
غرفه سازی says:
Hi, I used some festive looking origami papers and turned these paper diamonds into decor
January 3, 2018 — 16:37
بازسازی ساختمان says:
Yes it’s a bit confusing at the end….But to clarify…..You will need 2 seperate
January 3, 2018 — 16:38
Fai Coffin says:
Thanks for such very clear instructions. The combination of words and pictures really helped. Just finished making my first one and it’s wonderful. A little frustration trying to glue it, but it finally worked. Fai
May 17, 2018 — 02:29
Bev says:
I am completely stuck on the glue part. I have studied the images and just can’t work it out. I have had several goes at it. Can you post some images of this step or even a short video. Thank you.
December 2, 2018 — 05:19
Jason says:
omg!!!
December 19, 2018 — 20:06
jason says:
fineshed,looks perfect
December 19, 2018 — 20:24
Anoka says:
Loved the look of these adorable gems. I read all the comments about gluing the two pieces together but had no success in making that happen.
September 13, 2019 — 04:51
Dev says:
Thank you for this tutorial! Mine is not perfect, but I had fun making it. I’m going to look here for more ideas :)
October 24, 2019 — 11:36
bob line says:
thanks
December 17, 2019 — 20:33
Josue says:
Dis ain’t worth it.
April 17, 2020 — 22:10
Arta says:
I love it! Perfect ❤️
November 17, 2020 — 17:00
Unknown says:
Can you be more specific on the directions? I really wanted to make this for my mom and I couldn’t because you probably left out an important detail
November 29, 2020 — 20:13
Cheyenne says:
Can you be a bit more specific? I kept trying but it did not work
November 29, 2020 — 20:15
E Macdonald says:
Oh Matey, This is a terrible set of instructions…and no, I’m not new to origami. I’ve given up at the 1 hour mark. An hour of my life I’ll never get back.
December 10, 2020 — 02:45
Mykyta Ivanov says:
Thank you for the scheme! I enjoyed making the figure. It is easy and at the same time charming
December 19, 2020 — 22:34
Louise Watts says:
I love this simple project, and am folding some now in UK in Lockdown 3, ideal stress busting activity! I am making a set of tiny ones as tree ornaments for NEXT Christmas.
Thank you for posting, and your clear photos. I am an origami folder so I was impressed you gave instructions without diagramming so anyone could follow. Origamists would say ‘reverse the folds’ after the step where you cut the points off….but origamists usually do no cutting!!
January 5, 2021 — 16:28
Wendy Falk says:
I am at the gluing part and I know with a little practice and patience I will certainly “get it”!! I just wanted to thank you and offer a warm hug for all of your incredibly patient replies!! Esp to CAT :’D Blessings on your beautiful new year :)
January 21, 2021 — 17:14
Andy says:
A great idea. Thank you the blog.
November 20, 2021 — 13:25
Lori Murton says:
a really beautiful design – thanks for posting this!
November 30, 2021 — 00:43
Charlie says:
wow so much work has been put into that you are rely good at origami
May 27, 2022 — 01:36
Xheni says:
Am I the only one who doesn’t understand it.. Just how!!?
December 5, 2022 — 18:58
juju says:
j’ai REUSSIIIIIIII !!!!!!!
:) :) :) :) :) :) :) :) :) :): ): )
November 6, 2023 — 18:12