Menu Close

Page 17 of 313

WEEKLY WONDERS

Friday again (time flies! ) and time for another Weekly wonders list. First up is Marjolein Delhaas who has released her new products for 2017 and this diary/weekly planer is my favorite. See more news here

/// Fredag igen (vart tar veckorna vägen egentligen?) och det är dags för en ny veckans lista. Först ut är Marjolein Delhaas som har släppt nya produkter för 2017 och jag fastnade för den här dagboken/veckoplaneraren. För att se mer nyheter klicka här.

Marjolein Delhaas

Marjolein Delhaas

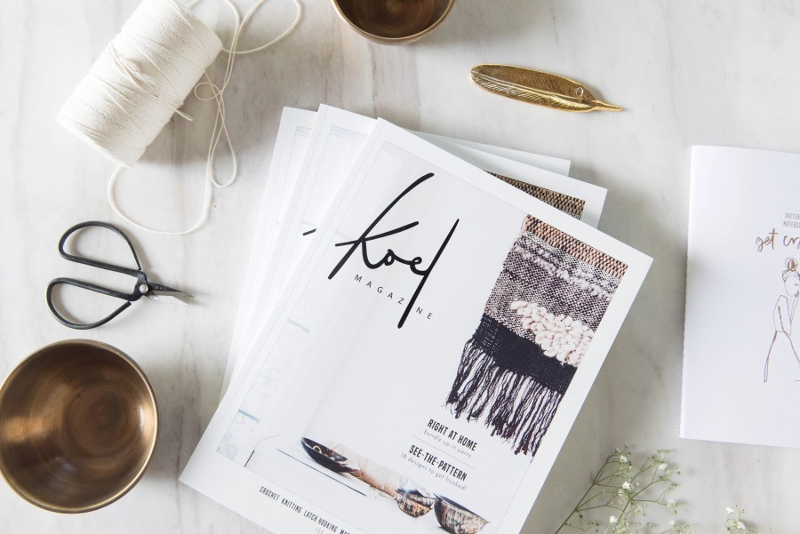
Via April and May, which incidentally has the finest blog design right now, I got wind of Koel magazine. This is how the crew behind KOEL describes their first issue:

/// Via April and May, som förövrigt har den finaste bloggdesignen just nu, så fick jag nys om Koel magazine. Såhär beskriver gänget bakom KOEL själva sitt första nummer:

KOEL is all about yarns and interior design. A treat of visuals, ready-to-make patterns, tricks of the trade, more visuals and simply lots of inspiration to create your own signature yarn pieces. In our debut issue we talk to contemporary fibre celebs such as Tamara Maynes, reveal exclusive patterns by Purl Soho and many other in the know designers, introduce you to easy to master craft techniques, take you on a global tour to find hidden gem supply shops and there’s more, but will keep you in suspense a little longer until you have purchased your very first issue

You can read more about it, or buy your own issue here.

/// Du kan läsa mer eller kanske till och med beställa ditt eget nummer här.

koel magazine via april and may

april and may

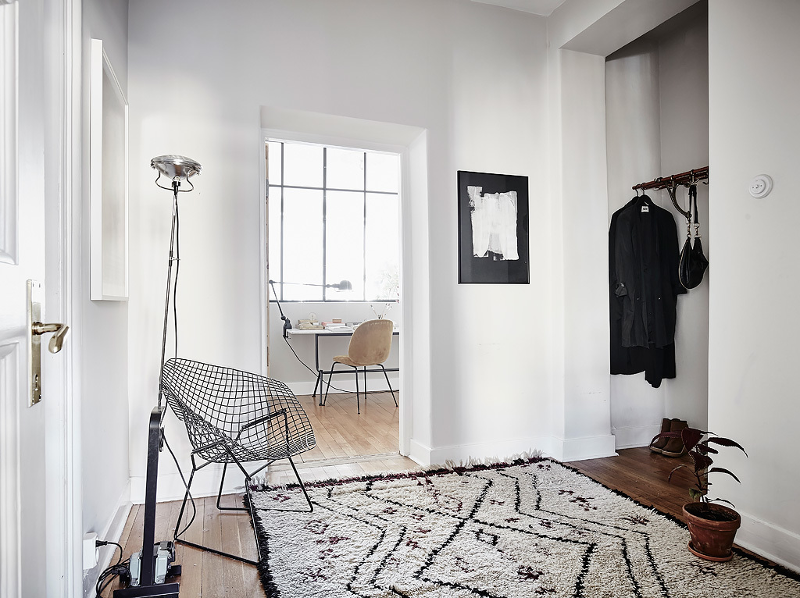
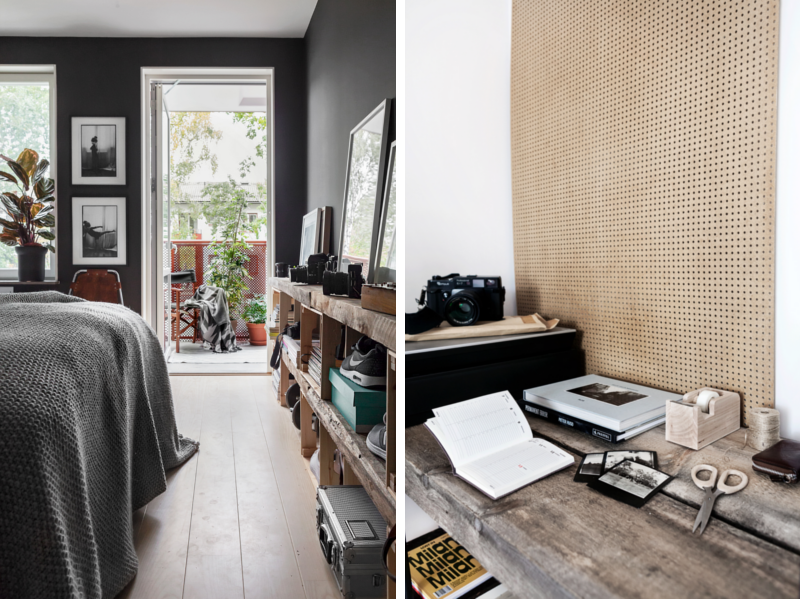
This apartment for sale via fantastic frank has alot of clever DIY’s. My favorite was the unpainted masonite with holes by the desk and the shelves in the bedroom.

/// Den här lägenheten till salu via Fantastic frank har många fina DIY’s. Mina favoriter var den omålade masonitskivan med hål och hyllsystemet i sovrummet.

via fantasticfrank

fantastic frank

And let’s end this list with Ikea Livet hemma and Pella’s amazing DIY. BEKANT desk screen as a headboard. Love it!

/// Och så avslutar vi denna lista med Ikea Livet hemma och Pellas fina DIY. Skrivbordsavskärmaren BEKANT som sänggavel. Vilken bra idé!

livethemma

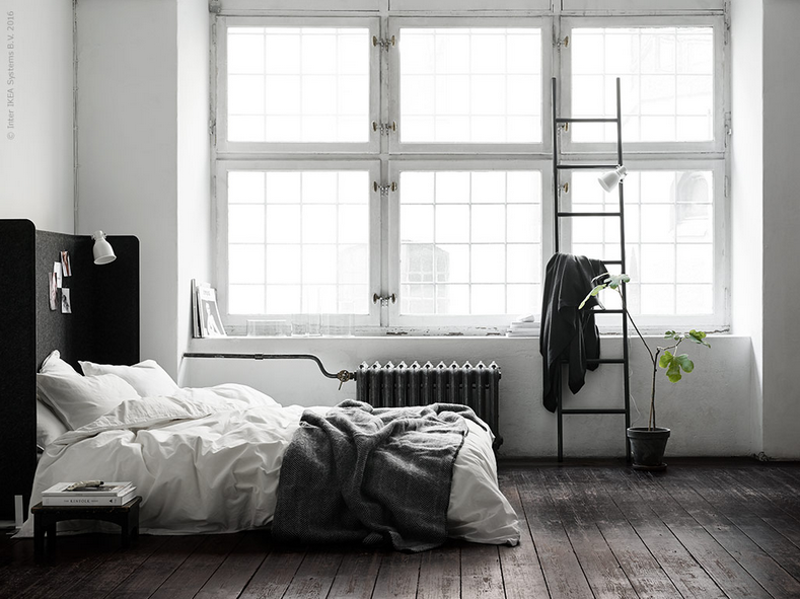
Ikea Livet hemma | Kristofer Johnsson

Have the best weekend!

/// Trevlig helg och så ses vi på måndag igen!

Spara

Spara

DIY INSPIRATION

via-skonahem

I like the look of this fern cutting in a tall vase, (that Ida did), so much I’m going to steal that idea right away. Today’s DIY inspiration! I also found the perfect vase for it.

/// Jag tycker det var så himla fint att sätta en liten ormbunksstickling i en hög vas precis som Ida gjort att jag ska sno den idéen rakt av. Dagens DIY inspiration! Vasen (där på sidan av) kommer från house doctor.

fo: sköna hem | Ida Carrol

Spara

APARTMENT FOR SALE

This apartment feels a lot like Artilleriet for me. Another feeling I get is that is is tooo “right”, too styled, with a lot of bloggers wishlist items. Do you know what I mean? Even though I get that feeling there is  still alot of things that I like about it. The wall color in the livingroom for example.

/// Den här lägenheten till salu via Entrance mäkleri känns väldigt mycket Artilleriet för mig. En annan känsla jag får är att den känns liite för perfekt, lite för rätt, när den har så många saker från bloggarnas wishlists. Förstår ni hur jag menar? Även om jag nu får den känslan så finns det mycket fint som jag gillar ändå. Väggfärgen i vardagsrummet till exempel.

via entrancemakleri

I also like the big plants, the low bench and that the room feels like it is planned for spending time together and not just for watching tv.

/// Jag gillar också de stora växterna, den låga bänken och att rummet känns som det är möblerat för att man ska umgås inte bara efter en tv/tv tittande.

via entrancemakleri

Oh that big window!

/// Det stora fönstret!

via entrancemakleri

I also like that the sofa and the wall almost have the same color. Even though I would have mixed the pillows with some in an another material.

/// Att soffan och väggfärgen går ton i ton var väldigt fint tycker jag. Även om jag hade valt att blanda ut kuddarna med några i ett annat material än linne.

via entrancemakleri

Next is the bedroom. I like that the chair gives a bit of color. And not too surprising it’s a autumn mustard and in velvet.

/// Vidare till sovrummet. Här gillar jag att man valt lite färg i och med stolen. Och kanske inte så oväntat med en höstig senapsgul färg, och i sammet.

via entrancemakleri

via entrancemakleri

You can’t talk about the workspace and not mention the window. Here I also like the mix of different materials: velvet, marble, steel, and rattan. Collecting all the russian dolls under one bell jar is an idea I’m going to steal right away.

/// Arbetsrummet kan man ju inte prata om utan att nämna glaspartiet. Här gillar jag också blandningen av olika material: sammet, marmor, stål och rotting. Att samla alla små ryska dockor under en glaskupa är en idé jag kommer att stjäla rakt av.

via entrancemakleri

And finally the hallway. I don’t know how practical it is with a big hairy white rug in a hallway, but it sure gives a homey feeling to the place.

/// Avslutningsvis hallen. Jag vet inte riktigt hur praktiskt det är med en stor lurvig, vit matta i en hall men det ger onekligen en ombonad känsla.

via entrancemakleri

fo: entrance mäkleri | Anders Bergstedt

ON THE WISHLIST

bookstands rock it

Todays craving are these book stands called Rock-it from Granstudio. Love!

/// Dagens vill-ha är dessa bokstöd, Rock-it från Granstudio. Kärlek!

fo: bolia

DIY – BOXES

Something that makes me frustrated is all the tiny bits and bobs that really doesn’t have a special place but seems to be everywhere (but you can’t find it when you actually need it). Like paperclips and things like that. So I desided to make these tiny boxes to hopefully get a little more organized. If you want one too, here comes a tutorial.

/// Jag blir så frustrerad över alla små gem och klämmor som egentligen inte har någon speciell plats men som ändå finns överallt (men som man ändå inte hittar när man letar) så jag bestämde mig för att göra små askar för att förhoppningsvis få lite mer ordning. Om du också vill ha likadana så kommer här  i vanlig ordning en beskrivning.

diy box

diy box

For this you need:

→ carton
→ glue
→ a ruler
→ a pencil
→ a pair of scissors
→ eraser (If you are using a carton with light color)

/// Till detta behöver du:

→ hobbykartong
→ lim
→ linjal
→ blyertspenna
→ sax

Ev:
→ sudd (om du använder en  ljusare kartong)

diy box

This is how you do it:

Draw these figures on your carton (in centimeters). Then cut them out.

/// Rita och klipp ut två figurer på kartongen med dessa mått. Måtten är i cm.

diy box

Then you measure a bit more.

/// Sedan ritar du lite till.

diy box

Cut it out like the picture shows.

/// Klipp som bilden visar.

diy box

Time to fold. Fold along all lines, and fold them towards you. Except the line where the white dots are, that line you fold backwards/away from you.

/// Nu är det dags att vika. Vik längst alla linjer, och vik dem mot dig. Förutom den linjen som är vit på bilden, där viker du från dig.

diy box

Like this. ↓ You can now also erase all the pencil lines.

/// Såhär. ↓ Om du använder en ljus kartong så kan du nu också sudda bort alla blyertsstreck.

diy box

Glue the box together by folding the tiny flaps in the bottom inwards..

/// Limma ihop asken genom att vika in de små flikarna i botten…

diy box

.. . then you fold the flap on the side so that you get that one on the inside..

/// … sedan stoppar du in fliken på sidan av asken på insidan…

diy box

..and finally, the big flap at the bottom.

/// .. och så sist, den stora fliken i botten.

diy box

Like this.

/// Såhär.

diy box

Before you glue the upper part of the box, cut away a few millimeters of the top flaps.

/// Innan du limmar ihop övre delen på asken så klipp bort ett par millimeter på den översta flikarna.

diy box

Then you fold these flaps (the top ones) inwards and glue them onto the sides.

/// Sedan viker du in dessa flikar (de övre) och limmar fast dem på sidorna.

diy box

After that you fold the lower flaps inwards and glue those too. Now you are finished with this part.

/// Sedan viker du in de nedre flikarna och limmar fast dem också. Nu är denna delen klar.

diy box

Over to the other piece of carton, the one that will work as a cover. Fold along the lines, (if you use a lighter colored paper erase all pencil lines), glue the two ends together, slide the box into the cover and you are done!

/// Så till den mindre biten, den som ska fungera som fodral. Vik längst med alla linjer, sudda eventuellt bort blyertsstreck och slutligen så limmar du ihop kortsidorna. Trä asken i fodralet, och du är klar!

diy box

diy box

diy box

diy box

Spara