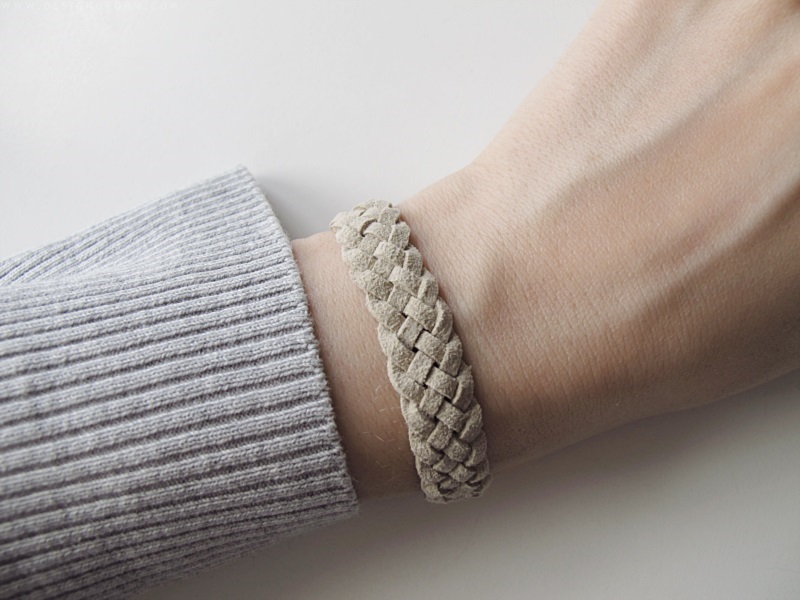
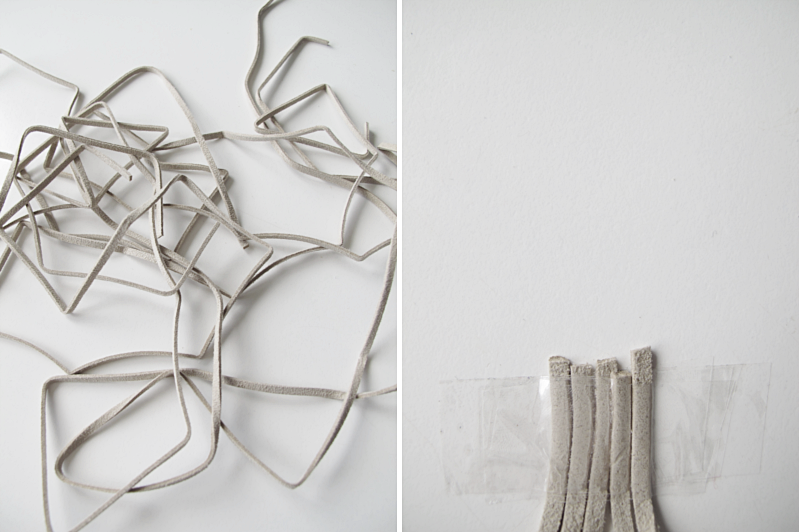
Today I’m going to show you how to make a five-strand-braid. First you want to attach the threads to a plane surface.
/// Idag tänkte jag visa er hur man gör denna fläta med fem snören. Börja med att fästa snörena på en plan yta.
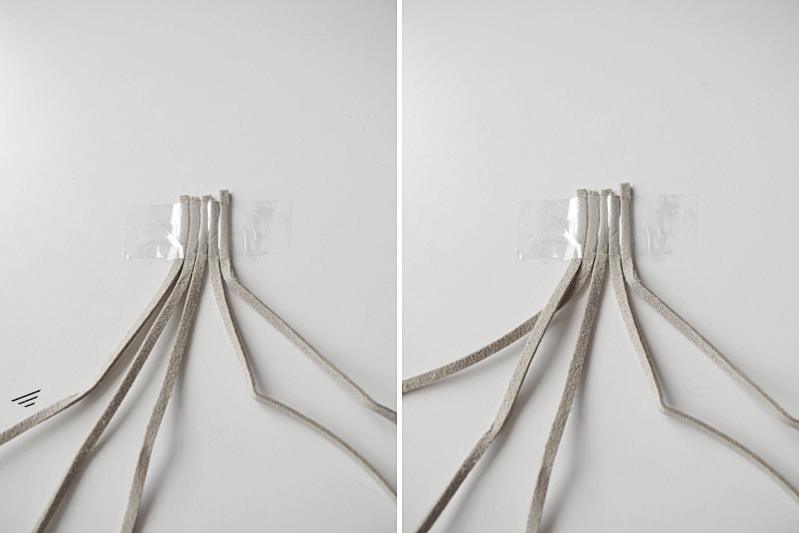
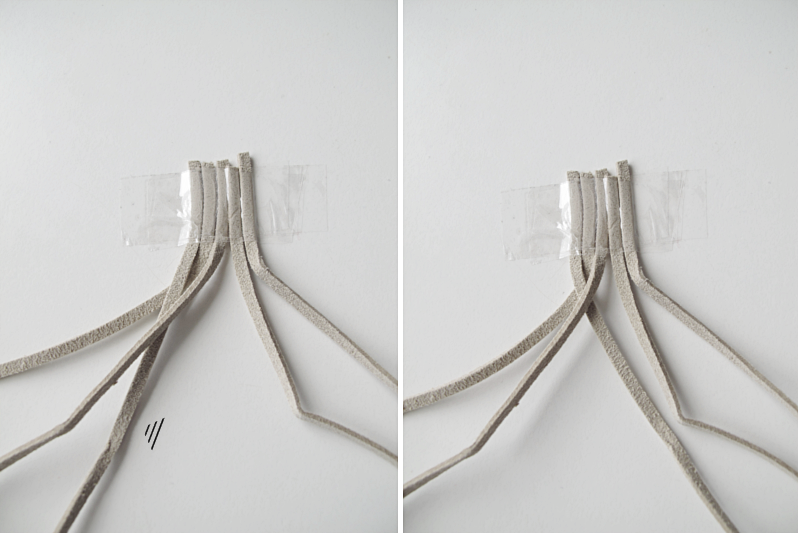
Divide the threads so that you have three on the left side and two on the right. Then start with the left side: Take the thread with the arrow, and place it over the thread next to it.
/// Dela upp snörena så att du har tre på vänstra sidan och två på högra. Så är det dags att börja på vänster sida: Ta snöret med pilen, och lägg den över snöret bredvid.
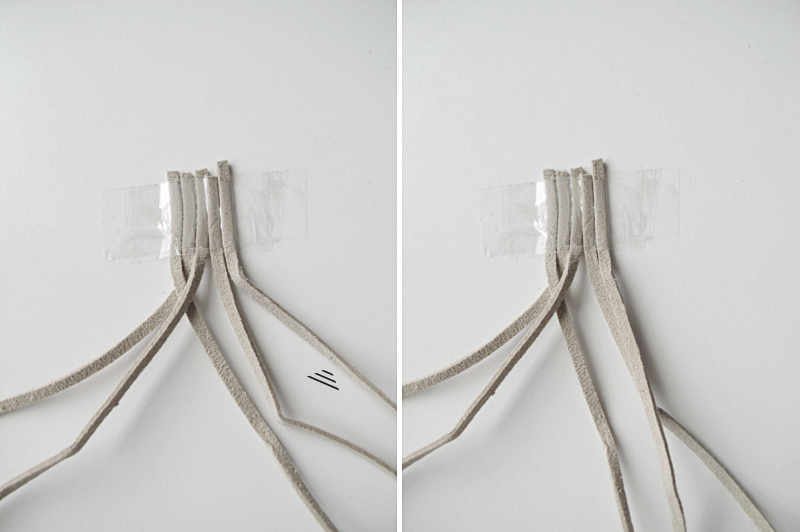
Take the thread with the arrow and place it over the thread to the left.
/// Ta snöret med pilen och lägg den över snöret till vänster.
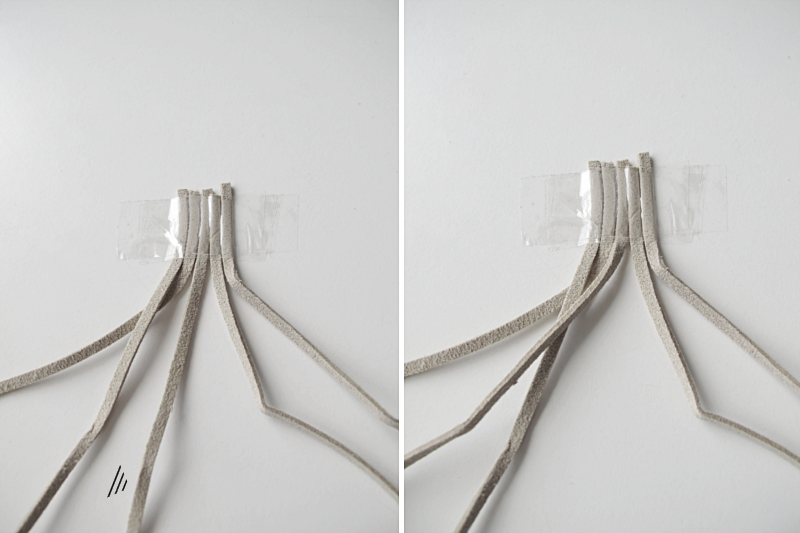
Take the thread with the arrow and move it over to the right side.
/// Ta snöret med pilen och flytta över den till höger sida.
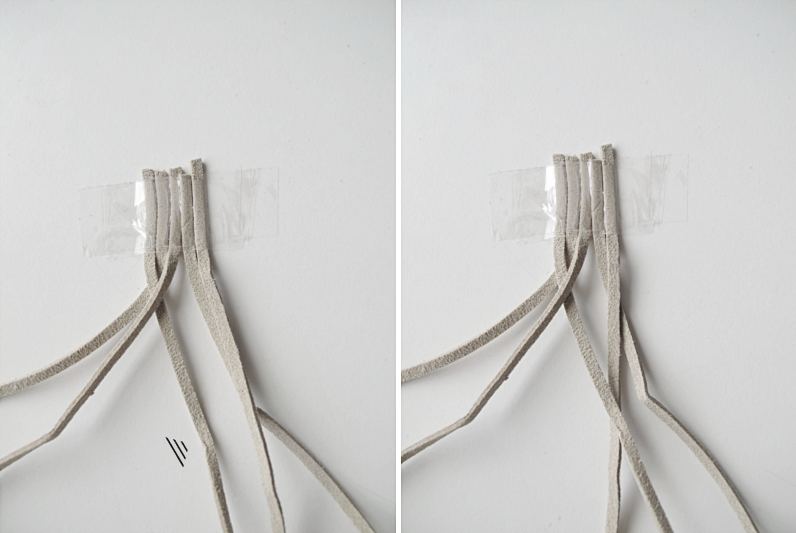
Then continue with the right side. This is actually the same as we did on the left side. Only mirrored. Take the thread with the arrow and place it over the thread next to it.
/// Och nu fortsätter vi på höger sida. Du ska göra precis som vi gjorde på vänster sida. Bara spegelvänt. Ta snöret med pilen och lägg den över snöret bredvid.
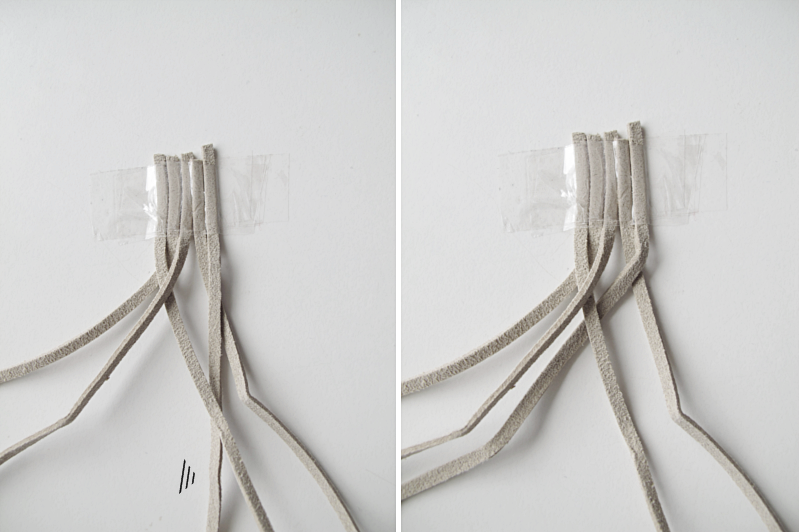
Take the thread with the arrow, and place it over the thread to the right.
/// Ta snöret med pilen, och lägg den över snöret till höger.
Move the thread with the arrow over to the left side and start from the beginning again. (from: ..start with the left side ). Repeat these steps until you have the length that you want. If you’re making a bracelet you can use one of these as a lock. Good luck!
/// Flytta över snöret med pilen till vänster sida och starta om från början igen. (från: ..börja på vänster sida.) Så alternerar du dessa sidor tills det att du har den längden du vill på flätan. Om du vill använda flätan som armband kan du använda dessa som lås. Lycka till!


McKenna Louise Ryan says:
I have to make this!! I would like to make one that is a key chain sort of deal. Thanks for the DIY! xx. McKenna Lou
August 12, 2013 — 18:16
designoform says:
You’re welcome! :)
August 12, 2013 — 21:13
isabelle zejlon says:
Jättefint, ska prova detta!
August 13, 2013 — 18:22
designoform says:
Det tycker jag! ;)
August 13, 2013 — 20:17
Petra says:
Så fint! Vart köper man den typen av platta läderband av den mocka-kvaliteten?
Kram Petra
August 13, 2013 — 20:18
designoform says:
Tack! Jag köpte mina på http://www.pandurohobby.se. Prova att söka på “mocka” där så kommer det upp flera varianter.
August 13, 2013 — 22:01
Lubica says:
Cool DIY…
http://lttreasure.blogspot.co.uk/
August 13, 2013 — 20:56
designoform says:
Thank you!
August 13, 2013 — 21:55
Petra says:
Hej. Tusen tack!
Jag tänkte prova att göra servettringar av denna teknik. Det hade nog varit snyggt. Frågan är bara hur man ska avsluta det utan att det blir klumpigt på något vis…jag får klura på den nöten! Tack för DIY!
Ha en fin dag!
Petra
August 14, 2013 — 09:16
designoform says:
Vilken bra idé! Kanske går att limma ihop sidorna med en tvärgående tygbit i samma färg.
Fin dag på dig med!
August 14, 2013 — 09:51
onel says:
Thanks so much for the detail pictorial instructions. The leather bracelet is beautiful :)
August 16, 2013 — 06:43
designoform says:
Thank you! I´m happy you like it!
August 16, 2013 — 14:30
raghad says:
thank you so much *^*
it’s looks perfect
August 16, 2013 — 15:11
designoform says:
You’re welcome! ;)
August 16, 2013 — 16:49
Monira Mogrin says:
Hi , thanks 4 the pictorial dude .
You didn’t mention how long are the threads ? If I’ gonna make a bracelet how long do I need ?
August 17, 2013 — 02:33
designoform says:
That you have to figure out yourself. It all depends on what kind of thread you are using, and how big or small wrists you have.
August 19, 2013 — 18:33
Carol Ferretti says:
I don’t see how the bracelat is finished and closed.
September 3, 2013 — 20:14
designoform says:
It all depends on which kind of lock you’re using. One way is to put a tiny bit of superglue between the threads and then on the lock.
September 4, 2013 — 10:51
Megan says:
Wonderful! But how to you finish it into a bracelet?
January 1, 2014 — 23:27
designoform says:
If you use the lock I used (the link in the end of the post) you just cut the threads, put some superglue in the lock, and gently push the threads in the lock. And wait for the glue to dry. And that’s it!
January 2, 2014 — 08:46
Gabriela Liberato Santos says:
How long is the length?
kindly,
Gabi
June 28, 2014 — 23:32
designoform says:
It’ s hard to say in advance, it all depends on how wide your wrists are and what kind of thread you are using. But the advice I can give you is to use a much longer thread than you think.
June 30, 2014 — 10:05
Laurie says:
Thanks, going to use the same technique to make a belt!
January 3, 2015 — 16:17
Courtney Weretka says:
I understand how to do the braid part but I do not understand how to fasten the ends to make it into a bracelet. How did others do it?
January 26, 2015 — 23:43
Kelly says:
Love the bracelet! The link for the lock takes me to a foreign, non-English site. Do you have a link for an English or American site for locks? Thank you!
March 12, 2015 — 14:01
Liyzsa1 says:
Amazing! I really want to try this. How long do the stands roughly need to be?
September 10, 2015 — 12:05
lol says:
WHAT!!!this is SOOO CONFUSING!!!!
December 8, 2015 — 04:27
Ana Mª Barrero Morientes says:
Cuánto hilo se necesita?
June 7, 2016 — 08:16
designoform says:
It depend on what kind of thread you are using, and how wide your wrist is. But a tip is to use longer threads then you think :)
June 8, 2016 — 14:57
Arpita says:
That really looks very good. I’m going to try to make one.
August 10, 2016 — 15:37
designoform says:
Thank you! :)
August 10, 2016 — 16:19
Linda says:
Thank you so much!! I’ve been wanting to do a braid like this for a long time. I will definitely try this. I don’t think I’ll have any trouble. You’re tutorial makes it look so much easier than I thought. Thank again…
September 7, 2018 — 03:27
Romi says:
Like to see how to start and end on the bracelet.
September 25, 2016 — 16:34
designoform says:
You can use one of these as a lock:
http://www.pandurohobby.se/Katalog/10-Smycken-Accessoarer/1010-Grundmaterial/101045-Avslutningshylsor-krymparlor-klammor/1/311485-Klammor-silverfarg-17x7mm-6st
Or one of these:
http://www.pandurohobby.se/Katalog/10-Smycken-Accessoarer/1010-Grundmaterial/101045-Avslutningshylsor-krymparlor-klammor/1/311207-Klamavslutningshylsa-10mm-10p
September 26, 2016 — 17:03
magda says:
I am very confused with the instructions, when it said “to the left” the picture shows the thread to the right (?)
Thank you
December 14, 2016 — 09:11
designoform says:
I’m not quite sure which picture you mean? Is it where it says “Take the thread with the arrow and place it over the thread to the left”?
December 30, 2016 — 17:49
Mardi says:
Was confusing at the beginning but i got it right. Thanks. It’s beautiful. Love from South-Africa
February 23, 2017 — 09:03
designoform says:
You’re welcome :)
February 24, 2017 — 12:10
Farmer white says:
Always wanted to learn braiding
After seeing this I am read
You are great
December 1, 2017 — 07:57
Stanley says:
This looks great and I must try to make one. Thank you for your generosity.
February 9, 2018 — 16:46
CC~ says:
Thank goodness for this!! feel like a true dingbat! I’ve been working a 17 strand synnet to get this very pattern – on the *other* side of the synnet! Your tutorial will save me $ and ⏳!!
Very pretty! I will be using this as a base braid for my other projects, too!!
Thanks, again!
September 23, 2018 — 21:46
Emily Macedo says:
What kind of specific thread are you using in the picture?
September 29, 2018 — 18:47
Joyce says:
Hi . I am wondering how to finish this off ? Thank you
January 31, 2019 — 15:30
Sweta says:
How to finish this weave give some tips
June 22, 2019 — 08:58
Tapora says:
How long are your laces before braiding.
May 9, 2020 — 20:01
Sarah says:
Omg this is beautiful! I’m going to try to adapt it to flat cords for a dress I’m making right now. Literally the pinned pieces are in my lap… I got so excited when I saw some comments in Norwegian and I was able to pick out words I know. I’m very much a beginner learning the language.
Tusen takk!
June 20, 2021 — 03:13