tree

trees

I recieved a question if I could make a tutorial on these trees that I showed on instagram. So here you go:

/// Jag fick en fråga hur jag gjorde dessa träd, som jag visade på en bild på instagram, och jag lovade en liten tutorial här på bloggen. Så här gjorde jag:

First you draw 4 circles. With the diameters 10,8,6 and 4 cm. And cut them out. Take one of the circles and fold it in half. ↓ /// Börja med att rita 4 cirklar med diametrarna 10, 8, 6 och 4 cm. Klipp sedan ut dem. Börja med en cirkel och vik den på mitten. ↓

trees

Unfold and fold it sideways. Turn it so it looks like this. ↓/// Vik upp, och vik den sedan åt sidan. Vänd så att den ser ut så här. ↓

trees

Fold it again. This time you take the top part and fold it towards you. Unfold, and it should look like this. ↓ /// Vik den igen. Denna gång tar du översta delen av cirkeln och viker den mot dig. Vik upp, och cirkeln ser ut så här. ↓

trees

Push the sides to each other, so it takes the shape of a piece of cake. Now you´re finished with that circle. Do the same to the other circles too. ↓ /// Tryck ihop sidorna mot varandra, så att tårtbitsformen kommer fram. Nu är du klar med denna cirkel. Då kan du göra samma vikning på de resterande cirklarna. ↓

trees

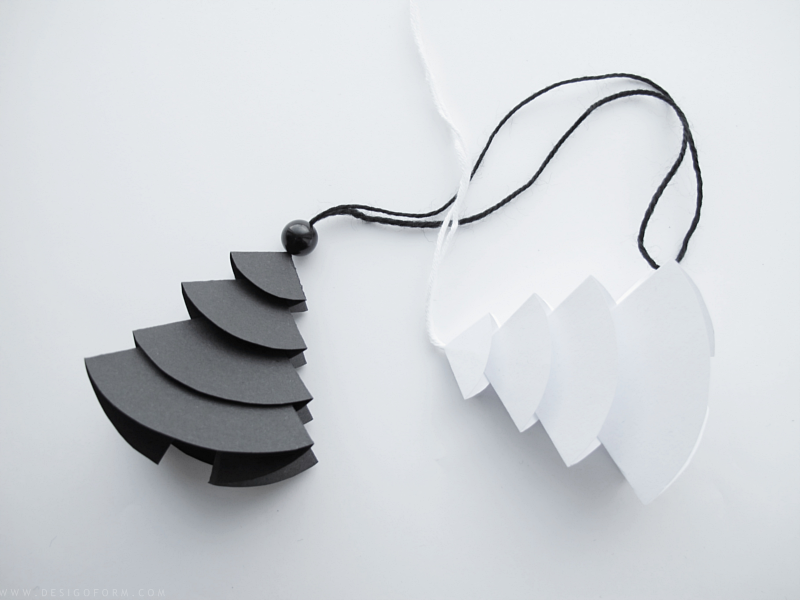
Cut a piece of yarn and tie a knot to tie the two ends together. Cut a small hole on the top of the paper and pull the yarn through the hole. You want the knot on the bottom side. ↓ /// Klipp en liten bit tråd och knyt ihop de två ändarna. Klipp ett litet hål i toppen och trä snöret igenom. Trä så att knuten kommer på undersidan. ↓

trees

Tie another knot on top of the paper and attach the other circles too. Once you´re finish you can end with a bead as a tree topper or just leave it.  Good luck! /// Knut ännu en knut på ovansidan av papperet. Sedan är det bara att trä på resterande cirklar på tråden. Och du är klar. Lycka till!

trees


Posted

in

by

Tags:

Comments

32 responses to “tree”

  1. Åh va fina! Och vilken härlig blogg du har.

    1. designoform

      Tack och tack! :)

  2. Vilka fina! Så mycket inspiration man får här! Har tipsat om din blogg på min, hoppas det är ok =)

    Fortsatt trevlig helg/Annelie

    1. designoform

      Å tack! Vad glad jag blir att du gillar! Självklart är det ok

      Trevlig helg på dig med… det lilla som nu är kvar :)

  3. SO CUUUUUTE! Thanks for sharing! I am going to do with my son :DD

  4. Andrea Williams

    Awesome ! yet simple – will try with my Kindergarteners – Thanks a bunch ! :)

    1. designoform

      It looks harder than it is :)

  5. […] z origami gwiazda z origami choinkowe bombki bombka z pasków Jak znajdziecie fajne pomysły na ozdoby świąteczne to dajcie […]

  6. Charlotte from AZ

    This is absolutely gorgeous!! …and so very kind of you to do it in the English language too… thanks so much for the great tutorial! I will be trying this very soon. Christmas will be here before we know it!

  7. […] en revanche, contraint à réduire l’encombrement des sapins, je suis alors tombé sur ce tuto (Pinterest mon amour!) qui tombait à pic car la base était la même que mes sapins pour Prima! […]

  8. […] 3 ingredient fudge | printable holiday envelopes felt Christmas tree pins | printable gift tags | paper Christmas trees printable wrapping paper | cosy bear card | printable gift […]

  9. […] på undersiden og oversiden av hver del. Fortsett slik til alle 4 er satt sammen. // Images: Via //  Da har det blitt et fint juletre. Treet kan også dekoreres med en perle på toppen […]

  10. surabhi

    This is so simple! Thank you so much

  11. […] Deze kerstbomen zijn heel makkelijk om te maken. En zien er qua vorm erg strak uit, zeker in deze twee kleuren. Ik vond het idee voor deze hangers hier. […]

  12. I just love this idea, a lovely simple design and low budget too!

  13. lorena

    fabulosos!!! faciles de hacer en la escuela. gracias!!!!

  14. Lise

    De er så fine! Tusind tak for instruktionen. ❤️

  15. Kasia

    Wonderful idea – thank you so much! Truly enjoying making them with all my kids (5 to 11) :-)

    1. designoform

      Thank you :) These DIY are the best. Easy to make but turns out great!

  16. […] Trees/Wreath: Semi-circular paper tree […]

  17. Dadeuse

    Bravo, ça me plaît et je vais le faire comme DECO individuelle dans l’assiette avec la serviette et du fil de fer de fleuriste
    Merci

  18. Dorte Lundberg Jeeppesen

    Hvor er de fine – tak for din tutorial.

Leave a Reply

Your email address will not be published. Required fields are marked *

We use cookies to personalise content and ads, to provide social media features and to analyse our traffic. We also share information about your use of our site with our social media, advertising and analytics partners.
Accept
Decline