DIY BRACELET

armbandet

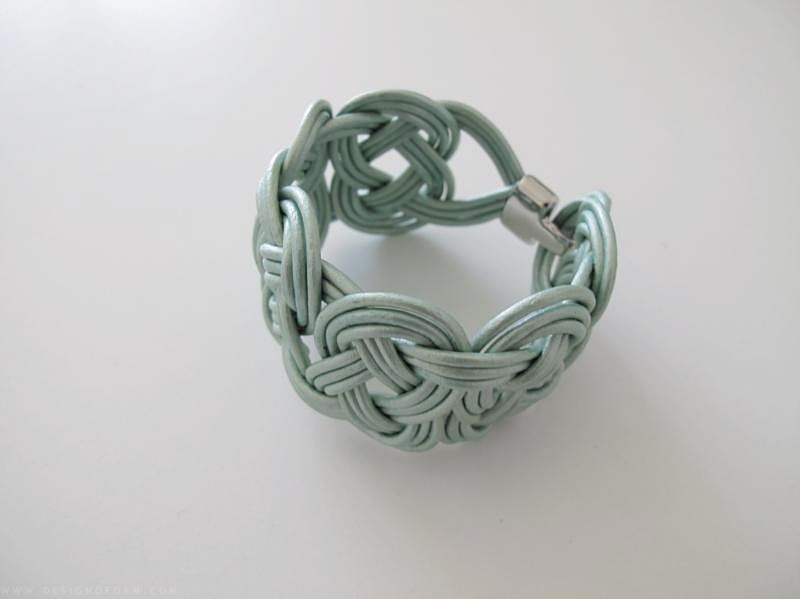
Time to make a braided bracelet. In this tutorial I used one thick thread, because it is easier to show what I am doing that way. But once you have the hang on the technique, you can use three thinner leather threads to get one that looks like the picture above. I used three threads, 2mm thick and about 1.65 m long. But make it a little bit longer just to be on the safe side.

/// Nu ska jag visa er hur man gör ett flätat armband. Jag har här använt ett tjockt snöre, för att det är enklare att visa vad jag gör. Men sen när ni har fått kläm på tekniken så kan ni använda tre stycken tunnare lädersnören. Då kommer armbandet se ut som på bilden ovan. Jag använde tre snören som var 2mm tjocka och ungefär 1.65 m långa. Men gör det lite längre bara för att vara på den säkra sidan.

armband

Start by finding the middle of your thread and  mark it with a piece of tape. Then take the thread to the right and make a bubble under the left thread. Then take the left thread and slide it under and over the bubble. See the pictures. When you´re finished pull the ends. You might have to adjust the thread as you go. This is part one.

/// Börja med att hitta mitten på ditt snöre och tejpa fast den på bordet. Sedan tar du tråden till höger och gör en bubbla under den vänstra tråden. Ta sedan den vänstra änden och trä den under och över bubblan. Se bilderna. När du gjort det klart, så dra i de båda ändarna. Du kommer nog att behöva justera lite eftersom. Detta är del 1.

armbandets

Now it´s time for part two. Make a bubble under the right thread using the left one. Then take the right thread and go under and over the bubble. Once again see pictures. And when you´re done. Pull the ends.

/// Nu är det dags för del 2. Använd den vänstra tråden och gör en ny bubbla under den högra. Ta sedan den högra änden och trä den under och över bubblan. Åter igen se bilderna. Och när du är klar. Dra i ändarna.

armbandets

Then start over with part one again, and then part two. Make six or seven parts, depending on how wide your wrist is, then cut the threads off, and glue them on the lock. And you are done!

/// Och så börjar du om med del 1 igen och sedan del 2. Varva tills du har 6 eller 7 delar beroende på hur bred handled du har. När du har gjort så många du behöver, klipp av ändarna och limma fast dem i låset. Klart!

armband


Posted

in

by

Tags:

Comments

27 responses to “DIY BRACELET”

  1. I’ve been wondering how to make these knotted bracelets. Thank you for the tut!

    1. Joy Maxwell

      Thank you. Xx

  2. Åh vad snyggt. Detta ska jag ta och testa någon dag.
    Glad Påsk // Tess.

    1. designoform

      Glad påsk på dig med!

  3. Så sjukt snyggt, tack för tipset!

  4. […] DIY BRACELET | DESIGN AND FORM […]

  5. amazing DIY…thank you for sharing…

    http://lttreasure.blogspot.co.uk/

  6. Inspierande inlägg och ett mycket vackert armband!

  7. Å så snyggt! Tack för att du visade hur man gjorde!!

    Fortsatt trevlig påsk!
    Annelie

  8. What a lovely tutorial! It is very well explained. I love this. I am so glad I stumbled upon your blog. I love the design, it is so lovely. I will definitely be following you on Bloglovin! xx. McKenna Lou
    http://www.lynnandlou.com
    p.s. Be sure to enter in our Lisa Leonard $50 giveaway! Today is the last day. http://www.lynnandlou.com/2013/03/double-outfits-lisa-leonard-giveaway.html

  9. Lovely!!
    I just have to try this, i’ve been looking for something like this for summer. Yess!

    Minna.K
    http://minna-karoliina.blogspot.fi/

  10. […] Per accedere al tutorial clicca qui […]

  11. Bellissimooooooooo, proverò a farlo con altri fili!
    Carmela by riciclando.it
    FB
    http://www.riciclando.it

  12. Bellissimoooooooooo proverò a farlo con altri fili!
    Carmela by riciclando.it
    http://www.riciclando.it
    FB

  13. Beatifull. I found your site from Elsas-blog. I think I could use this DIY topic for something.

  14. […] How about a DIY Bracelet? There are tons of tutorials for different types out there, but I really love this one from Design Form. […]

  15. Kellie

    Lovely! Thank you so much for the tutorial!

    1. designoform

      You´re welcome :)

  16. […] DIY project and photo credit to designoform.com […]

  17. […] Denne DIY viser skridt for skridt, hvordan du laver et flot, flettet armbånd. Billederne er dejligt overskuelige og teksten godt forklaret, så alle kan være med. Se den fulde DIY her. […]

  18. so cute, i like it, thank you for the tutoriel :)

  19. […] Dette armbånd er simpelthen så fint. Farver og tråd kan jo varieres i det uendelige, så det passer til lige bestemt den, du skal give det til. Beskrivelsen er lige til at gå til og billederne er meget udførlige, så alle kan være med. Bestemt et kig værd, hvis man overvejer at lave armbånd i julegave. DIY kan findes her. […]

  20. Cory

    I did make your bracelet and it turned out beautifully. Due to the lack of stores in my area I have to order the clasp/lock on line. Can you give me information of the one you used.. There are so many to choose from on line. Thanks for your help.

    1. designoform

      Oh there is not much to say.. This is the one I used. http://www.pandurohobby.se/Katalog/10-Smycken-Accessoarer/1010-Grundmaterial/101050-Las/1/311306-Stort-smyckelas-silverfarg
      But as you can se I only used one of the parts.

Leave a Reply

Your email address will not be published. Required fields are marked *

We use cookies to personalise content and ads, to provide social media features and to analyse our traffic. We also share information about your use of our site with our social media, advertising and analytics partners.
Accept
Decline