Menu Close

Tag: leather (page 3 of 4)

A BIT OF LEATHER

bracelet

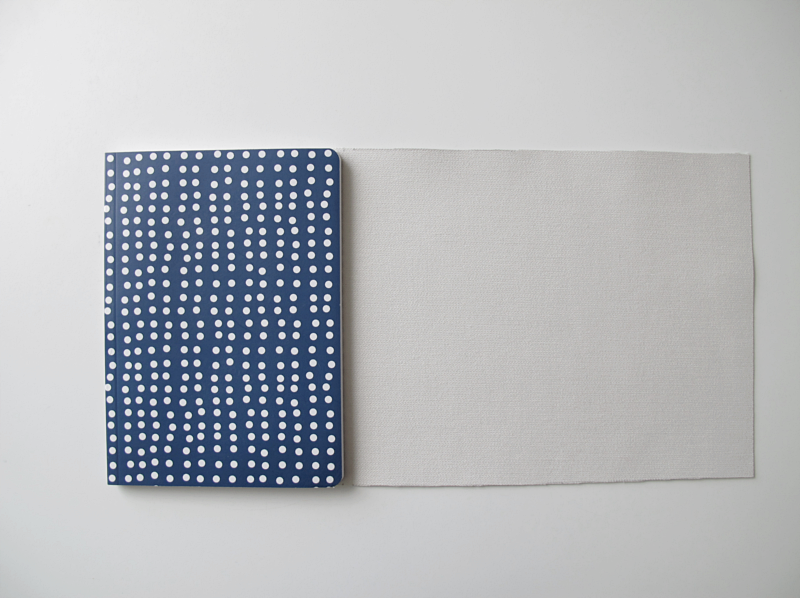
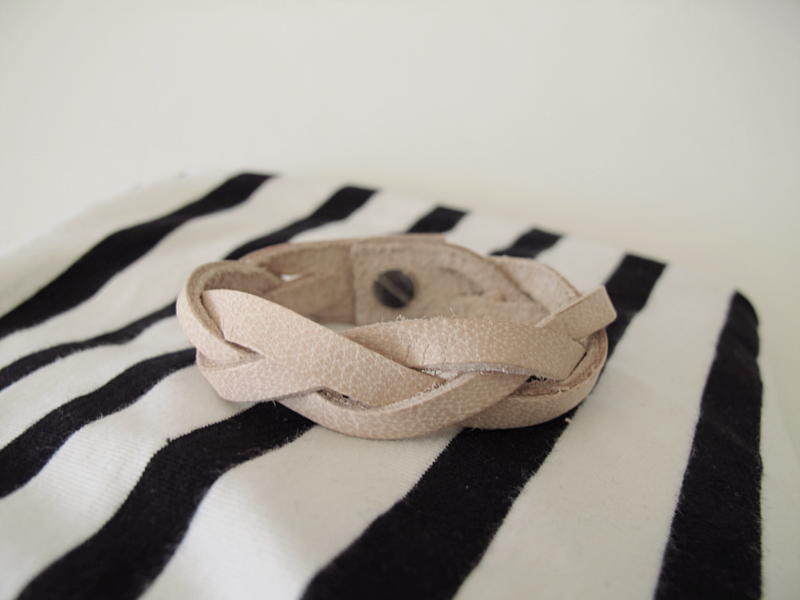
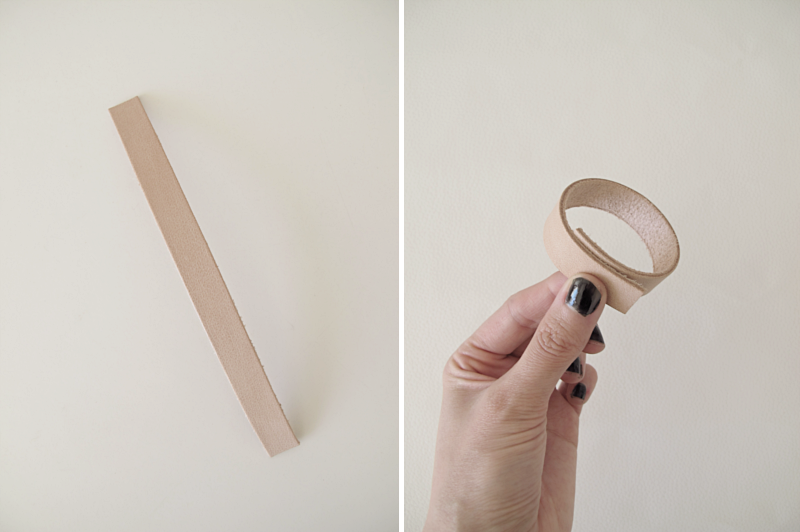
Todays diy is once again a bracelet. This time I made one in thick leather. 1. Start by cutting a piece of leather that is a bit longer that the perimeter of your wrist. 2. Here you can see how much longer I made mine. And my bracelet is pretty tight. But if you want it to “hang” more just use more leather.

/// Dagens diy är återigen ett armband. Denna gång i tjockt läder. 1. Börja med att skära ut ett band som är lite längre än omkretsen på din handled. 2. På bilden ser ni ungefär hur mycket längre jag gjorde min. Och då sitter armbandet ganska tight. Vill du ha ett lösare armband så tar du såklart mera läder.

bracelet

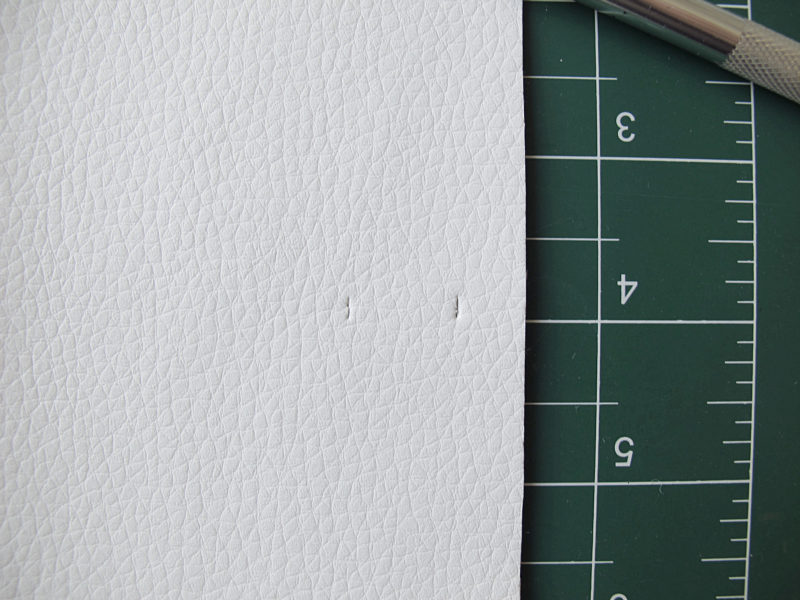
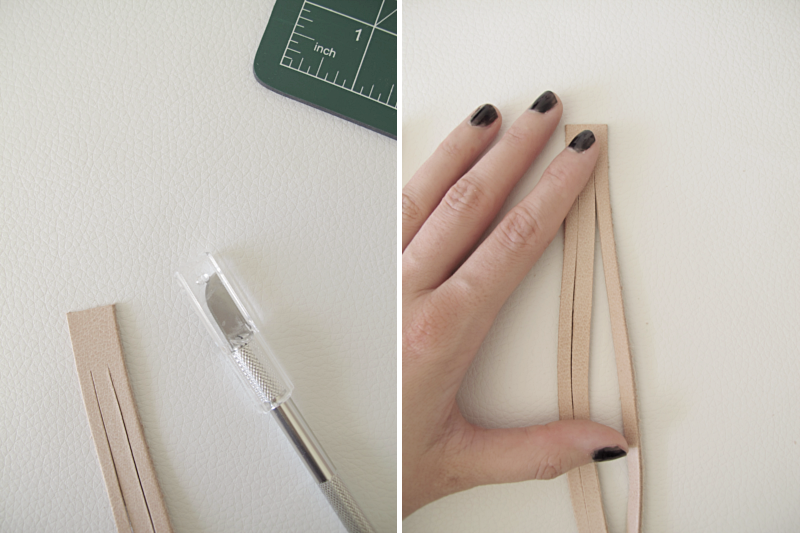
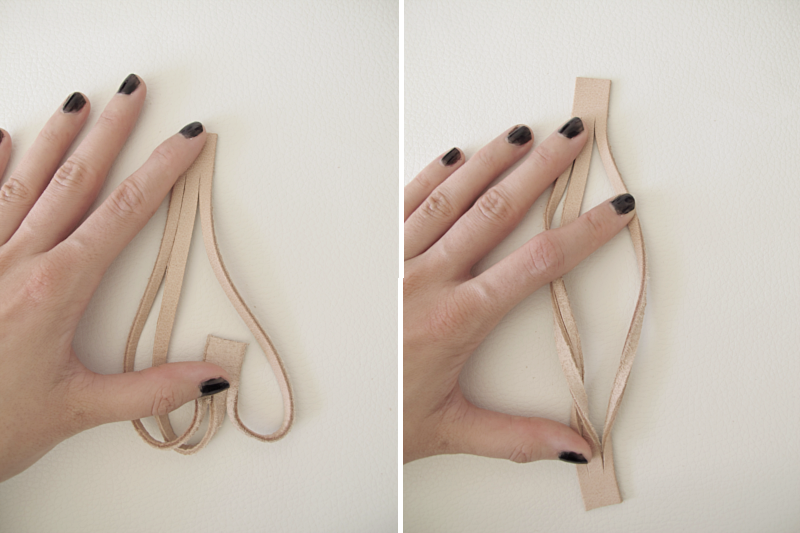
3. Cut two cuts along the bracelet. ( But be careful! It’ s easy to slip.) Leave 2cm on the top of the bracelet and about 1.5cm at the bottom. 4. Divide the threads so that you have two on the left side and one on the right.

/// 3. Skär två skåror längst med bandet. ( Men var försiktig när du skär. Det är lätt hänt att man slinter med kniven.) Lämna 2cm uppe på och ung 1.5cm nere. 4. Dela upp remmarna så att du har två på vänster sida och en på höger.

bracelet

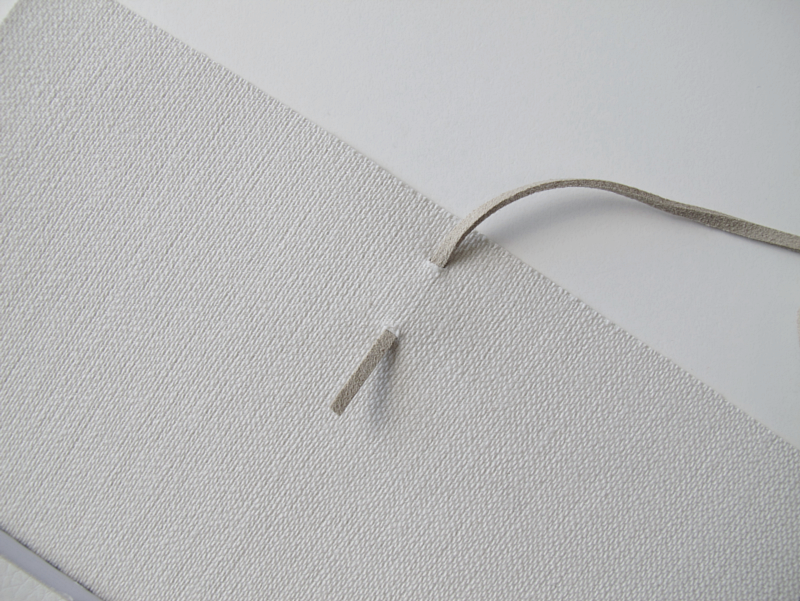
5. Then slide the bottom part of the bracelet through the hole. 6. So that it look like this.

/// 5. Trä så den nedre delen av armbandet genom öglan. 6. Så att det ser ut såhär.

bracelet

7. Adjust the upper part of the bracelet so you have the beginning of a braid. Now you have two threads on the right side and one on the left. 8. Slide once again the bottom of the bracelet through the hole.

/// 7. Fixa till den övre delen av ambandet så att du får början till en fläta. Nu har du två små remmar på höger sida och en på vänster. 8. Trä återigen nedre delen av ambandet igenom öglan.

bracelet

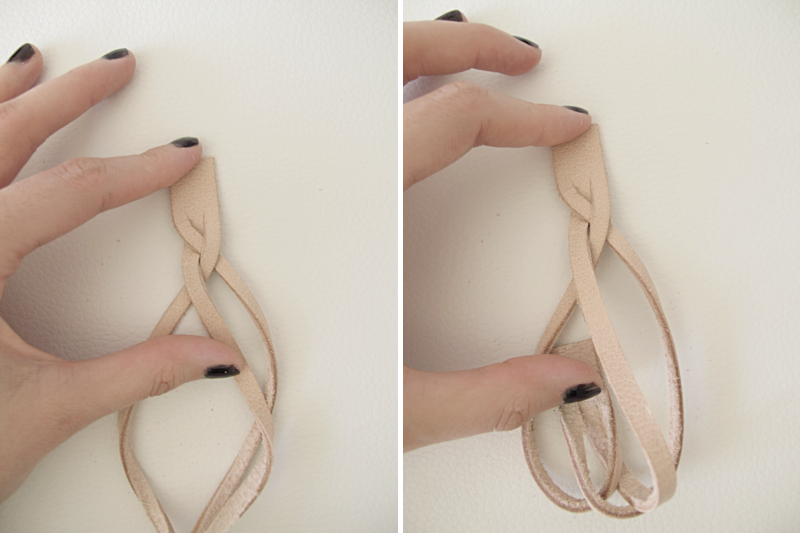
9. Like this. 10. Now we’re just going to repeat the before steps. Like in step 4 we now have two threads on the left side and one on the right.

/// 9. Så att det ser ut så här. 10. Dags att upprepa igen, precis som i steg 4 så har vi två små remmar på vänster sida och en på höger.

bracelet

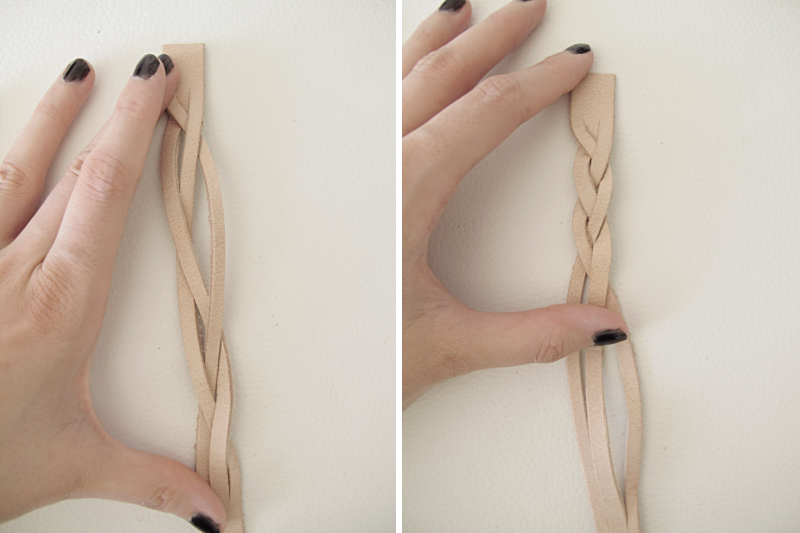
11. Slide the bottom part through the hole. 12. Now you have two threads on the right side.

/// 11. Trä nedre delen av armbandet igenom öglan. 12. Nu har du två remmar på höger sida.

bracelet

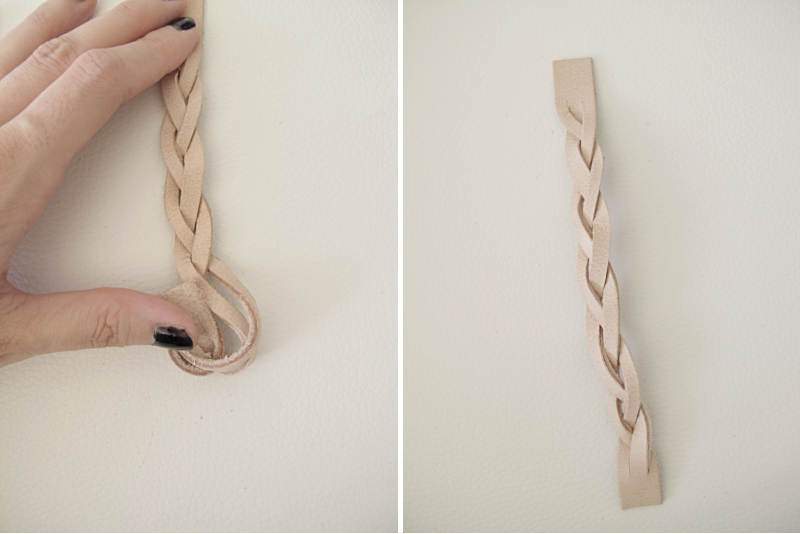
13. Slide the bottom through. 14. And you’re finished with the braid. ( If you have a longer bracelet, you might have to do another round. )

/// 13. Trä igenom den lilla slutbiten igenom öglan. 14. Och du har nu flätat klart. ( Har du ett långt armband kan du få göra en omgång till. )

bracelet

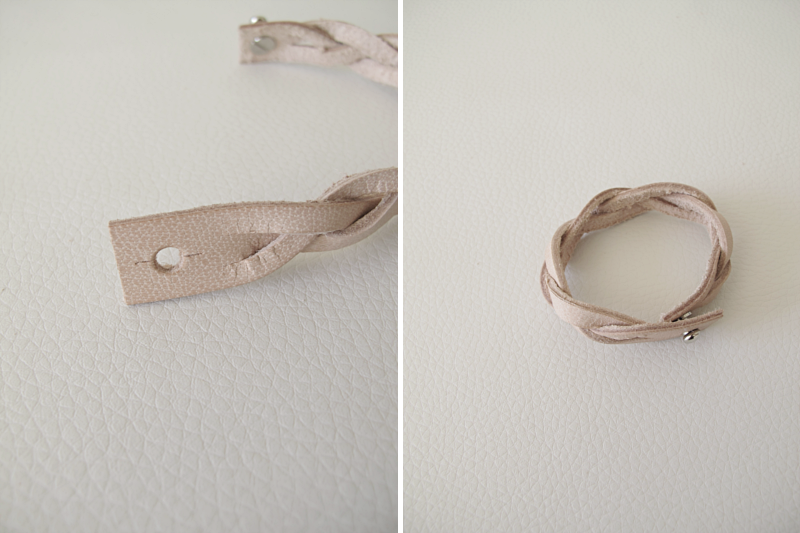
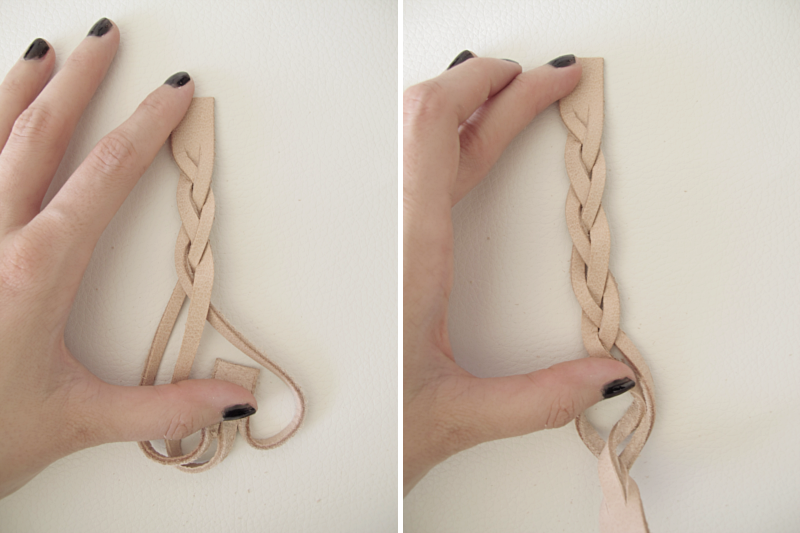
15. As a lock I used screw back button studs. 16. Make a hole as big as the screw “part” is, on the side that is 1.5cm.

/// 15. Till lås använde jag sådana här låsknoppar. 16. Gör ett hål lika stort som skruvdelen, på den sida som är 1.5cm.

bracelet

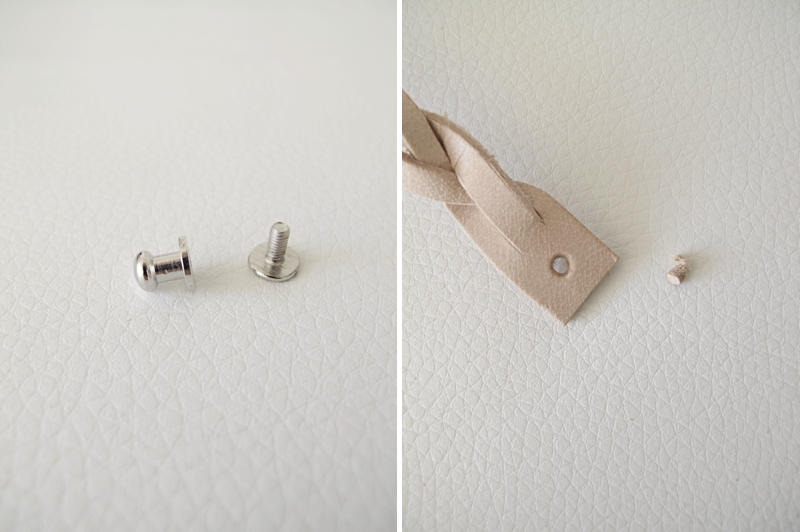
17. And attach the studs. 18. Now you want to make a hole on the other side of the bracelet. But make it a bit smaller than the head on the stud.

/// 17. Och skruva fast låsknoppen. 18. Nu ska du göra ett hål på den andra sidan armbandet. Gör hålet en liten bit mindre än låsknoppens huvud.

bracelet

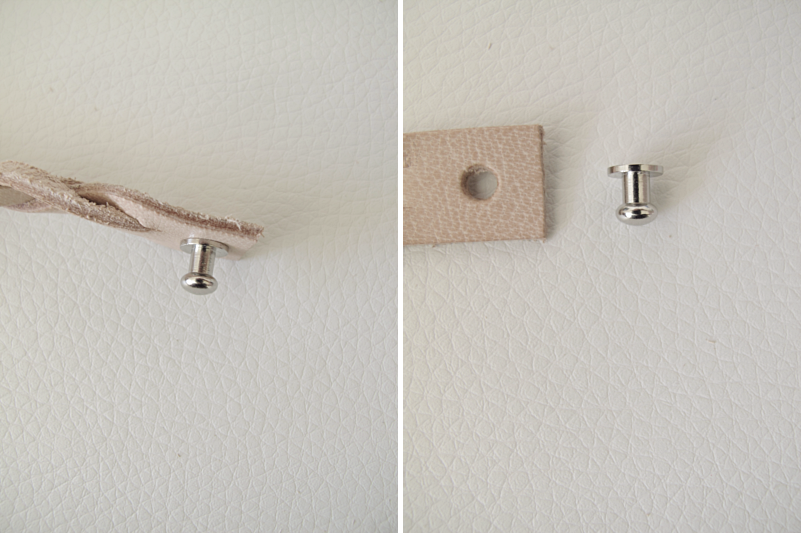
19. Cut two small cuts on both sides of the hole. Just so you can get the head through. 20. And you are done!

/// 19. Avsluta med att skära två små snitt på varsin sida av hålet. Gör de inte längre än att du kan trä över hålet över knoppen, med lite motstånd. 20. Och du är klar!

bracelet

STORAGE BOX

storage

Today I´m going to show you a diy storage box. A diy that requires no sewing or glue. Start with a piece of (“harder”) fabric, that is 48 x 43.5 cm.  Cut the corners off. The pieces you are cutting off, should be 12cm from left to right and 14 cm from the top to the bottom.

/// Idag tänkte jag visa er ett förvaringslåda diy som inte kräver att du ska sy eller limma något. Börja med en bit (lite “styvare”) tyg som är 48 x 43.5cm. Klipp bort hörnen. De bitar som du klipper bort ska vara 12cm från vänster till höger och 14 cm från toppen till botten.

storage

Then cut a 2 cm long cut in all four corners. See the picture where the purple dotted lines shows.

/// Klipp sedan ett 2cm långt jack i de fyra hörnen. Se på bilden var de lila prickade linjerna visar.

storage

Make a template out of paper. 2 cm x 14 cm. This is to help you with the “stiches” that holds the storage box together.  I did my “stiches” 1,5 cm long, and the space between them, the same. ( Here you can decide if you want your “stiches” to be smaller or longer then the ones I did. Just make sure you have enough fabric to finish.)  If you want your box to look like the one I did, make marks at 0.5 cm, 2 cm, 3.5 cm, 5 cm, 6.5 cm, 8 cm, 9.5 cm, 11 cm , 12.5 cm and 13 cm. I wanted the thread to be 0.7 cm wide, so I made a space in the middle of the template 0.7 cm wide.

/// Gör en mall av vanligt papper. 2 cm x 14 cm. Den här mallen ska du sedan använda när du ska göra hål för tråden som håller ihop lådan. Jag ville att mina “stygn” skulle vara 1,5 cm och mellanrummen lika långa. ( Men här kan du själv bestämma hur långa eller korta “stygn” du vill göra. Kolla bara innan du börjar att du har tillräckligt med tyg på slutet). Om du vill att din låda ska se likadan ut som den jag gjorde, så gör du markeringar på 0.5 cm, 2 cm, 3.5 cm, 5 cm, 6.5 cm, 8 cm, 9.5 cm, 11 cm, 12.5 cm och 13 cm. Jag ville att tråden skulle vara 0.7cm så jag gjorde även en markering i mitten av mallen 0.7 cm bred.

storage

Place the template on top of the fabric and start cutting along the shorter lines. You want the cuts to be a tiny bit wider than the thread, otherwise you cant get the thread through.

/// Lägg mallen på tyget och skär längst med de kortare linjerna. Skär dem en liten bit bredare än 0.7 cm så att du får igenom tråden.

storage

Here you can see, that I cut on both sides of the empty space. Now it´s time to make threads out of the fabric. 4 of them and make them about 16 cm long. When you´re done with that, it´s time to put the box together. Start at the bottom and make sure you have the end of the thread on the inside of the box.

/// Här kan du se att jag skurit på båda sidor om kanten. Gör sedan 4 trådar, 0.7 cm breda och ungefär 16cm långa. När det är klart kan du börja trä ihop din låda. Börja i botten och tänk på att ha trådens ände på insidan av lådan.

storage

Gently pull it through the cuts. You can use the tip of a pencil to easier get them through. When you have reached the top of the box, cut the excess part off.

/// Dra så försiktigt trådarna igenom hålen. Jag använde en blyertspenna, utan stift, som hjälp med att få tråden igenom. När du har kommit till toppen på lådan, så klipper du bara av den överblivna delen.

storage

And you are done! As you can see, I had a hard time deciding which thread I like the most. In the first picture I have used two 2mm leather cords and in the tutorial, strips of grey fabric.

/// Och du är klar! Som ni kan se hade jag lite svårt att välja tråd till min låda. Började med tygtråden för att sedan prova med 2 stycken 2mm lädersnören. (första bilden).

storage

FOR THE CARDS

cardholder

This is really not a tutorial on how to make a card holder, since I haven´t yet figured out how to get the pdf-files on the blog (so that you can print a template), but I wanted to show you how I did it anyway . First I made a template in plain paper using a card. I folded the paper in half to get the pages exactly the same. Then I cut out the template, drew it on the back of the leather, cut it out again and made holes in all four corners.

/// Det här blir inte riktigt en tutorial på hur du gör en korthållare, då jag ännu inte klurat ut hur jag får in pdf-filer på bloggen (för att ni ska kunna skriva ut en mall), men jag ville ändå visa er hur jag gjort. Först gjorde jag en mall i vanligt papper med hjälp av ett kort. Jag vek papperet på mitten för att få sidorna precis likadana. Sedan klippte jag ut mallen, ritade av den på baksidan av lädret, klippte ut den igen och gjorde hål i alla fyra hörn.

cardholder

I just used one of these and screwed the whole thing together. And done!

/// Sedan använde jag en skruvknopp och skruvade ihop det hela. Och klart!

cardholder

cardholder

Edit:

Here you have a the template: card holder diy. When you print it out make sure to change the printer settings to “no border”.

/// Nu finns PDF-filen på länken ovan. ↑ När du skriver ut så kom ihåg att sätta skrivarens inställning på “ingen marginal”.

NOTE BOOK 2 .0

notebook

notebook

I want to show you an easy way to upgrade your note book. You need a piece of (fake) leather, some glue, a thread ( I used a light brown suede thread) and a pair of scissors. Start with removing the elastic band, if you have one of those on your note book. Don´t forget to remove the small metallic pieces too.

/// Nu tänkte jag visa hur du enkelt uppdaterar en anteckningsbok. Du behöver en bit (fusk) läder, lite lim, en tråd (jag använde en beige mocka tråd) och en sax. Börja med att klippa bort gummibandet, om du har en sån bok. Kom ihåg att ta bort de små metallbitarna också.

notebook

Now you should cut a piece of the leather with these dimensions:  2x the width of your book + 2x the back + three quarters the width. And on the other length as high as your note book is.

/// Nu ska du klippa ut en bit av lädret med dessa mått: 2x bredden på din bok + 2x bredden på bokryggen  + 3/4 av bredden på din bok.

notebook

Put some glue on the front of the book. Make sure you put glue all the way to the corners. And gently put the leather piece on top of the glue and press. When that side has dried, put glue on the other side of the book and fold the piece of leather over that side too. And press. Don´t put any glue on the books spine.

/// Stryk lim på framsidan av din anteckningsbok. Var noga med att få ut limmet ända ut till kanterna. Lägg försiktigt på läderbiten och tryck till. När den sidan har torkat tar du och stryker lim på den andra sidan av boken. Och viker lädret över till den sidan och trycker till. Stryk inget lim på bokryggen.

notebook

When the book has dried you can cut two small holes on the piece that have no glue. Make the holes as wide as the thread you´re using.

/// När limmet har torkat kan du göra två små hål på den biten som inte har något lim. Gör hålen så stora som den tråd du vill använda.

notebook

Slide the thread thru the holes. And glue the end to the leather.

/// Dra sedan tråden genom hålen och limma fast den lilla änden i lädret.

notebook

And you´re done! /// Och nu är du klar!

notebook

diy leather bag

I wanted to show you how I made my (fake) leather bag. I have it on my desk, and I use it to store all the small things like paperclips, rubberbands and tape rolls that otherwise ends up everywhere.

/// Jag ville visa er hur jag gjort min lilla påse där jag förvarar alla småsaker som gem, tejprullar och gummiband som annars lätt hamnar lite varstans.

First you cut a circle and a rectangle. The measurements I used for the circle was about 13cm (diameter) and for the rectangle about 41cmx24cm. ↓

/// Först klipper du ut en cirkel, (ung 13cm i diameter) och en rektangel (ca 41cmx24cm).

Then you attach the two shorter sides of the rectangle together. I also sewed two extra seams on each side of the first seam, just to make it look nicer. ↓

/// Sy ihop kortsidorna på rektangeln, och om du vill kan du även sy två sömmar på vardera sidan om den första sömmen. Bara för att göra en extra liten detalj.

Now it´s time to sew the circle to the tube. Make sure you have the tube inside out and the backside of the circle facing up. When you have finished sewing, turn the hole thing inside out. ↓

/// Nu är det dags för att sy fast botten. Vänt tuben ut och in, så att avigsidan kommer fram, och vänd också cirkelns avigsida uppåt. När du har sytt färdigt, vänd hela påsen ut och in.

And you´re done! Now you can fold the top which way you prefer, or you can even cut a part of it off, if you rather like that. Good luck!

/// Och du är klar! Lycka till!