Menu Close

Category: DIY – OTHER (page 2 of 11)

TIN CAN MAKEOVER

tin can makeover | designoform.com

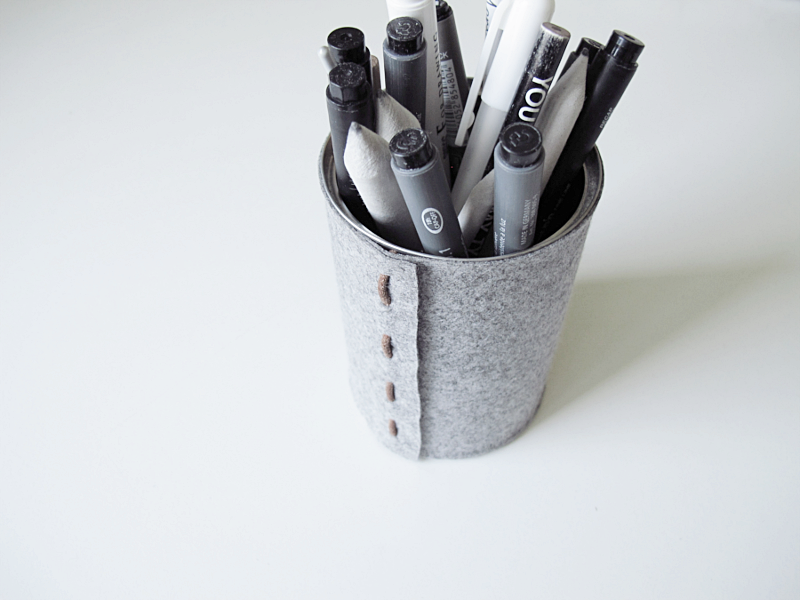
If you’ve been following the blog for a while you might recognise this DIY. Or at least the felt and leather part. I did a no sewing storage box using the same tecnique  a couple of years ago.

// Om du har följt bloggen ett tag så kanske du känner igen det här DIY:et. Eller i allafall filten och lädret. Jag gjorde nämligen denna förvaringslåda på exakt samma sätt.

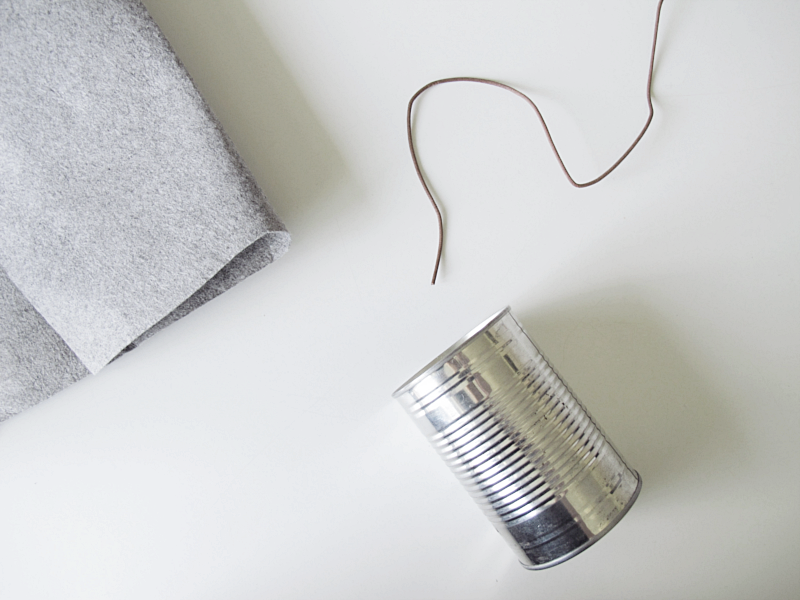
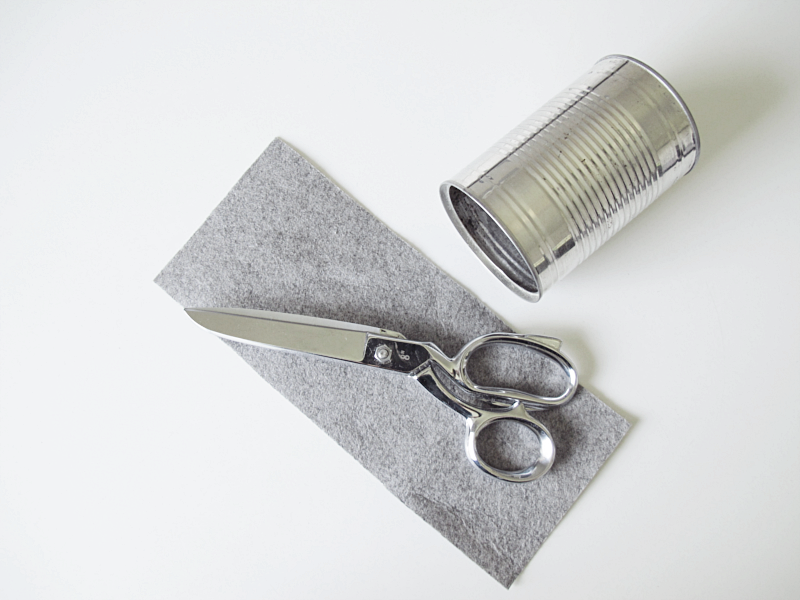
For this you’ll need:

→ Felt
→ Tin can
→ Leather thread
→ Paper knife
→ A pair of scissors
→ Paper
→ Pen
→ Measuring tape

/// Till detta behöver du:

→ Filt
→ Konservburk
→ Lädersnöre
→ Papperskniv
→ Sax
→ Papper
→ Penna
→ Måttband

tin can makeover | designoform.com

And this is how  you do it:

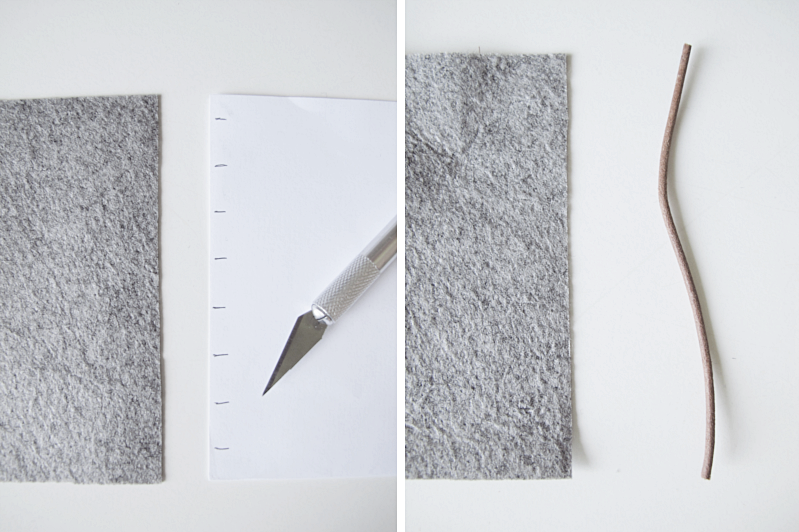
Start by measuring your tin can. Add 2cm on the circumference and then cut a piece of felt using thouse measurements (My tin can measured 10.5cm x 24cm. So I cut the felt 10.5cm x 26cm).

/// Börja med att mäta din konservburk. Addera sedan 2cm till omkretsen på burken och klipp ut en bit filt med de måtten. ( Min konservburk hade måtten 10.5cm x 24cm, Så jag klippte ut en bit som var 10.5cm x 26cm).

tin can makeover | designoform.com

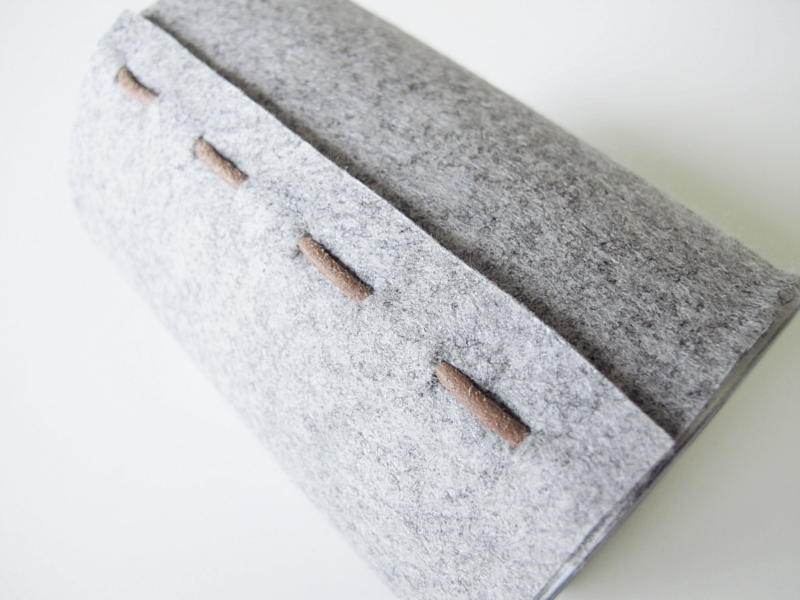
Now you are going to make small cuts on both ends of the felt. How far apart you decide. I wanted the ends of my leather thread to be on the inside (between the tin can and the felt), and I wanted the same amount of felt on both sides of  the first and last cut. That made the first cut 1cm from the edge, the next 12mm, the third 12mm and so on. When that is done you cut the leather thread a couple of millimeters longer than the hight of the tin can.

/// Sedan ska du skära små snitt i filten. Hur långt avstånd mellan snitten väljer du själv. Jag ville att mina ändar på lädersnöret skulle vara på insidan filten (mellan filten och konservburken), och så ville jag ha lika mycket filt på båda sidor av första och sista snittet. Vilket gjorde att första snittet blev ca 1 cm in, sedan nästa ca 12mm från det första, den tredje 12mm ifrån den och så fortsatte jag så hela vägen. Huvudsaken är att du gör snitten på samma plats på båda ändarna av filttyget.  När det är klart klipper du en bit av lädersnöret som är några mm längre än höjden på konservburken. (I mitt fall några millimeter mer än 10.5cm)

tin can makeover | designoform.com

Now it’s time to attach the ends of the felt using the leather thread. Do this without the tin can inside.

/// Sedan är det dags att trä ihop filten. Gör detta utan att ha konservburken inuti.

tin can makeover | designoform.com

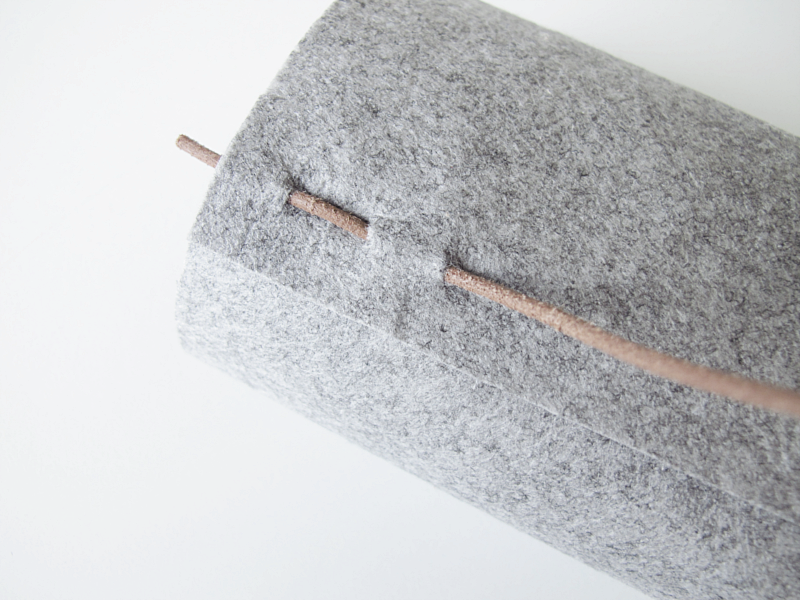
When that is done you pull the felt over the tin can. This can be a bit tricky but you can do it! Here you can see that the ends of the leather threads are on the inside. And you are done!

/// När det är klart så trär du filten över konservburken. Det kan vara lite pilligt men det går! Här ser du också att ändarna på lädersnöret är på insidan. Och du är klar!
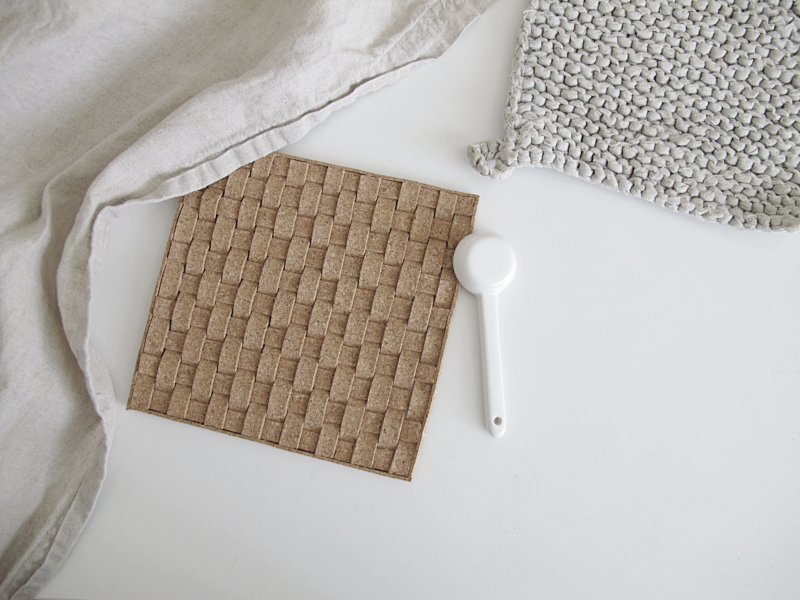
tin can makeover | designoform.com


like

These felt flippers
This braided key holder
This combined card and key holder

DIY – CORK CANDLE HOLDER

diy cork candleholder

Todays DIY is super simple, and it doesn’t take a lot of time to make.

You’ll need:

→ Cork
→ A pair of scissors
→ Glue
→ A candle

/// Dagens DIY är superenkelt  och tar inte mer än 10 minuter att göra.

Du behöver:

→ Kork
→ Sax
→ Lim
→ Ett värmeljus

And this is how you do it:

Take the candle and use it as a template to cut out a circle on the piece of cork. Make it a few millimeters wider than the candle.

/// Ta värmeljuset och använd denna som mall för att klippa ut en cirkel i korkbiten. Några millimeter större än värmeljuset.

diy cork candleholder

Cut a strip of cork as high as the cork (the circle) + the height of the candle. Glue the circle to the strip (on the inside).

/// Klipp sedan ut en remsa ur korken lika hög som värmeljuset + korkbiten som du klippt till en cirkel. Den ska vara så lång att den når runt cirkelns omkrets. Limma sedan fast cirkeln på remsans insida.

diy cork candleholder

And you are done! And remember to never leave candles unattended.

/// Och du är klar! Och kom ihåg att aldrig lämna levande ljus utan uppsikt.


like

This DIY marble light
This DIY lamp with golden foot
This minimalistic marble lamp

DIY – CARTON BOWLS

diy paper bowl

As I promised last week here you have the tutorial for the paper bowl made with carton instead. It’ s not that much different from the paper bowl tutorial, the biggest difference is that here you don’t fold the paper in half. If you want to make this bowl I suggest that you first take a peak at the first tutorial I did.

For this you need:

→ 2 squared shaped pieces of carton. Mine where 13 x 13cm.
→ A piece of regular copying paper
→ A crochet hook and a ruler (Or foldingbones. Use whatever you use to make a nice folding)
→ A pair of scissors
→ Glue

/// Som lovat förra veckan kommer här en beskrivning på hur du gör skålen i hobbykartong istället. Det är inte så stor skillnad mot den andra beskrivningen, den största är att man inte viker fyrkanten på mitten. Om du vill göra denna skål så är mitt förslag att du först tittar på hur skålen görs i vanligt papper.

Till detta behöver du:

→ 2 fyrkantiga bitar med kartong. Jag använde bitar som är 13x 13cm
→ En bit vanligt kopieringspapper
→ En virknål och linjal (Eller vikben. Använd vad du brukar använda för att göra fina viklinjer)
→ Sax
→ Lim

And this is how you do it:

Start by cutting the pieces of carton in half so that you get 4 triangles. But we are only using three of them for this. Then cut the copying paper in the same size as the triangles, and fold it like I did here (Step 2-5).

/// Börja med att klippa kartongbitarna på mitten så att du får fyra trekanter. Men vi ska bara använda tre till detta DIY. Klipp sedan kopieringspapperet i samma storlek som trianglarna, och vik det som jag gjorde här (Steg 2-5).

Diy paper bowl

Place the copying paper on top of the carton and draw with the crochet hook along the folded lines (use the ruler as a help). This leaves marks so that you know where to fold later on. Repeat on all pieces of carton.

/// Placera biten med kopieringspapper på en av kartongbitarna och dra med virknålen längst efter de vikta linjerna (använd linjalen som hjälp). Detta lämnar märken på kartongen så att du vet var du ska vika den senare. Gör likadant på alla tre kartongbitarna.

DIY paper dowl

Fold the carton along the lines. Then (instead of attaching the pieces together by sliding one corner into the other, as I did with the thinner paper) you glue the pieces together.

/// Vik kartongen längs med linjerna. Sedan (istället för att trä en spets in i en annan, som jag gjorde med den av tunnare papper) limmar du ihop delarna.

Diy Paper bowl

Then glue the bottom pieces together and you are done!

/// Limma sedan ihop bottenflikarna och du är klar!

Diy paper bowl


like

This storage box
This gift box
These mini plastic bags

DIY – PAPER BOWL

bowl

bowl

So many of you followers on Bloglovin liked the Paper pen holder I did so I thought that you might like this one too, and it’s actually a bit easier to make. No cutting or measuring at all.

For this you need:

→ 3 pieces of thin paper in the shapes of squares. How big, you decide. I did one 9x9cm and the finished bowl is about 6.5 cm wide and 2.5 cm high. I also did one 13x13cm and that turn out to be about 9 cm wide and 4 cm high.
→ Glue

/// Så många av er följare på Bloglovin gillade Pennhållaren jag gjorde, så jag tänkte att ni nog skulle gilla den här också. Den är faktiskt lite lättare att göra. Inget klippande eller mätande överhuvudtaget.

Till denna behöver du

→ 3 bitar fyrkantigt tunt papper. Hur stora bestämmer du själv. Jag gjorde en skål med papper som var 9x9cm och då blev måtten på den färdiga skålen ungefär 6.5cm bred och 2.5cm hög, och en med papper som var 13x13cm och då blev skålen ungefär 9cm bred och 4cm hög.
→ Lim

bowl

Fold one of the squares, so that the top meets the bottom.

/// Vik ett av papperna på mitten.

bowl

Fold the top left corner so that it meets the bottom corner.

/// Vik in vänstra spetsen så att den möter spetsen i botten.

bowl

Repeat on the other side.

/// Vik likadant på andra sidan.

bowl

Unfold.

/// Vik upp spetsarna igen.

bowl

Fold the bottom corner to the top.

/// Vik spetsen i botten uppåt så att den möter övre delen av papperet.

bowl

Now fold the two remaining pieces of paper, just like the first one you did.

/// Vik de två andra papperna precis likadant som den första.

bowl

Attach two of the pieces. See picture below.

/// Trä in en spets i spetsen på ett annat papper.

bowl

And then attach the last one. Once that is done, attach the two farthest out on each side with each other.

/// Gör likadant med det tredje papperet. När det är klart sätter du ihop de två spetsarna längst ut på vardera sidan med varandra.

bowl

Put some glue on the ends at the bottom of the bowl. And press them together until the glue is dry.

/// Limma ihop bitarna i botten och tryck lätt tills limmet torkat.

bowl

And you are done!

/// Klart!

bowl

Next week I’ll show you how to do this with carton instead.

/// Nästa vecka tänkte jag visa er hur man gör denna i kartong istället.

DIY – CORK TRIVET

kork5

I’ve seen alot of trivet diy’s with this kind of thin cork, but I wanted to make it a bit different, so I decided to make it with a braided pattern.

For this diy you will need cork, a pair of scissors, a ruler and glue.

/// Jag har sett ganska många underläggs-diy’s med denna rullbara kork, men jag ville försöka göra det lite annorlunda så jag bestämde mig för att göra ett flätat mönster på mitt.

För detta diy behöver du: rullbar kork, en sax, en linjal och lim.

kork

Start by cutting the cork into 1 cm wide strips. I made mine 16cm long and I used 25 pieces, but if you want a bigger trivet just make them longer and more of them.

/// Börja med att klippa korken i 1 cm breda och 16 cm långa bitar. Jag använde mig av 25 stycken allt som allt, men om du vill göra ditt underlägg större så klipper du såklart längre bitar och fler.

kork1

Then you glue the first row like the picture shows.

/// Limma sedan ihop bitarna som bilden visar.

kork2

Then you thread another piece of cork again like the picture shows. And another one.. Don’t glue them into place yet, because as you go you can make the braiding tighter and tighter. But be careful with the cork so it doesn’t brake.

/// Sedan tar du en till bit och trär in den, också här som bilden visar. Och så fortsätter du så… Men limma inte dem på plats ännu för ju mer man flätar ju tajtare kan man göra underlägget, men vad försiktig så inte korken går sönder.

kork3

Continue like this until you reach the other end. Here I ended up cutting off a piece of the ends of the cork, because I wanted to finish with a horizontal strip. Then you glue the ends of the strips togehter.

I also cut four thin strips and glue them on all sides of the trivet to get a nicer finish. And you are done!

/// Fortsätt så tills du kommer till anda sidan. Här fick jag klippa bort lite överflödig kork, för jag ville avsluta med en vågrät bit. Nu kan du också limma ihop ändarna på bitarna.

Jag klippte även fyra tunnare bitar och limmade fast dem på kanten rund, för att få ett fint avslut. Och nu är du klar!

kork4