Menu Close

Month: June 2013 (page 2 of 3)

COMBINED

diy

diy

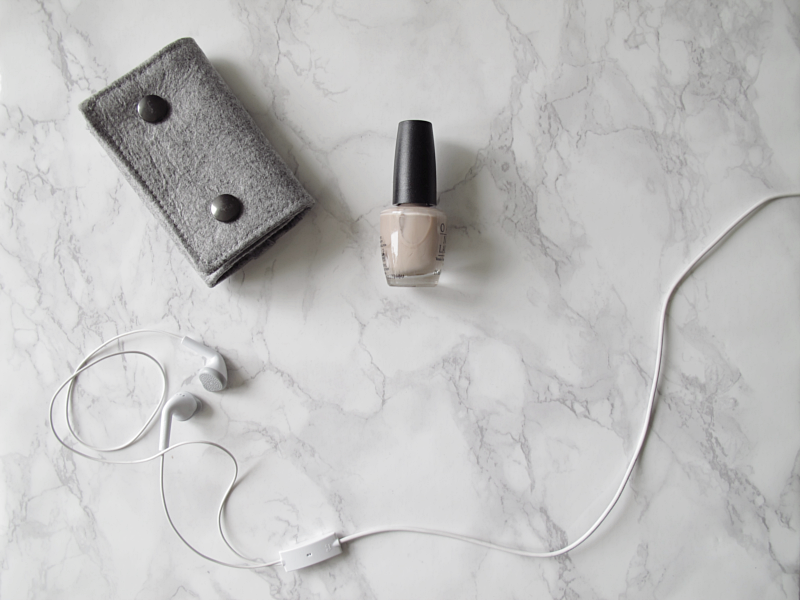
This weeks diy is a combined card and keyholder.

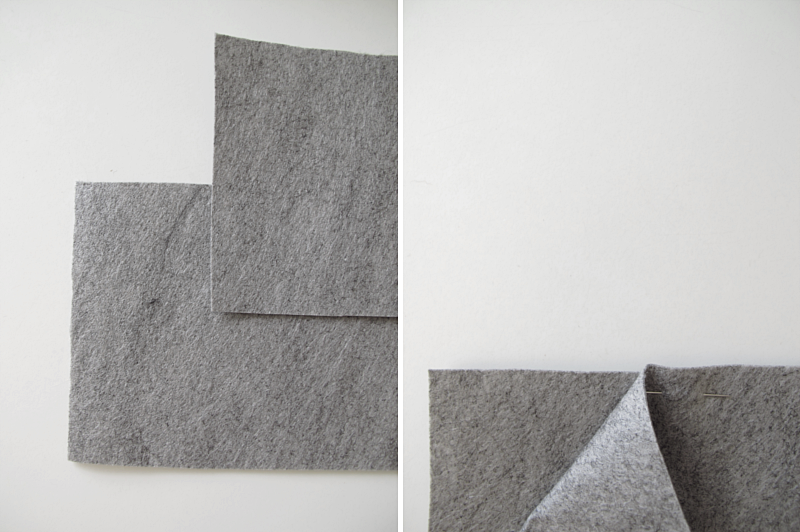
1. Make two rectangles out of a thick fabric that doesn´t thread. One 18,5cm x 13cm, and the other 28cm x 13cm.  2. Place the longer piece on top of the smaller one, make sure that the two short sides are in a line. And pin them together.

/// Denna veckas diy är en kombinerad kort och nyckelhållare. 

1. Börja med att göra två rektanglar ur ett tjockt tyg som inte trådar sig. En ska vara 18,5cm x 13cm och den andra 28cm x 13 cm.          2. Lägg den längre rektangeln på den kortare, se till att de vänstra kortsidorna är precis ovanför varandra. Nåla sedan ihop dem.

diy

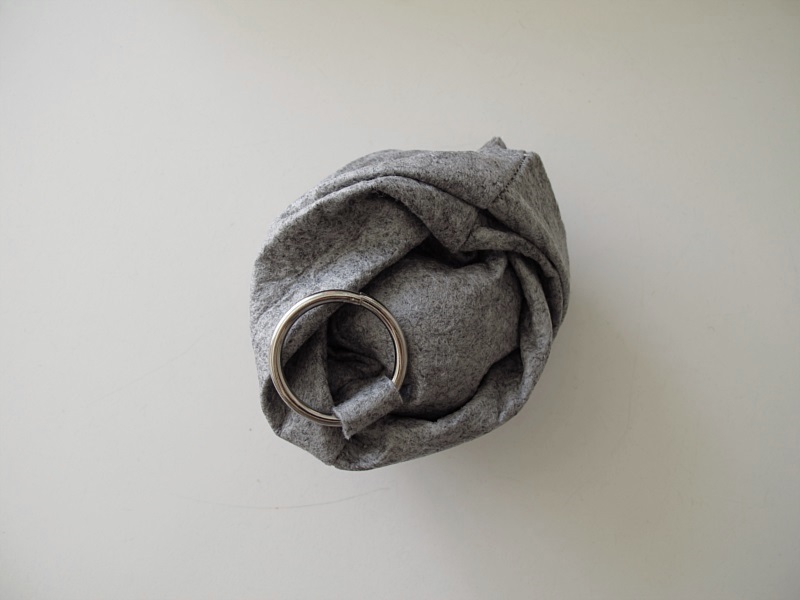
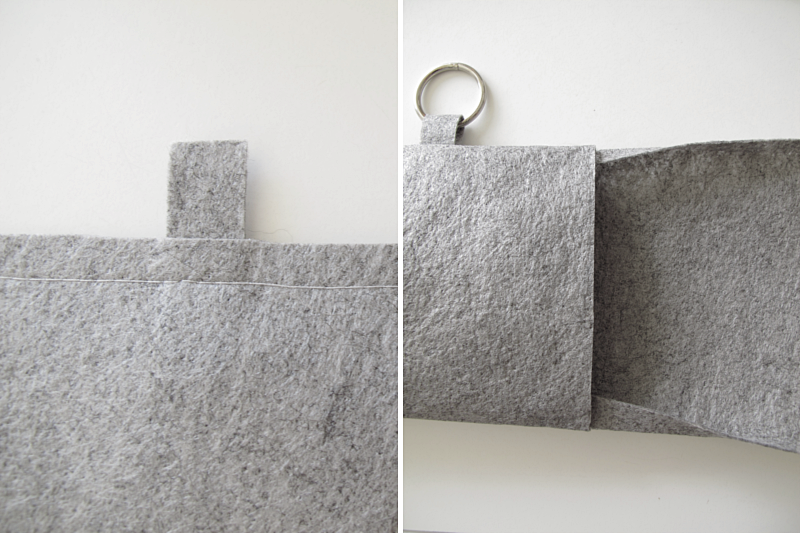
3. Make a strip of the fabric, 1,5 cm wide and 5 cm long. 4. Slide it through a silver ring, and place the ring between the two pieces of fabric. About 11,5 cm from the left side.

/// 3. Klipp en remsa ur tyget. 1,5 cm x 5cm. 4. Trä den igenom en ring och placera ringen mellan de två rektanglarna. Ungefär 11,5 cm från vänstra kanten.

diy

5. Now it´s time to sew. Sew the two longer sides together (with 1cm seam allowance), and leave the short sides. 6. Cut off the excess part from the ring holder strip, and turn the whole thing inside out.

/// 5. Nu är det dags att sy. Sy ihop långsidorna (med en sömsmån på 1cm), men lämna kortsidorna osydda. 6. Klipp av den överflödiga delen av  remsan som håller i ringen. Vänd den ut och in.

diy

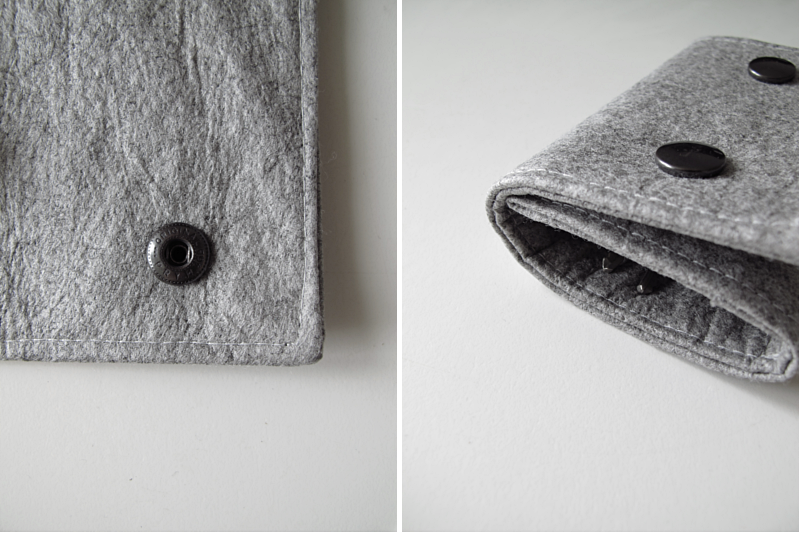
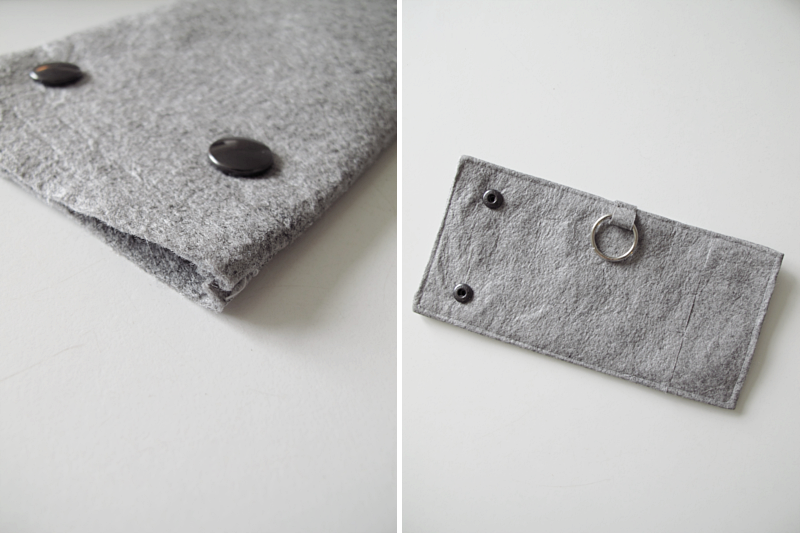
7. Attach the eyelets, 1,5 cm from the edge. (on the upper fabric). How you do that, is written on the back of the box they came in. Make sure to turn them the right way. 8. Then fold the piece of fabric like the picture shows, and pin it.

/// 7. Sätt fast tryckknapparna 1,5 cm från kanten (på de övre tyget). Hur du gör det står på baksidan av förpackningen. Kom ihåg att sätta dem rätt väg. 8. Vik sedan in tyget, precis som bilden visar, och nåla.

diy

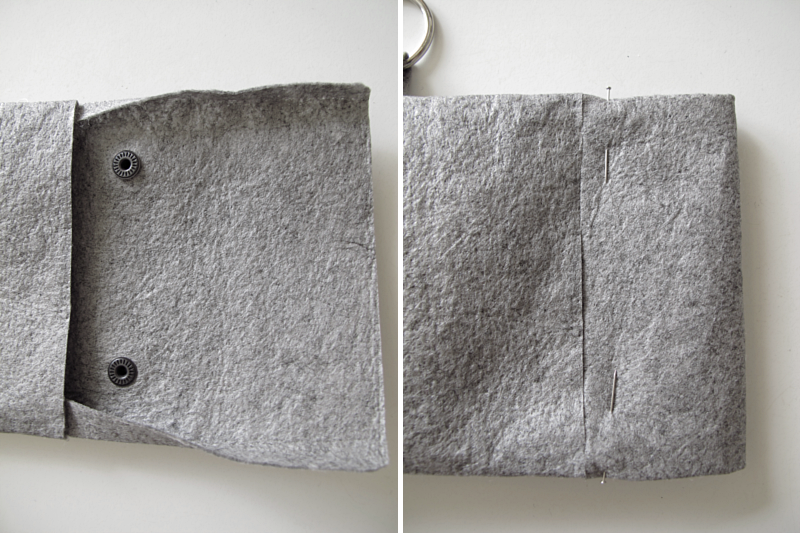
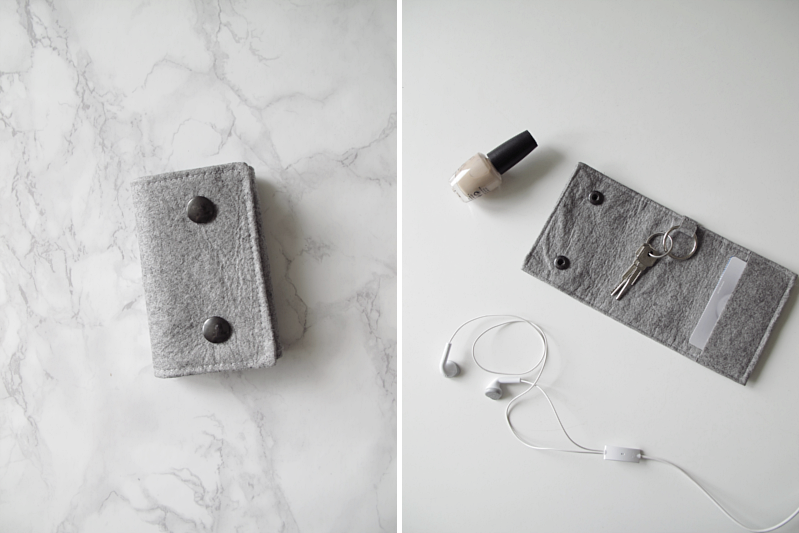
9. Attach the buttons. About 4cm from the left. Now your keyholder should look like this.

/// 9. Sätt fast den andra delen av trycknapparna. 4cm från kanten. Nu ska din korthållare se ut såhär.

diy

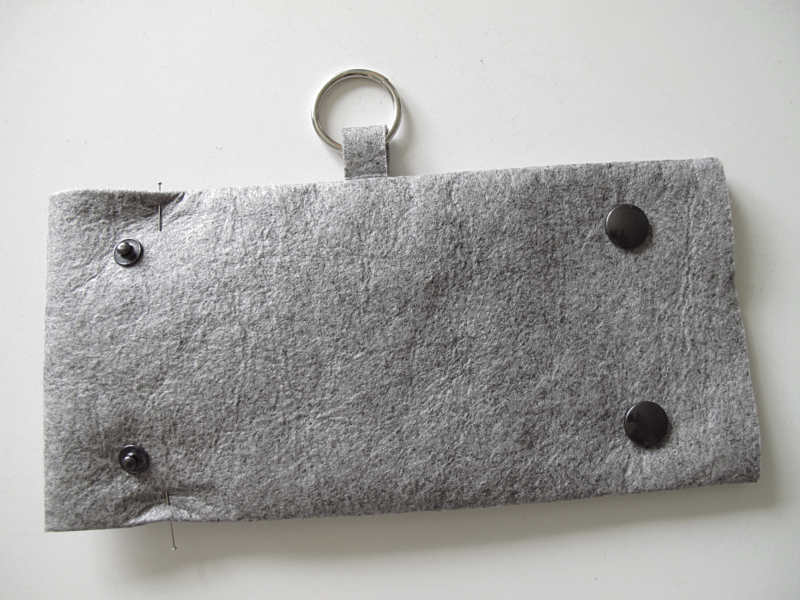
10. Fold this end of the fabric inwards. 11. And sew a seam around the whole thing.

/// 10. Vik in kanten. 11. Och sy en söm runt hela.

diy

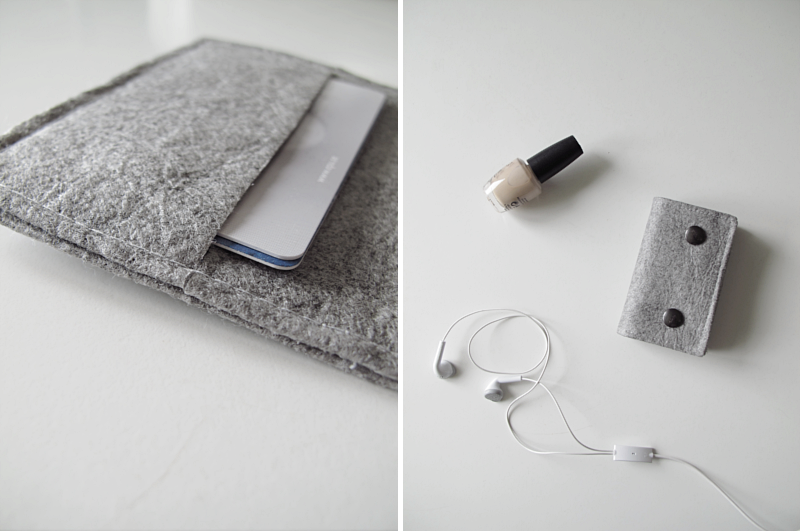
12. And you are done!

/// 12. Och du är klar!

diy

diy

DURING

sneakpeek

This is a “during”-picture from a diy I did this weekend. The whole diy I will show you tomorrow.

/// Det här är en bild fotad mitt i ett diy som jag gjort i helgen. Efter-bilder får ni se imorgon.

FINALLY IT`S HERE

korthållare

Finally it here. The PDF-file for the card holder I made in this post. Hope you like it! Oh and make sure to change the printer settings to “no border”.

/// Äntligen är den här. Pdf-filen till korthållaren jag gjorde i detta inlägg. Jag vet att ni är många som väntat på den! Och kom ihåg att ändra skrivarinställningen till “ingen marginal”. Hoppas ni gillar!

STEAL IT

stealit

Neon letters /// Neon bokstäverUrban Outfitters

Paper clamp /// PappersklämmaGranit

Duvet covers /// Påslakanset H&M

Bedspread /// ÖverkastÅhlens

Yoko Ono poster /// Yoko Ono posterModerna Museet

Componibili side table /// Sidbordet Componibili Länna Möbler

Antifoni Floor lamp /// Golvlampan AntifoniIkea

Curtain /// GardinÅhlens

fo: fantastic frank

DIY FOLDABLE BOXES

låda

låda

låda

låda

And here is how: /// Och så här gör du:

1. Start with a A4 paper and make lines from the top at 5, 10, 15 and 20 cm. Then make two lines 7cm in on both sides. And finally make two lines 2cm in on both sides. See picture where to do them.

/// 1. Börja med ett A4 papper. Rita linjer 5, 10, 15 och 20 cm från toppen. Sedan gör du två linjer till, 7cm från kanten på båda sidor. Och slutligen gör du två linjer, 2cm från kanten. Var du ska göra dom ser du på bilden.

ask

2. Continue where you last did the lines. Make two marks 1mm from the sides at the bottom of the “box”. 3. Then make two marks 5mm on the top of the “box”.

/// 2. Fortsätt nu i den rutan du gjorde sist. Gör två markeringar 1mm in på båda sidorna. 3. Gör sedan två nya markeringar 5mm in från kanterna på toppen av “rektangeln”

ask

4. Draw lines between the marks. And make another mark 5mm from the first. Repeat step 2-4 on the other side too. 5. Now you want to make a template of how you want the two loose sideparts of the box to look like. I wanted mine to look like this.

/// 4. Dra två linjer mellan markeringarna. Så gör du två markeringar till, 5mm från de två första du gjorde. Sedan upprepar du steg 2-4 på andra sidan. 5. Nu ska du göra en mall på hur du vill att de två lösa sidbitarna på botten och toppen av din låda ska se ut. Jag ville att mina skulle se ut så här.

ask

6. If you made the template in step 5 equal on both sides you can skip this step and do step 7, to see where you should draw around the template. But if you, like me, made the sides different you want to make sure that they look similar when you fold the box together. Start by drawing around the template on the same places as I did in the picture below. Notice that I turned it.

/// 6. Om du gjort en mall där båda sidorna ser likadana ut så kan du hoppa till steg 7, för att se var du ska rita ut dem. Men om du som jag, gjorde sidorna olika, så vill du nu vara noga så att lådan ser likadan ut på båda sidor när du viker ihop den. Börja med att rita av mallen på samma ställen där jag gjort det. Kom ihåg att snurra på den.

ask

7. Now turn the template upside down and draw two more. (If you skipped step 6 you can see in this picture where you should draw along the sides of the template.)

/// 7. Vänd nu mallen upp och ner och rita igen. (Om du hoppade över steg 6 så ser du här i vilka rutor du ska rita av mallen)

ask

8. Cut along the lines. Make sure to cut all the way to the marks. See picture.

/// 8. Nu är det dags att klippa ut din ask. Och kom ihåg att klippa ända till markeringarna.

ask

9. Fold along the lines and erase all the pencil lines. 10. Glue the 1cm side ( the one in the bottom in step1) to the opposite side and you are done!

/// 9. Vik längst med linjerna och sudda sedan bort blyertsstrecken. 10. Sätt lite lim på 1cm-biten (den längst ner på bilden i steg 1) och limma ihop den med den andra sidan och du är klar!

ask

If you want to you can make the lid and the bottom of the box with round corners. As I did with the green ones.

/// Om du vill så kan du göra botten och locket med rundade hörn, som jag gjort med de gröna lådorna.